Copyright giadaelesuenuvole.blogspot.it. Powered by Blogger.

giadalesuenuvole

Pagine

  • Chi sono
  • Privacy Policy


Hello my friends! This time I decided to create a summer card with all the new penguins designed by Some Odd Girl for Whimsy Stamps. At first I wanted to focus on the Slushie Penguin only, but then I decided to create a slimline card with all of them.

Ciao a tutti! Questa volta mi sono buttata su una card estiva, realizzata con i nuovi pinguini disegnati da Some Odd Girl per Whimsy Stamps. All'inizio avevo deciso di concentrarmi solo sulla femminuccia, ma poi ho deciso di creare una card slimline utilizzandoli tutti e 3.

I printed all the images on a white cardstock, colored them with alcohol markers and fussy cut. In particular I chose pastel colors and warm greys. I framed every penguin with a colorful squared cardstock and a little polaroid with a stamped sentiment.

Ho stampato tutte le immagini su del cartoncino bianco, le ho colorate con i pennarelli ad alcohol e ritagliate. In particolare ho scelto delle tinte pastello e dei grigi caldi. Ho incorniciato ogni pinguino con del cartoncino colorato e una piccola polaroid con una scritta timbrata.


I added some little images on top the background for a tone-on-tone look.

Ho aggiunto anche qualche piccola timbrata su ogni sfondo per un effetto tono su tono.


Finally I glued everything on a white cardbase, fixing the penguins with foam tape to make them pop.

Infine ho incollato il tutto su una base bianca, fissando i pinguini con del nastro gommato per farli risaltare maggiormente.
Share
Tweet
Pin
Share
No commenti


Hello my friends, today I'm back after some busy and stressing weeks without any creative inspiration. Coloring is so relaxing and therapeutic! The image I chose to color is one from the latest release by Whimsy Stamps, in particular the Antartic Mermaid by Some Odd Girl. She has such a classy look and her little friends are so cute!

Ciao amici, eccomi di ritorno dopo alcune settimane frenetiche e stressanti, con pochissimo estro creativo. Colorare però è sempre così rilassante e terapeutico! L'immagine che ho scelto di colorare fa parte dell'ultima release di Whimsy Stamps, in particolare l'Antartic Mermaid di Some Odd Girl. Ha un aspetto molto elegante e i suoi amichetti sono così teneri!


I printed the image on white cardstock and colored it with alcohol markers, adding white and silver dots here and there to make her dress and tail even more elegant. Then I fussy cut her, cutting off all the sea waves, since I wanted to put her on a blended background. 

Ho stampato l'immagine su del cartoncino bianco e l'ho colorata con i pennarelli ad alcol, aggiungendo puntini bianchi e argento per rendere il suo vestito e la sua coda ancora più eleganti. Poi l'ho ritagliata, eliminando le onde in basso perché avevo intenzione di posizionarla su uno sfondo sfumato con gli inchiostri.


For the background I used 3 Distress Oxides: Evergreen Bough, Cracked Pistachio and Antique Linen. Once they dried, I added some water splashes and some silver splashes too. Finally I put everything on a white cardbase, fixing the mermaid on top of a vellum circle and gluing a little sentiment on the left of the mermaid. 

Per lo sfondo ho utilizzato 3 diversi Distress Oxides: Evergreen Bough, Cracked Pistachio e Antique Linen. Una volta asciutti, ho aggiunto gocce d'acqua e d'argento. Infine ho posizionato il tutto su una base banca, incollando la sirenetta su un cerchio in vellum e incollando l'augurio a sinistra della sirenetta.
Share
Tweet
Pin
Share
1 commenti


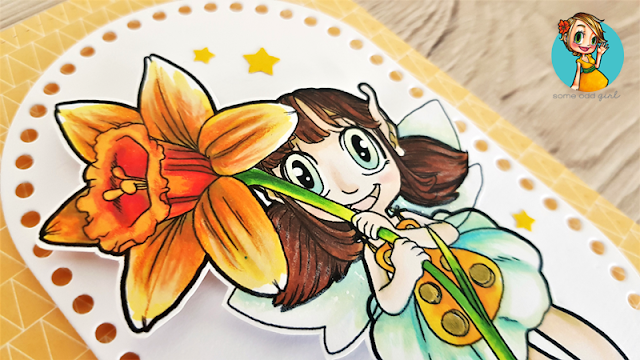
Hello my friends! Fairies, critters and flowers are my favorite subjects, especially for coloring. This Daffodil Fairy is part of the new Digi Release by Some Odd Girl for Whimsy Stamps and I needed to print and color it - the details on the daffodil are amazing. This time I decided to combine alcohol markers with prismacolor pencils to reinforce highlights and shadows.

Ciao a tutti! Fate, animaletti e fiori sono i miei soggetti preferiti, specialmente quando parliamo di colorazione. Questa Daffodil Fairy fa parte della nuova Digi Release di Some Odd Girl per Whimsy Stamps e ho sentito il bisogno di stamparla e colorarla (manco a dirlo, i dettagli del narciso sono stupendi). Questa volta ho deciso di combinare pennarelli ad alcol e matite prismacolor per far risaltare punti luce e ombre.


First of all I printed the image on a regular cardstock, colored it and fussy cut. As I used lots of orange, I picked a patterned paper of the same color for the front panel. Then I die cut an oval shape from white cardstock and glued the fairy on top with some foam tape. Finally I added a sentiment by heat embossing it on a strip of brown cardstock and a bunch of yellow stars too.

Prima di tutto ho stampato l'immagine su del cartoncino bianco, l'ho colorata e ritagliata. Visto che ho utilizzato molto arancione, ho scelto una carta decorativa dello stesso colore del pannello frontale. Poi ho fustellato un ovale da del cartoncino bianco e ho incollato la fatina con del nastro gommato. Infine ho aggiunto la scritta, embossandola su una striscia di cartoncino marrone, e un po' di stelline gialle.
Share
Tweet
Pin
Share
No commenti


Hello there! It's been a while since I used googly eyes on a project. As soon as I saw this Loveable Kitty by Some Odd Girl for Whimsy Stamps, I wanted to make this image super cute with them! I created my own background with the Buffalo Background stamp by Crackerbox & Suzy Stamps: I stamped it with grey ink on top of grey cardstock.

Ciao a tutti! E' passato un po' di tempo da quando ho utilizzato gli occhi finti su una card. Non appena ho visto il digi Loveable Kitty di Some Odd Girl per Whimsy Stamps, ho deciso di rendere ancora più tenera questa immagine con un paio di occhietti roteanti! Ho realizzato il mio sfondo personalizzato con il timbro Buffalo Background di Crackerbox & Suzy Stamps: l'ho timbrato con dell'inchiostro grigio su del cartoncino grigio.


Then I printed the kitty on white cardstock, colored it with alcohol markers and fussy cut. At this point I added a couple of googly eyes, then I die cut a frame from white cardstock and a speech bubble with a red heart on top. I put everything on a cardbase and used some foam tape to fix the kitty. Finally I added a thin layer of Wink of Stella on top of the bow and of the heart.

In seguito ho stampato il gattino su del cartoncino bianco, l'ho colorato con pennarelli ad alcohol e l'ho ritagliato. A questo punto ho aggiunto gli occhietti, poi ho fustellato una cornice da del cartoncino bianco e una nuvoletta con un cuore rosso al centro. Ho messo tutto insieme e ho usato un po' di nastro gommato per fissare il gattino. Infine ho aggiunto un sottile strato di Wink of Stella sul nastro e sul cuore.

Share
Tweet
Pin
Share
No commenti


Hello my friends! New month means a new digi release at Whimsy Stamps: today I'm showcasing this clean and simple card I made with the Marching Gnome digi stamp designed by Some Odd Girl. I love the pose and the smiling face of the gnome, as well as his beautiful outfit. So I decided to create a card inspired by the tales that begins with "Once upon a time...". 

Ciao a tutti! Un nuovo mese significa una nuova release di Whimsy Stamps: oggi vi mostro la card CAS che ho realizzato con il digi Marching Gnome disegnato da Some Odd Girl. Adoro la posa e il faccino sorridente dello gnomo, nonché l'outfit folkloristico. Per questo ho deciso di creare una card che si ispirasse ai racconti di fiabe che cominciano con "C'era una volta...".


I printed the gnome on white cardstock, colored with alcohol markers and fussy cut it. I added golden details with a glitter pen and a layer of glossy accents on top of his glasses. I adhered it on a white cardbase, with a partial die cut by Tim Holtz and some leaves, nuts and mushrooms by different stampset from MFT Stamps and Lawn Fawn. I enjoyed myself so much while I created this card!

Ho stampato lo gnomo su del cartoncino bianco, l'ho colorato con pennarelli ad alcohol e ritagliato. Ho aggiunto qualche dettaglio dorato con una penna glitter e uno strato di glossy accent sugli occhiali. L'ho incollato su una base bianca, con una fustellata parziale da un set di Tim Holtz e qualche foglia, ghianda e funghetto qua e là, timbrati da diversi set di MFT Stamps e Lawn Fawn. Mi sono divertita davvero molto mentre creavo questa card!
Share
Tweet
Pin
Share
No commenti


Hello there! In hard times beauty and creativity are precious, so I'm keeping on creating very simple and clean cards with super cute designs by Some Odd Girl for Whimsy Stamps. Today I'm sharing two tags that I made with Teddy Bear Valentine digi stamp, but I thought to create something different: not a Valentine project, but two baby tags (one for girls and one for boys).

Ciao a tutti! In questi tempi duri la bellezza e la creatività sono preziosi, per cui continuo a creare progetti molto semplici e puliti con design adorabili grazie alle creazioni di Some Odd Girl per Whimsy Stamps. Oggi vi mostro due tag che ho realizzato con il digi Teddy Bear Valentine, ma ho pensato di mettere insieme qualcosa di diverso: non un progetto per San Valentino, ma due tag per bambini (uno da femmina e uno da maschio).


First of all I die cut two tags from kraft cardstock with a punch die. Then I embossed both of them with a polka dots embossing folder and blended a little bit of white ink on top of the dots. While the Big Shot was out, I die cut two Hello dies from white cardstock too.

Prima di tutto ho fustellato due tag da del cartoncino kraft con una fustella punch. Poi ho embossato entrambe con un embossing folder puntinato e ho sfumato un po' di inchiostro bianco al di sopra dei puntini. Già che stavo utilizzando la Big Shot, ho fustellato due scritte da del cartoncino bianco.


I printed two bears, I colored them with brown and warm greys colors and fussy cut them. Finally I glued those two on the tags with foam tape and added two ribbons as final touches.

Ho stampato due orsetti, li ho colorati con colori marroni e grigi e li ho ritagliati. Infine ho incollato questi due sulle tag utilizzando del nastro gommato e ho aggiunto due twine come tocco finale. 
Share
Tweet
Pin
Share
No commenti


Hi all! One month left to Valentine's Day, I don't know how it will be but I need positive vibes. Luckily the January release of Whimsy Stamps is full of new adorable critters designed by Some Odd Girl, such as the super-cute Balloon Bunny digi stamp.

Ciao a tutti! Manca un mese a San Valentino, non so cosa ci aspetta ma c'è bisogno di vibrazioni positive. Per fortuna la release di gennaio di Whimsy Stamps è ricca di adorabili animaletti disegnati da Some Odd Girl, così come il tenerissimo digital Balloon Bunny.


I printed the bunny on regular white cardstock, then I colored it with alcohol markers and fussy cut. I decided to color the balloon in red and added white touches with a gel pen.

Ho stampato il coniglietto su del cartoncino bianco, poi l'ho colorato con i pennarelli ad alcohol e ritagliato. Ho deciso di colorare i palloncini con il rosso e ho aggiunto dei dettagli con la penna gel bianca.


I combined it with a patterned paper full of golden details that I used for the background of my card. 

Ho combinato il coniglietto con una carta decorativa ricca di dettagli dorati, che ho utilizzato come sfondo per la mia card.


I heat embossed a big sentiment with golden powder and fussy cut it. I used foam tape for the sentiment as well as for the bunny. I think that this card is so elegant and romantic!

Ho embossato la grande scritta con della polvere dorata, poi l'ho ritagliata. Ho utilizzato del nastro gommato per la scritta, così come per il coniglietto. Penso che questa sia proprio una card elegante e romantica!

Share
Tweet
Pin
Share
No commenti


Hello there and happy New Year! Everyone is looking for good news this year, so my first creation of 2021 is a special tag. I used the adorable and new Valentine Delivery Pup digi stamp designed by Some Odd Girl for Whimsy Stamps.

Ciao amici e buon anno! Penso che tutti noi ci auguriamo buone notizie per questo nuovo anno, per cui la mia prima creazione del 2021 è una tag speciale. Ho utilizzato un nuovo timbro digitale, l'adorabile Valentine Delivery Pup disegnata da Some Odd Girl per Whimsy Stamps.


I printed this puppy on white cardstock, colored it with alcohol markers and fussy cut. I chose aqua blue, warm grey and brown shades for the puppy.

Ho stampato il cagnolino su del cartoncino bianco, colorato con pennarelli ad alcohol e ritagliato. Ho scelto una palette di colori basata su verde acqua, marroni e grigi caldi.


I picked a strip of kraft cardstock and cut it as a big tag. Then I heat embossed it with snowflakes, using Versamark Ink and white embossing powder. To fullfill the tag, I added a bunch of liquid pearls here and there.

Ho preso del cartoncino kraft e l'ho ritagliato a forma di grande tag. Poi l'ho embossato con fiocchi di neve, utilizzando inchiostro Versamark e polvere da embossing bianca. Per riempire la tag, ho aggiunto un sacco di liquid pearls qua e là.


Finally I stamped a sentiment and put it near to the puppy, that I glued with foam tape. As final touch, I fixed two hearts and a layer of clear Wink of Stella here and there.

Infine ho timbrato una scritta e l'ho posizionata vicino al cagnolino, che ho incollato con del nastro gommato. Come tocco finale, ho incollato due cuori rossi e del Wink of Stella trasparente.
Share
Tweet
Pin
Share
No commenti


Hello my friends! I love robins with their redbreasts and sweet faces, so I decided to customize the bird from the Christmas Prank digi stamp designed by Some Odd Girl for Whimsy Stamps and put it in the middle of a snowy sky.

Ciao a tutti! Adoro il pettirosso, con il suo piumaggio variopinto ed il musino dolce, per cui ho deciso di personalizzare l'uccellino presente nel set Christmas Prank disegnato da Some Odd Girl per Whimsy Stamps e di posizionarlo al centro di una scena nevosa.


First of all I printed the bird with the Christmas ball on a white piece of cardstock, colored it as a robin and fussy cut. Then I placed it on a couple of hills, die cut from white cardstock.

Prima di tutto ho stampato l'uccellino con la pallina di Natale su del cartoncino bianco, l'ho colorato come un pettirosso e ritagliato. Poi l'ho posizionato sopra un paio di colline, fustellate da del cartoncino bianco.


I chose a light blue cardstock as my background, adding some 3D-liner as snowflakes here and there. Finally I added an heat embossed sentiment in white on red.

Ho scelto un cartoncino azzurro come sfondo, aggiungendo dei fiocchi di neve qua e là con il 3D-Liner. Infine ho aggiunto un augurio embossato in bianco su del cartoncino rosso.

Share
Tweet
Pin
Share
No commenti


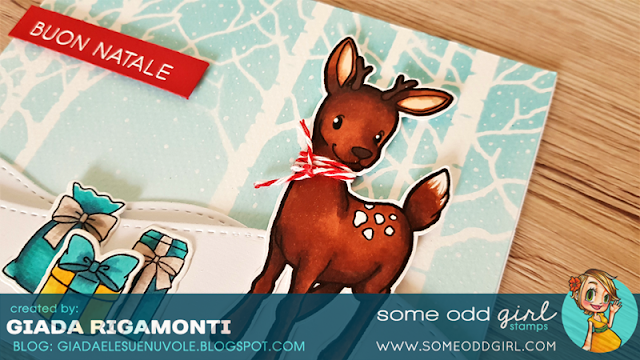
Hello stampers! It's December and I'm finally back on my blog. I joined the 11 Coloring Challenge on Instagram and worked to some new Holiday cards, that I hope I'm going to share here soon. Today I'm showing a couple of them, made with one of my favorite subject for Christmas: the deer. I used this sweet one by Some Odd Girl and Whimsy Stamps, dressed it with a scarf made of twine and put it on a snowy landscape.

Ciao a tutti! E' finalmente dicembre ed eccomi tornata sul blog. Nel frattempo ho partecipato alla 11 Coloring Challenge su Instagram e ho lavorato ad alcune nuove card natalizie, che spero di condividere presto anche qui. Oggi vi mostro un paio di queste card, realizzate con uno dei miei soggetti preferiti: la renna. Ho utilizzato questa dolce renna di Some Odd Girl e Whimsy Stamps, l'ho vestita con una sciarpa fatta di twine e l'ho posizionata su del paesaggio nevoso.


I made two different versions of the same card, using the same subject but changing colors and little details like the presents and che die cut for the ground.

Ho realizzato due versioni diverse della stessa card, utilizzando lo stesso soggetto ma cambiando colori e piccoli dettagli (come i regalini e i bordi fustellati).


I printed the deers multiple times on white cardstock, colored with alcohol markers and fussy cut. I added a scarf to them made with a red or blue twine, as well as some white details with a gel pen. I stamped some presents, colored and die cut them as well.

Ho stampato le renne più volte su del cartoncino bianco, colorato con pennarelli ad alcohol e ritagliati. Ho aggiunto la sciarpa realizzata con del twine rosso o azzurro, così come dei dettagli con la penna gel bianca. Ho timbrato i regali, li ho colorati e fustellati.


For the background I combined stencils with Distress Inks and white border die cuts. I kept everything clean, simple and soft, so that the deer could be the focus with the heat embossed sentiments.

Per lo sfondo ho abbinato stencils con Distress Inks e terreni bianchi fustellati. Ho mantenuto tutto molto semplice, pulito ed etereo, così che la renna possa rimanere il focus della card, insieme agli auguri embossati.

Share
Tweet
Pin
Share
No commenti


Hello my friends! Another Holiday card? Yes, please! Today I'm using a different deer by Some Odd Girl: there are a bunch of them in the shop and every single deer is just so unique and cute! Brown is one of my favorite colors in general and for Holiday cards in particular. For this card I used a lot of brown and white, adding colors only for the lights and the sentiment.

Ciao amici! Un'altra card natalizia? Oh sì! Oggi ho utilizzato una diversa renna di Some Odd Girl: ce ne sono un bel po' nello shop e ogni singola renna è così unica e carina! Il marrone è uno dei miei colori preferiti, in particolare quando si tratta di card natalizie. Per questo biglietto ho utilizzato un sacco di marrone e bianca, aggiungendo colori soltanto nelle luci e nell'augurio.


First of all, I printed the deer on white cardstock, colored and fussy cut. Then I added some details with a white gel pen and put the deer on a rectangular die cut. I fussy cut the Christmas lights and put them on top of the deer. At this point I embossed a brownish cardstock with a polka dots embossing folder and glued some little snowflakes here and there.

Prima di tutto, ho stampato la renna su del cartoncino bianco, l'ho colorata e ritagliata. Poi ho aggiunto qualche dettaglio con una penna gel bianco e ho posizionato la renna su una finestra rettangolare fustellata. Ho ritagliato le luci di Natale e le ho posizionate sulle corna della renna. A questo punto ho embossato un cartoncino marroncino con un folder puntinato e ho incollato un po' di fiocchi di neve qua e là.


Finally I heat embossed a scripty sentiment with gold embossing powder and fixed everything on a white cardbase. I really love the color palette of this card, even if I'm going to try something different in the nearly future!

Infine ho embossato un augurio calligrafato con della polvere da embossing dorata e ho incollato il tutto su una base bianca. Adoro la palette di colori di questa card, anche se proverò a creare qualcosa di diverso nel prossimo futuro!

Share
Tweet
Pin
Share
No commenti


Hello stampers! Today I have another Holiday card for you, using one of my favorite stamps by Some Odd Girl: the Mini Rudolph digi. I love its face and its big nose! I printed it on a piece of white cardstock in order to color it with alcohol markers. I chose different hues of brown colors for all the card, from the deer to the background panel.

Ciao a tutti! Oggi ho un'altra card natalizia per voi, che ho creato utilizzando uno dei miei timbri preferiti di Some Odd Girl: la mini renna Rudolph. Adoro il suo musino e il suo nasone! Ho stampato il digi su del cartoncino bianco al fine di colorarlo con i pennarelli ad alcohol. Ho scelto diverse sfumature di marrone su tutta la card, dalla renna al pannello di sfondo.


I colored Rudolph, added some golden accents and fussy cut. I picked a piece of chocolate cardstock and covered it with white dots. I die cut a strip of patterned paper and put it at the center of the panel. I glued some snowflakes here and there, fixed Rudolph with a bit of foam tape and heat embossed the sentiment in white on red cardstock.

Ho colorato Rudolph, aggiunto qualche tocco dorato e ritagliato. Ho preso del cartoncino marrone e l'ho ricoperto con puntini bianchi. Ho aggiunto della carta decorativa al centro del pannello, fustellandone i bordi. Ho incollato qualche fiocco di neve qua e là, ho fissato la renna con del nastro gommato e ho embossato l'augurio su del cartoncino rosso.

Share
Tweet
Pin
Share
No commenti


Hello stampers! Christmas is coming in 2 months, so it's time to start creating Holiday cards! For my first Christmas card of the year I chose the tiny and cute snowman by Some Odd Girl. As my first step I realized a tag, then I put it on a customized background.

Ciao a tutti! Mancano solo 2 mesi a Natale, quindi è tempo di realizzare qualche card a tema! Per creare la mia prima card natalizia dell'anno ho scelto il piccolo e carinissimo pupazzo di neve di Some Odd Girl. Come primo step ho realizzato una tag, che poi ho deciso di posizionare su uno sfondo personalizzato.


I printed the snowman on a piece of white cardstock and colored it with alcohol markers. I added lots of white dots here and there as if they were snowflakes, covering part of the snowman too. I die cut the image with a tag die and tied a string on top of it.

Ho stampato il pupazzo di neve su del cartoncino bianco e l'ho colorato con pennarelli ad alcohol. Ho aggiunto un sacco di puntini bianchi/fiocchi di neve qua e là, coprendo anche parte del pupazzo di neve. Ho fustellato l'immagine con una fustella a forma di tag e ho annodato un nastrino ad di sopra.


Then I put the tag and the heat embossed sentiment on a kraft panel, on which I blended some Walnut Stain Distress Oxide with a stencil. I added lots and lots of snowflakes - white dots too! I really love the snowy atmosphere and the color palette!

Infine ho posizionato la tag e l'augurio embossato su un pannello kraft, su cui avevo precedentemente sfumato del Distress Oxide Walnut Stain tramite uno stencil. Ho aggiunto una vagonata di puntini bianchi anche qui! Adoro l'atmosfera e anche la palette di colori che ho utilizzato!

Share
Tweet
Pin
Share
No commenti


Boo stampers! Here I am with another Halloween card made with one of the super-cute ghost stamps designed by Some Odd Girl and available at Whimsy Stamps shop. I created a spooky scene with ink and stencil. This time I chose the mummy ghost, that I printed on white cardstock and colored.

Boo a tutti! Eccomi con un'altra card di Halloween, realizzata con uno dei fantasmini super-carini disegnati da Some Odd Girl e disponibili sullo shop di Whimsy Stamps. Ho creato una scena spaventosa con inchiostro e stencil. Questa volta ho scelto un fantasma vestito da mummia, che ho stampato su del cartoncino bianco e colorato.


I picked few markers, that I used especially for the bandages - I really want to use different colors to make everything pop. Then I fussy cut it.

Ho scelto pochissimi pennarelli, che ho utilizzato in particolare per il bendaggio - ho voluto utilizzare colori diversi per far risaltare le diverse parti. Poi ho ritagliato il fantasmino.


For the background, I blended some white pigment ink on a blakc cardstock, using a stencil with a forest design. Finally I added some white highlights with a gel pen and the sentiment on top of a strip of white paper.

Per lo sfondo, ho sfumato dell'inchiostro bianco su del cartoncino nero, utilizzando uno stencil per realizzare una foresta. Infine ho aggiunto qualche punto luce con della penna bianca e l'augurio su del cartoncino bianco.
Share
Tweet
Pin
Share
No commenti

Hello stampers! I'm back here with a magical card today, created with the funny Owl Wizard by Some Odd Girl for Whimsy Stamps. I love his face, especially the hat and the bear... how wise he should be! I printed the digi on a white piece of cardstock and colored with alcohol markers. I added a couple of white dots for the eyes and a touch of gold on the moon and the stars of the hat.

Ciao a tutti! Sono di nuovo qui con una card magica, realizzata con il simpaticissimo Owl Wizard di Some Odd Girl per Whimsy Stamps. Adoro il suo muso, specialmente il cappello da mago e la barba... sembra proprio un grande saggio! Ho stampato il timbro digitale su del cartoncino bianco e l'ho colorato con i pennarelli ad alcohol. Ho aggiunto un paio di punti bianchi per gli occhi e un tocco di oro su luna e stelle del cappello.


I cut the panel in a square shape and I picked a square of brown cardstock too in order to frame the white one. I did the same with the sentiment, while I chose a blue cardstock for the background, on which I heat embossed some images with gold embossing powder.

Ho ritagliato il pannello in una forma quadrata e l'ho abbinato a un quadrato marrone, che fosse in grado di incorniciarlo. Ho fatto lo stesso con l'augurio, mentre ho scelto un cartoncino blu come sfondo, su cui ho embossato un paio di immagini in oro. 
Share
Tweet
Pin
Share
No commenti


Hello fellow stampers! First of all, a big announcement: Some Odd Girl will be releasing new digis via Whimsy Stamps from now on... so be sure to check their shop! You will find the new digi by Some Odd Girl, especially the Halloween Ghost Gang. I used the witch one to create a not-so-spooky Halloween card.

Ciao amici! Prima di tutto, un grande annuncio: Some Odd Girl farà uscire le proprie release sul portale di Whimsy Stamps d'ora in poi... per cui assicuratevi di dare un'occhiata allo shop! Troverete la nuovissima release di Some Odd Girl, specialmente il set Halloween Ghost Gang. Ho utilizzato il fantasmino vestito da strega per realizzare una card di Halloween - per nulla spaventosa.


I printed the little ghost on white cardstock, colored with alcohol markers and fussy cut it. I decided to create a blended background with a bunch of Distress Inks, such as Antique Linen, Picked Raspberry and Seedless Preserves. 

Ho stampato il piccolo fantasma su del cartoncino bianco, l'ho colorato con pennarelli ad alcohol e l'ho ritagliato. Ho deciso di creare lo sfondo utilizzando le sfumature di Distress Inks, scegliendo Antique Linen, Picked Raspbeyy e Seedless Preserves.


Finally I added a couple of black die cuts for the grass and the fence, as well as lots of white dots all around the ghost. How cute is that?!

Infine ho aggiunto un paio di fustellate per l'erba e la staccionata, così come un sacco di puntini bianchi tutto intorno al fantasma. Ma quanto è carino?!
Share
Tweet
Pin
Share
No commenti


Hello guys! Selfies with besties are so funny! I used this new digi by Some Odd Girl to create a birthday card for a special person. I decided to keep everything black and white (or at least grey) except the frame.

Ciao a tutti! I selfie con i più grandi amici sono così divertenti! Ho utilizzato questo nuovo digi di Some Odd Girl per realizzare una card di compleanno per una persona speciale. Ho deciso di mantenere il tutto bianco/nero (o al massimo grigio) eccetto che per il selfie.


I printed the digi on top of white cardstock. I chose fading colors for the hair and the dresses, adding some shadows all around the edges. 

Ho stampato il digi su del cartoncino bianco. Ho scelto di utilizzare dei colori un po' smorti per capelli e vestiti, aggiungendo delle ombre tutto intorno ai bordi delle persone.


I picked a patterned paper as my cardbase and I framed the digi with black cardstock. Finally I glued a scripty golden sentiment on top with foam tape.

Ho optato per una carta decorativa come sfondo e ho incorniciato il digi all'interno di un cartoncino nero. Infine ho incollato un augurio dorato al di sopra del frame con del nastro gommato.

Share
Tweet
Pin
Share
No commenti
Older Posts

About me

About me
I'm Giada, an italian cardmaker. I love clean and simple cards...and coloring critters! Thank for being here!

Follow Me

  • Facebook
  • Instagram
  • Youtube

Contact me

Nome

Email *

Messaggio *

Blog Archive

  • ▼  2023 (3)
    • ▼  nov 2023 (1)
      • Winter Friends
    • ►  giu 2023 (1)
    • ►  feb 2023 (1)
  • ►  2022 (14)
    • ►  ott 2022 (1)
    • ►  ago 2022 (1)
    • ►  lug 2022 (2)
    • ►  giu 2022 (1)
    • ►  mag 2022 (1)
    • ►  apr 2022 (1)
    • ►  mar 2022 (3)
    • ►  feb 2022 (1)
    • ►  gen 2022 (3)
  • ►  2021 (27)
    • ►  dic 2021 (1)
    • ►  nov 2021 (1)
    • ►  ott 2021 (2)
    • ►  set 2021 (2)
    • ►  ago 2021 (3)
    • ►  lug 2021 (2)
    • ►  giu 2021 (1)
    • ►  mag 2021 (2)
    • ►  apr 2021 (2)
    • ►  mar 2021 (2)
    • ►  feb 2021 (5)
    • ►  gen 2021 (4)
  • ►  2020 (72)
    • ►  dic 2020 (2)
    • ►  nov 2020 (2)
    • ►  ott 2020 (4)
    • ►  set 2020 (8)
    • ►  ago 2020 (4)
    • ►  lug 2020 (7)
    • ►  giu 2020 (8)
    • ►  mag 2020 (5)
    • ►  apr 2020 (12)
    • ►  mar 2020 (7)
    • ►  feb 2020 (7)
    • ►  gen 2020 (6)
  • ►  2019 (68)
    • ►  dic 2019 (6)
    • ►  nov 2019 (8)
    • ►  ott 2019 (9)
    • ►  set 2019 (9)
    • ►  ago 2019 (8)
    • ►  lug 2019 (8)
    • ►  giu 2019 (3)
    • ►  mag 2019 (4)
    • ►  apr 2019 (2)
    • ►  mar 2019 (3)
    • ►  feb 2019 (4)
    • ►  gen 2019 (4)
  • ►  2018 (59)
    • ►  dic 2018 (2)
    • ►  nov 2018 (7)
    • ►  ott 2018 (7)
    • ►  set 2018 (7)
    • ►  ago 2018 (7)
    • ►  lug 2018 (6)
    • ►  giu 2018 (4)
    • ►  mag 2018 (4)
    • ►  apr 2018 (4)
    • ►  mar 2018 (4)
    • ►  feb 2018 (3)
    • ►  gen 2018 (4)
  • ►  2017 (45)
    • ►  nov 2017 (6)
    • ►  ott 2017 (3)
    • ►  set 2017 (5)
    • ►  ago 2017 (3)
    • ►  lug 2017 (3)
    • ►  giu 2017 (3)
    • ►  mag 2017 (3)
    • ►  apr 2017 (5)
    • ►  mar 2017 (3)
    • ►  feb 2017 (6)
    • ►  gen 2017 (5)
  • ►  2016 (32)
    • ►  dic 2016 (1)
    • ►  nov 2016 (6)
    • ►  ott 2016 (3)
    • ►  set 2016 (3)
    • ►  ago 2016 (3)
    • ►  lug 2016 (4)
    • ►  giu 2016 (4)
    • ►  mag 2016 (2)
    • ►  apr 2016 (1)
    • ►  mar 2016 (2)
    • ►  feb 2016 (2)
    • ►  gen 2016 (1)
  • ►  2015 (21)
    • ►  dic 2015 (1)
    • ►  nov 2015 (2)
    • ►  set 2015 (1)
    • ►  ago 2015 (2)
    • ►  lug 2015 (1)
    • ►  mag 2015 (1)
    • ►  apr 2015 (2)
    • ►  mar 2015 (4)
    • ►  feb 2015 (4)
    • ►  gen 2015 (3)
  • ►  2014 (31)
    • ►  dic 2014 (2)
    • ►  nov 2014 (2)
    • ►  ott 2014 (2)
    • ►  set 2014 (4)
    • ►  ago 2014 (1)
    • ►  lug 2014 (3)
    • ►  giu 2014 (3)
    • ►  mag 2014 (3)
    • ►  apr 2014 (2)
    • ►  mar 2014 (3)
    • ►  feb 2014 (3)
    • ►  gen 2014 (3)
  • ►  2013 (33)
    • ►  dic 2013 (4)
    • ►  nov 2013 (5)
    • ►  ott 2013 (4)
    • ►  set 2013 (3)
    • ►  ago 2013 (4)
    • ►  lug 2013 (5)
    • ►  giu 2013 (8)

Search

Labels

  • crackerbox & suzy stamps
  • craftin desert divas
  • create a smile stamps
  • lawnfawn
  • mft stamps
  • rinea foiled paper
  • so suzy stamps
  • someoddgirl
  • whimsy stamps
  • wplus9

Created with by BeautyTemplates