Copyright giadaelesuenuvole.blogspot.it. Powered by Blogger.

giadalesuenuvole

Pagine

  • Chi sono
  • Privacy Policy
 

Hello there! I made tons of Holiday cards this year, but it seems like I didn't finish yet. Thanks to Impronte d'Autore, I have new Christmas stamps and dies I can work with... and today I used the sweetest and cutest snowman I've ever seen to create a winter card. I stamped the Snowman with Memento Tuxedo black ink, die cut with the coordinating die and colored with Illustrator markers. 

Ciao a tutti! Ho realizzato tantissime card natalizie quest'anno, ma sembra proprio che non abbia ancora finito. Grazie a Impronte d'Autore, mi sono procurata un sacco di timbri e fustelle natalizie con cui lavorare... ed oggi ho utilizzato il pupazzo di neve più dolce e più carino che abbia mai visto per realizzare una card invernale. Ho timbrato il Pupazzo di neve con dell'inchiostro Memento Tuxedo nero, l'ho ritagliato con le fustelle abbinate e l'ho colorato con i pennarelli Illustrator.


Then I picked a piece of watercolor paper and I blended it with Tumbled Glass, Broken China and Faded Jeans Distress Oxides. I let it dry and sprinkled some waterdrops here and there. Then I die cut some tree trunks and a couple of hills from the Alberi and Bordo Alberi Slimline dies. I blended some Broken China at the bottom of the hills too. Finally I put everything together with foam tape and regular adhesive, adding a embossed sentiment on top of the scene.

In seguito ho preso un foglio acquerellabile e l'ho sfumato con i Distress Oxide Tumbled Glass, Broken China e Faded Jeans. Ho aspettato che asciugasse e ci ho spruzzato sopra qualche goccia d'acqua. Poi ho fustellato dei fusti d'albero e un paio di colline, grazie alle fustelle Alberi e Bordo Alberi Slimline. Ho sfumato del Broken China anche nella bordo inferiore delle colline. Infine ho messo insieme il tutto, utilizzando sia del nastro gommato sia del biadesivo standard, aggiungendo una scritta embossata su cartoncino rosso.
Share
Tweet
Pin
Share
No commenti

Hello my friends! I'm creating as a busy bee for Christmas and today I wanted to share a couple of cards in a box that I made for Impronte d'Autore. I used their dies to create the structure of the box: these are a must-have in my opinion, since they made my life easier and the process faster!

Ciao amici! Sto creando come una matta per Natale e oggi vi voglio mostrare un paio di card in a box che ho realizzato per Impronte d'Autore. Ho utilizzato le loro fustelle per realizzare la struttura della scatolina: si tratta di un must-have secondo me, perché rendono questa operazione molto più veloce! 

In fact the dies cut the box itself, which is composed by two parts that should be adhered together, and the strips, which can be added in the middle to create two (or more) layers. Plus, in the set there are also other rectangular dies to be used for the decoration of the box.

Infatti le fustelle tagliano la scatolina, che è composta da due parti che devono essere incollate tra loro, e le due strisce che possono essere aggiunte al centro della card per realizzare due (o più) livelli. In più, in questo set ci sono anche altre fustelle rettangolari che permettono di decorare la scatolina.

First I die cut the structure out of white cardstock, while I chose a couple of patterned papers from the set Winterland by Mintay for the decorative parts - which is the perfect set to create a winter scene.

Prima di tutto ho fustellato la struttura da del cartoncino bianco, mentre ho scelto un paio di carte decorative dal set Winterland di Mintay, perfette per mettere insieme una scena invernale.

Then I die cut all the other things I needed to complete the scene: some white hills with the Bordo Alberi Slimline dies and some trees with the Alberi dies from kraft cardstock.

Poi ho fustellato tutto ciò che mi serviva per completare la scenetta: qualche collina bianca con le fustelle Bordo Alberi Slimline e qualche albero con le fustelle Alberi da del cartoncino kraft.

Finally I needed to fill the scene with critters: I chose the penguin and the bear from the Baby Polar Friends set and the Santa from the Babbo Esultante set: I stamped them with Memento Tuxedo Black Ink, colored with Illustrator markers and die cut. I adhered everything trying to create a dynamic scene on two layers and heat embossed the sentiment Buon Natale on a strip of white cardstock. As usual, this card in a box can be folded and put in a standard envelope. 

Infine avevo bisogno di riempire la scenetta con dei personaggi: ho scelto il pinguino e l'orsetto dal set Baby Polar Friends e il Babbo Natale dal set Babbo Esultante: li ho timbrati con dell'inchiostro nero Memento Tuxedo, colorati con i pennarelli Illustrator e fustellati. Ho incollato il tutto in modo da creare una scena dinamica su più livelli e ho embossato l'augurio Buon Natale su una striscia di cartoncino bianco. Come per tutte le card in a box, questa può essere piegata e inserita in una busta standard.

I coudn't resist, so I created another card in a box with the unique Christmas Elves of the Fairy Forest stampset, which are called "Holfi". I stamped three of them with Memento Ink, die cut and colored with Illustrator markers. Then I put the structure together, using green cardstock and papers from the Christmas Italian Style pack by Moda Scrap.

Non ho potuto resistere, per cui ho realizzato una seconda card in a box con gli originalissimi elfi natalizi del set Fairy Forest, che sono chiamati "Holfi". Ho timbrato tre di loro con dell'inchiostro Memento nero, fustellati e colorati con i pennarelli Illustrator. Poi ho messo insieme la struttura, utilizzando del cartoncino verde e le carte patterned dal set Christmas Italian Style di Moda Scrap.

As the first version, I added some white hills and put the elves on the two layers. 

Come per la prima versione, ho aggiunto delle colline bianche e ho incollato gli elfi su due livelli.

Finally I added the die cut sentiment, which is part of the starter kit of the Cutty Machine. I really love the Santa's version of the card, but the elves have a super cute faces too!

Infine ho aggiunto un sentiment fustellato, che fa parte dello start kit della macchinetta Cutty. Adoro la versione con Babbo Natale, ma è innegabile che gli elfi abbiano una simpatica faccina!
Share
Tweet
Pin
Share
No commenti


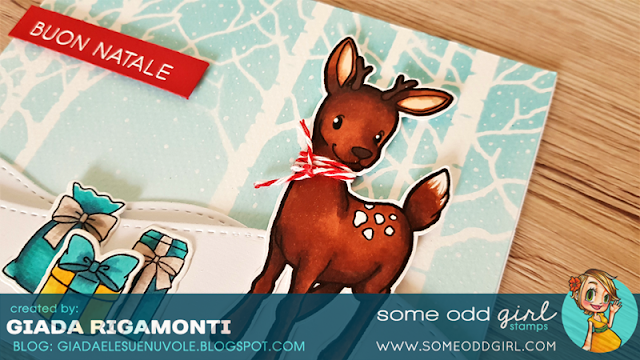
Hello stampers! It's December and I'm finally back on my blog. I joined the 11 Coloring Challenge on Instagram and worked to some new Holiday cards, that I hope I'm going to share here soon. Today I'm showing a couple of them, made with one of my favorite subject for Christmas: the deer. I used this sweet one by Some Odd Girl and Whimsy Stamps, dressed it with a scarf made of twine and put it on a snowy landscape.

Ciao a tutti! E' finalmente dicembre ed eccomi tornata sul blog. Nel frattempo ho partecipato alla 11 Coloring Challenge su Instagram e ho lavorato ad alcune nuove card natalizie, che spero di condividere presto anche qui. Oggi vi mostro un paio di queste card, realizzate con uno dei miei soggetti preferiti: la renna. Ho utilizzato questa dolce renna di Some Odd Girl e Whimsy Stamps, l'ho vestita con una sciarpa fatta di twine e l'ho posizionata su del paesaggio nevoso.


I made two different versions of the same card, using the same subject but changing colors and little details like the presents and che die cut for the ground.

Ho realizzato due versioni diverse della stessa card, utilizzando lo stesso soggetto ma cambiando colori e piccoli dettagli (come i regalini e i bordi fustellati).


I printed the deers multiple times on white cardstock, colored with alcohol markers and fussy cut. I added a scarf to them made with a red or blue twine, as well as some white details with a gel pen. I stamped some presents, colored and die cut them as well.

Ho stampato le renne più volte su del cartoncino bianco, colorato con pennarelli ad alcohol e ritagliati. Ho aggiunto la sciarpa realizzata con del twine rosso o azzurro, così come dei dettagli con la penna gel bianca. Ho timbrato i regali, li ho colorati e fustellati.


For the background I combined stencils with Distress Inks and white border die cuts. I kept everything clean, simple and soft, so that the deer could be the focus with the heat embossed sentiments.

Per lo sfondo ho abbinato stencils con Distress Inks e terreni bianchi fustellati. Ho mantenuto tutto molto semplice, pulito ed etereo, così che la renna possa rimanere il focus della card, insieme agli auguri embossati.

Share
Tweet
Pin
Share
No commenti


Hello my friends! Another Holiday card? Yes, please! Today I'm using a different deer by Some Odd Girl: there are a bunch of them in the shop and every single deer is just so unique and cute! Brown is one of my favorite colors in general and for Holiday cards in particular. For this card I used a lot of brown and white, adding colors only for the lights and the sentiment.

Ciao amici! Un'altra card natalizia? Oh sì! Oggi ho utilizzato una diversa renna di Some Odd Girl: ce ne sono un bel po' nello shop e ogni singola renna è così unica e carina! Il marrone è uno dei miei colori preferiti, in particolare quando si tratta di card natalizie. Per questo biglietto ho utilizzato un sacco di marrone e bianca, aggiungendo colori soltanto nelle luci e nell'augurio.


First of all, I printed the deer on white cardstock, colored and fussy cut. Then I added some details with a white gel pen and put the deer on a rectangular die cut. I fussy cut the Christmas lights and put them on top of the deer. At this point I embossed a brownish cardstock with a polka dots embossing folder and glued some little snowflakes here and there.

Prima di tutto, ho stampato la renna su del cartoncino bianco, l'ho colorata e ritagliata. Poi ho aggiunto qualche dettaglio con una penna gel bianco e ho posizionato la renna su una finestra rettangolare fustellata. Ho ritagliato le luci di Natale e le ho posizionate sulle corna della renna. A questo punto ho embossato un cartoncino marroncino con un folder puntinato e ho incollato un po' di fiocchi di neve qua e là.


Finally I heat embossed a scripty sentiment with gold embossing powder and fixed everything on a white cardbase. I really love the color palette of this card, even if I'm going to try something different in the nearly future!

Infine ho embossato un augurio calligrafato con della polvere da embossing dorata e ho incollato il tutto su una base bianca. Adoro la palette di colori di questa card, anche se proverò a creare qualcosa di diverso nel prossimo futuro!

Share
Tweet
Pin
Share
No commenti


Hello stampers! Christmas is coming in 2 months, so it's time to start creating Holiday cards! For my first Christmas card of the year I chose the tiny and cute snowman by Some Odd Girl. As my first step I realized a tag, then I put it on a customized background.

Ciao a tutti! Mancano solo 2 mesi a Natale, quindi è tempo di realizzare qualche card a tema! Per creare la mia prima card natalizia dell'anno ho scelto il piccolo e carinissimo pupazzo di neve di Some Odd Girl. Come primo step ho realizzato una tag, che poi ho deciso di posizionare su uno sfondo personalizzato.


I printed the snowman on a piece of white cardstock and colored it with alcohol markers. I added lots of white dots here and there as if they were snowflakes, covering part of the snowman too. I die cut the image with a tag die and tied a string on top of it.

Ho stampato il pupazzo di neve su del cartoncino bianco e l'ho colorato con pennarelli ad alcohol. Ho aggiunto un sacco di puntini bianchi/fiocchi di neve qua e là, coprendo anche parte del pupazzo di neve. Ho fustellato l'immagine con una fustella a forma di tag e ho annodato un nastrino ad di sopra.


Then I put the tag and the heat embossed sentiment on a kraft panel, on which I blended some Walnut Stain Distress Oxide with a stencil. I added lots and lots of snowflakes - white dots too! I really love the snowy atmosphere and the color palette!

Infine ho posizionato la tag e l'augurio embossato su un pannello kraft, su cui avevo precedentemente sfumato del Distress Oxide Walnut Stain tramite uno stencil. Ho aggiunto una vagonata di puntini bianchi anche qui! Adoro l'atmosfera e anche la palette di colori che ho utilizzato!

Share
Tweet
Pin
Share
No commenti


Hello my friends! As you can see, one of my favorite critters for Holiday cards is deer. I love them, especially the sweet ones: as soon as I saw the Holiday Minis digi stampset by Some Odd Girl, I knew I had to buy it! I decided to combine this deer with unsual but pretty color combos for Christmas: light blue with brown and grey.

Ciao a tutti! Come potete vedere, uno dei miei soggetti preferiti per le card natalizie è la renna. Le adoro tutte, in particolare quelle dall'aspetto tenero e dagli occhioni dolci: non appena ho visto il set digitale Holiday Minis di Some Odd Girl, sapevo di dovermelo accaparrare! Ho deciso di abbinare la renna a combinazioni di colore non tradizionali ma comunque molto belle per Natale: azzurro con grigio e marrone.


I printed the deer on white cardstock, colored it with alcohol markers and fussy cut. For the background I die cut some pieces: a white hill, a rectangular panel in light blue and some trees by Tim Holtz which I previously heat embossed in white. I stamped my sentiment on top of the hill and added some white dots in the sky.

Ho stampato la renna su del cartoncino bianco, colorato con i pennarelli ad alcohol e ritagliata. Per lo sfondo ho fustellato un po' di cose: una collina bianca, un pannello rettangolare azzurrino e qualche albero di Tim Holtz che avevo precedentemente embossato in bianco. Ho timbrato la scritta sulla collina e aggiunto qualche puntino bianco nel cielo.


For the main panel, I die cut grey and kraft cardstock and I stamped some snowflakes by Tim Holtz on top of them with white ink. Finally I used some baker's twine to tie a bow around the neck of the deers, as if it was a scarf!

Per la base ho fustellato del cartoncino grigio e kraft ed ho timbrato qualche fiocco di neve sempre di Tim Holtz utilizzando dell'inchiostro bianco. Infine ho utilizzato del twine per stringere un nodo intorno al collo delle renne, come se fosse una sciarpa! 
Share
Tweet
Pin
Share
No commenti
Older Posts

About me

About me
I'm Giada, an italian cardmaker. I love clean and simple cards...and coloring critters! Thank for being here!

Follow Me

  • Facebook
  • Instagram
  • Youtube

Contact me

Nome

Email *

Messaggio *

Blog Archive

  • ▼  2023 (3)
    • ▼  nov 2023 (1)
      • Winter Friends
    • ►  giu 2023 (1)
    • ►  feb 2023 (1)
  • ►  2022 (14)
    • ►  ott 2022 (1)
    • ►  ago 2022 (1)
    • ►  lug 2022 (2)
    • ►  giu 2022 (1)
    • ►  mag 2022 (1)
    • ►  apr 2022 (1)
    • ►  mar 2022 (3)
    • ►  feb 2022 (1)
    • ►  gen 2022 (3)
  • ►  2021 (27)
    • ►  dic 2021 (1)
    • ►  nov 2021 (1)
    • ►  ott 2021 (2)
    • ►  set 2021 (2)
    • ►  ago 2021 (3)
    • ►  lug 2021 (2)
    • ►  giu 2021 (1)
    • ►  mag 2021 (2)
    • ►  apr 2021 (2)
    • ►  mar 2021 (2)
    • ►  feb 2021 (5)
    • ►  gen 2021 (4)
  • ►  2020 (72)
    • ►  dic 2020 (2)
    • ►  nov 2020 (2)
    • ►  ott 2020 (4)
    • ►  set 2020 (8)
    • ►  ago 2020 (4)
    • ►  lug 2020 (7)
    • ►  giu 2020 (8)
    • ►  mag 2020 (5)
    • ►  apr 2020 (12)
    • ►  mar 2020 (7)
    • ►  feb 2020 (7)
    • ►  gen 2020 (6)
  • ►  2019 (68)
    • ►  dic 2019 (6)
    • ►  nov 2019 (8)
    • ►  ott 2019 (9)
    • ►  set 2019 (9)
    • ►  ago 2019 (8)
    • ►  lug 2019 (8)
    • ►  giu 2019 (3)
    • ►  mag 2019 (4)
    • ►  apr 2019 (2)
    • ►  mar 2019 (3)
    • ►  feb 2019 (4)
    • ►  gen 2019 (4)
  • ►  2018 (59)
    • ►  dic 2018 (2)
    • ►  nov 2018 (7)
    • ►  ott 2018 (7)
    • ►  set 2018 (7)
    • ►  ago 2018 (7)
    • ►  lug 2018 (6)
    • ►  giu 2018 (4)
    • ►  mag 2018 (4)
    • ►  apr 2018 (4)
    • ►  mar 2018 (4)
    • ►  feb 2018 (3)
    • ►  gen 2018 (4)
  • ►  2017 (45)
    • ►  nov 2017 (6)
    • ►  ott 2017 (3)
    • ►  set 2017 (5)
    • ►  ago 2017 (3)
    • ►  lug 2017 (3)
    • ►  giu 2017 (3)
    • ►  mag 2017 (3)
    • ►  apr 2017 (5)
    • ►  mar 2017 (3)
    • ►  feb 2017 (6)
    • ►  gen 2017 (5)
  • ►  2016 (32)
    • ►  dic 2016 (1)
    • ►  nov 2016 (6)
    • ►  ott 2016 (3)
    • ►  set 2016 (3)
    • ►  ago 2016 (3)
    • ►  lug 2016 (4)
    • ►  giu 2016 (4)
    • ►  mag 2016 (2)
    • ►  apr 2016 (1)
    • ►  mar 2016 (2)
    • ►  feb 2016 (2)
    • ►  gen 2016 (1)
  • ►  2015 (21)
    • ►  dic 2015 (1)
    • ►  nov 2015 (2)
    • ►  set 2015 (1)
    • ►  ago 2015 (2)
    • ►  lug 2015 (1)
    • ►  mag 2015 (1)
    • ►  apr 2015 (2)
    • ►  mar 2015 (4)
    • ►  feb 2015 (4)
    • ►  gen 2015 (3)
  • ►  2014 (31)
    • ►  dic 2014 (2)
    • ►  nov 2014 (2)
    • ►  ott 2014 (2)
    • ►  set 2014 (4)
    • ►  ago 2014 (1)
    • ►  lug 2014 (3)
    • ►  giu 2014 (3)
    • ►  mag 2014 (3)
    • ►  apr 2014 (2)
    • ►  mar 2014 (3)
    • ►  feb 2014 (3)
    • ►  gen 2014 (3)
  • ►  2013 (33)
    • ►  dic 2013 (4)
    • ►  nov 2013 (5)
    • ►  ott 2013 (4)
    • ►  set 2013 (3)
    • ►  ago 2013 (4)
    • ►  lug 2013 (5)
    • ►  giu 2013 (8)

Search

Labels

  • crackerbox & suzy stamps
  • craftin desert divas
  • create a smile stamps
  • lawnfawn
  • mft stamps
  • rinea foiled paper
  • so suzy stamps
  • someoddgirl
  • whimsy stamps
  • wplus9

Created with by BeautyTemplates