Copyright giadaelesuenuvole.blogspot.it. Powered by Blogger.

giadalesuenuvole

Pagine

  • Chi sono
  • Privacy Policy


Hello fellow stampers! First of all, a big announcement: Some Odd Girl will be releasing new digis via Whimsy Stamps from now on... so be sure to check their shop! You will find the new digi by Some Odd Girl, especially the Halloween Ghost Gang. I used the witch one to create a not-so-spooky Halloween card.

Ciao amici! Prima di tutto, un grande annuncio: Some Odd Girl farà uscire le proprie release sul portale di Whimsy Stamps d'ora in poi... per cui assicuratevi di dare un'occhiata allo shop! Troverete la nuovissima release di Some Odd Girl, specialmente il set Halloween Ghost Gang. Ho utilizzato il fantasmino vestito da strega per realizzare una card di Halloween - per nulla spaventosa.


I printed the little ghost on white cardstock, colored with alcohol markers and fussy cut it. I decided to create a blended background with a bunch of Distress Inks, such as Antique Linen, Picked Raspberry and Seedless Preserves. 

Ho stampato il piccolo fantasma su del cartoncino bianco, l'ho colorato con pennarelli ad alcohol e l'ho ritagliato. Ho deciso di creare lo sfondo utilizzando le sfumature di Distress Inks, scegliendo Antique Linen, Picked Raspbeyy e Seedless Preserves.


Finally I added a couple of black die cuts for the grass and the fence, as well as lots of white dots all around the ghost. How cute is that?!

Infine ho aggiunto un paio di fustellate per l'erba e la staccionata, così come un sacco di puntini bianchi tutto intorno al fantasma. Ma quanto è carino?!
Share
Tweet
Pin
Share
No commenti


Hello stampers! Today I'm sharing this little square card that I made for my boyfriend, since he loved the Fishing Cat digi stamp at first sight.

Ciao a tutti! Oggi vi mostro questa piccola card quadrata che ho realizzato per il mio ragazzo, visto che si è innamorato del digi Fishing Cat a prima vista.


I printed the flipped fishing cat and colored it with alcohol markers in blue, grey and orange shades. Then I fussy cut it and placed on top of a kraft panel with different pieces of patterned papers. Finally I stamped the sentiment, which I think it's perfect for this satisfied cat!

Ho stampato l'immagine del gatto specchiata e l'ho colorato con pennarelli ad alcohol nei colori azzurro, arancione e grigio. Poi l'ho ritagliato e posizionato su un pannello kraft con diverse carte decorative. Infine ho timbrato la scritta, che penso si addica a un gatto con un muso così soddisfatto!

Share
Tweet
Pin
Share
No commenti


Hello there! After building a long pile with this set of pets by Some Odd Girl in my previous card, I can't stop using and coloring those super-cute critters! Today I made a card with masculine colors, a bunny and an hamster.

Ciao a tutti! Dopo aver costruito una lunga pila con il set di animaletti di Some Odd Girl nella precedente card, non posso smettere di utilizzare e colorare questi adorabili animali! Oggi ho realizzato una card con colori mascolini, un coniglio e un criceto.

I placed the 2 digis one on top of the other, colored with alcohol markers and fussy cut. I chose a bunch of patterned paper in brown and teal and die cut the lightest with a tag die.

Ho posizionato i 2 digi uno sopra l'altro, colorati con pennarelli ad alcohol e li ho ritagliati. Ho scelto un po' di carte decorative nei colori marrone e foglia di té, fustellando la più chiara a forma di tag.

Then I glued everything on a panel, adding the critters on top with foam tape. How cute are they? I can't resist them!

Infine ho incollato ogni cosa su un pannello, aggiungendo gli animaletti con del nastro gommato. Ma quanto sono carini? Oserei dire, irresistibili!

Share
Tweet
Pin
Share
No commenti

Hello there! It's time for the Some Odd Girl new release, which is full of moth girls. Today I chose my favorite one, which is Blue Moth: it seems like a japanese girl who is going to school. As usual, I love the colors of the reference image, so I decided to print and color her.

Ciao a tutti! E' tempo di una nuova release di Some Odd Girl, che è piena di ragazze-falena. Oggi ho scelto la mia preferita, che è Blue Moth: mi piace perché sembra proprio una ragazza giapponese che sta andando a scuola. Come sempre, mi sono divertita a seguire i colori dell'immagine presente sul sito, per cui ho deciso di stamparla e colorarla.


I used teal shades for her hair, dress and shoes and finished with beige and light blue colors. Then I fussy cut.

Ho utilizzato sfumature blu per i capelli, il vestito e le scarpe, poi ho finito con il beige e l'azzurro chiaro. Poi ho ritagliato la figura.


I picked a piece of patterned paper with grey designs and put it on the front panel. Next I decided to add a white tag at the center of the card, in order to create a focus.

Ho scelto della carta decorativa con dei design grigi e l'ho posizionata sul pannello frontale. In seguito ho deciso di aggiungere una tag bianca al centro della card, così da poter creare un focus.


Finally I stamped a sentiment that says "Follow your dreams" at the bottom of the moth. 

Infine ho timbrato il sentiment e l'ho posizionato tra le gambe della falena.
Share
Tweet
Pin
Share
No commenti


Hello my friends! As you can see, one of my favorite critters for Holiday cards is deer. I love them, especially the sweet ones: as soon as I saw the Holiday Minis digi stampset by Some Odd Girl, I knew I had to buy it! I decided to combine this deer with unsual but pretty color combos for Christmas: light blue with brown and grey.

Ciao a tutti! Come potete vedere, uno dei miei soggetti preferiti per le card natalizie è la renna. Le adoro tutte, in particolare quelle dall'aspetto tenero e dagli occhioni dolci: non appena ho visto il set digitale Holiday Minis di Some Odd Girl, sapevo di dovermelo accaparrare! Ho deciso di abbinare la renna a combinazioni di colore non tradizionali ma comunque molto belle per Natale: azzurro con grigio e marrone.


I printed the deer on white cardstock, colored it with alcohol markers and fussy cut. For the background I die cut some pieces: a white hill, a rectangular panel in light blue and some trees by Tim Holtz which I previously heat embossed in white. I stamped my sentiment on top of the hill and added some white dots in the sky.

Ho stampato la renna su del cartoncino bianco, colorato con i pennarelli ad alcohol e ritagliata. Per lo sfondo ho fustellato un po' di cose: una collina bianca, un pannello rettangolare azzurrino e qualche albero di Tim Holtz che avevo precedentemente embossato in bianco. Ho timbrato la scritta sulla collina e aggiunto qualche puntino bianco nel cielo.


For the main panel, I die cut grey and kraft cardstock and I stamped some snowflakes by Tim Holtz on top of them with white ink. Finally I used some baker's twine to tie a bow around the neck of the deers, as if it was a scarf!

Per la base ho fustellato del cartoncino grigio e kraft ed ho timbrato qualche fiocco di neve sempre di Tim Holtz utilizzando dell'inchiostro bianco. Infine ho utilizzato del twine per stringere un nodo intorno al collo delle renne, come se fosse una sciarpa! 
Share
Tweet
Pin
Share
No commenti

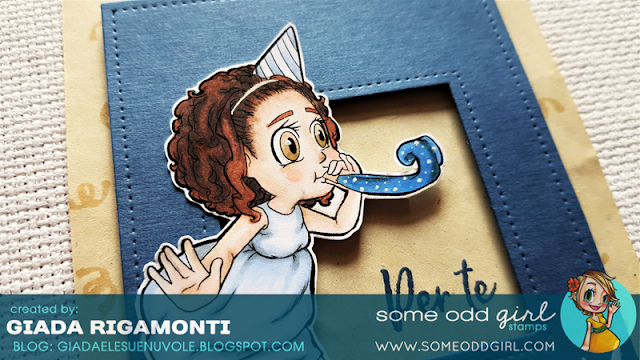
Hello Oddies! For today's card I focused on a color combination: when I feel like I need new inspiration, I search for videos, images or new color combinations. In this case I worked with blues, kraft, brown and white colors, which I used to color and match the Party Tia digi stamp by Some Odd Girl.
Everything is quite simple here: I printed and colored Tia using alcohol markers. Then I fussy cut.

Ciao a tutti! Per realizzare la card di oggi mi sono concentrata su una combinazione di colori: quando mi sembra di creare sempre le stesse cose, cerco nuovi video, immagini...o nuove combo di colori. In questo caso ho deciso di lavorare con i blu, il kraft, il marrone ed il bianco, tutti colori che ho utilizzato sull'immagine Party Tia di Some Odd Girl.
Il risultato finale è davvero molto semplice: ho stampato e colorato Tia utilizzando i pennarelli ad alcohol, poi l'ho ritagliata.


Next I took a piece of kraft cardstock, fullfilled by stamping a little image here and there. Finally I die cut a piece of blue cardstock to create a sort of frame and a piece of white cardstock with a grass border. The sentiment says "For you"!

Poi ho preso del cartoncino kraft, che ho riempito timbrando qua e là una piccolissima immagine a tema. Infine ho fustellato del cartoncino blu per realizzare una sorta di cornice e del cartoncino bianco per ricavare del prato dove far poggiare Tia.
Share
Tweet
Pin
Share
No commenti
Older Posts

About me

About me
I'm Giada, an italian cardmaker. I love clean and simple cards...and coloring critters! Thank for being here!

Follow Me

  • Facebook
  • Instagram
  • Youtube

Contact me

Nome

Email *

Messaggio *

Blog Archive

  • ▼  2023 (3)
    • ▼  nov 2023 (1)
      • Winter Friends
    • ►  giu 2023 (1)
    • ►  feb 2023 (1)
  • ►  2022 (14)
    • ►  ott 2022 (1)
    • ►  ago 2022 (1)
    • ►  lug 2022 (2)
    • ►  giu 2022 (1)
    • ►  mag 2022 (1)
    • ►  apr 2022 (1)
    • ►  mar 2022 (3)
    • ►  feb 2022 (1)
    • ►  gen 2022 (3)
  • ►  2021 (27)
    • ►  dic 2021 (1)
    • ►  nov 2021 (1)
    • ►  ott 2021 (2)
    • ►  set 2021 (2)
    • ►  ago 2021 (3)
    • ►  lug 2021 (2)
    • ►  giu 2021 (1)
    • ►  mag 2021 (2)
    • ►  apr 2021 (2)
    • ►  mar 2021 (2)
    • ►  feb 2021 (5)
    • ►  gen 2021 (4)
  • ►  2020 (72)
    • ►  dic 2020 (2)
    • ►  nov 2020 (2)
    • ►  ott 2020 (4)
    • ►  set 2020 (8)
    • ►  ago 2020 (4)
    • ►  lug 2020 (7)
    • ►  giu 2020 (8)
    • ►  mag 2020 (5)
    • ►  apr 2020 (12)
    • ►  mar 2020 (7)
    • ►  feb 2020 (7)
    • ►  gen 2020 (6)
  • ►  2019 (68)
    • ►  dic 2019 (6)
    • ►  nov 2019 (8)
    • ►  ott 2019 (9)
    • ►  set 2019 (9)
    • ►  ago 2019 (8)
    • ►  lug 2019 (8)
    • ►  giu 2019 (3)
    • ►  mag 2019 (4)
    • ►  apr 2019 (2)
    • ►  mar 2019 (3)
    • ►  feb 2019 (4)
    • ►  gen 2019 (4)
  • ►  2018 (59)
    • ►  dic 2018 (2)
    • ►  nov 2018 (7)
    • ►  ott 2018 (7)
    • ►  set 2018 (7)
    • ►  ago 2018 (7)
    • ►  lug 2018 (6)
    • ►  giu 2018 (4)
    • ►  mag 2018 (4)
    • ►  apr 2018 (4)
    • ►  mar 2018 (4)
    • ►  feb 2018 (3)
    • ►  gen 2018 (4)
  • ►  2017 (45)
    • ►  nov 2017 (6)
    • ►  ott 2017 (3)
    • ►  set 2017 (5)
    • ►  ago 2017 (3)
    • ►  lug 2017 (3)
    • ►  giu 2017 (3)
    • ►  mag 2017 (3)
    • ►  apr 2017 (5)
    • ►  mar 2017 (3)
    • ►  feb 2017 (6)
    • ►  gen 2017 (5)
  • ►  2016 (32)
    • ►  dic 2016 (1)
    • ►  nov 2016 (6)
    • ►  ott 2016 (3)
    • ►  set 2016 (3)
    • ►  ago 2016 (3)
    • ►  lug 2016 (4)
    • ►  giu 2016 (4)
    • ►  mag 2016 (2)
    • ►  apr 2016 (1)
    • ►  mar 2016 (2)
    • ►  feb 2016 (2)
    • ►  gen 2016 (1)
  • ►  2015 (21)
    • ►  dic 2015 (1)
    • ►  nov 2015 (2)
    • ►  set 2015 (1)
    • ►  ago 2015 (2)
    • ►  lug 2015 (1)
    • ►  mag 2015 (1)
    • ►  apr 2015 (2)
    • ►  mar 2015 (4)
    • ►  feb 2015 (4)
    • ►  gen 2015 (3)
  • ►  2014 (31)
    • ►  dic 2014 (2)
    • ►  nov 2014 (2)
    • ►  ott 2014 (2)
    • ►  set 2014 (4)
    • ►  ago 2014 (1)
    • ►  lug 2014 (3)
    • ►  giu 2014 (3)
    • ►  mag 2014 (3)
    • ►  apr 2014 (2)
    • ►  mar 2014 (3)
    • ►  feb 2014 (3)
    • ►  gen 2014 (3)
  • ►  2013 (33)
    • ►  dic 2013 (4)
    • ►  nov 2013 (5)
    • ►  ott 2013 (4)
    • ►  set 2013 (3)
    • ►  ago 2013 (4)
    • ►  lug 2013 (5)
    • ►  giu 2013 (8)

Search

Labels

  • crackerbox & suzy stamps
  • craftin desert divas
  • create a smile stamps
  • lawnfawn
  • mft stamps
  • rinea foiled paper
  • so suzy stamps
  • someoddgirl
  • whimsy stamps
  • wplus9

Created with by BeautyTemplates