Copyright giadaelesuenuvole.blogspot.it. Powered by Blogger.

giadalesuenuvole

Pagine

  • Chi sono
  • Privacy Policy


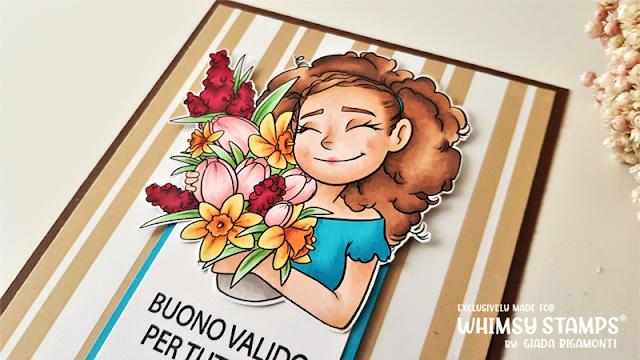
Hello everyone! Today I want to share a Spring card with a beautiful digi stamp available at Whimsy Stamps shop. It's a simple one, very quick to make since the stamp I'm using is so gorgeous and detailed! I printed Bouquet Piper stamp on white cardstock, colored it with Illustrator markers and fussy cut.

Ciao a tutti! Oggi voglio condividere una card primaverile realizzata con il bellissimo digi disponibile su Whimsy Stamps. Si tratta di un biglietto molto semplice e veloce da realizzare, visto che il timbro che sto utilizzando è splendido e dettagliato! Ho stampato il timbro Bouquet Piper su del cartoncino bianco, colorato con i pennarelli Illustrator e ritagliato.


I stamped a sentiment on a strip of white cardstock and framed it with another one, that I colored with the same marker I used for Piper's shirt. Finally I put everything on a digi patterned paper and chose a brown cardstock for my cardbase.

Ho timbrato la scritta su del cartoncino bianco e l'ho incorniciato con un altro, che ho colorato con lo stesso pennarello che ho utilizzato per la maglietta di Piper. Infine ho fissato il tutto su una carta digitale e ho optato per un cartoncino marrone come base.

Share
Tweet
Pin
Share
No commenti


Hello everyone! Summer holidays are over, but the benefits are not vanished (yet): I feel relaxed and full of ideas and creativity. This is a magical period, since I'm getting ready for the activities that I will do, but everything is still calm and quiet. So I picked the Pretty Unicorn by Whimsy Stamps and I created a simple but sweet card.

Ciao a tutti! Le vacanze sono finite, ma gli effetti benefici non sono ancora svaniti: mi sento rilassata e piena di idee e creatività. Questo è un periodo magico e me lo sto gustando: mi sto preparando a tutte le attività che arriveranno in autunno, ma per ora tutto è ancora calmo e tranquillo. Per cui ho scelto il timbro digitale Pretty Unicorn di Whimsy Stamps e ho creato una card semplice ma dolce.


First of all I printed my image on regular cardstock, colored it with alcohol markers and fussy cut. I used both rose and aqua shades because they matches a patterned paper that I think work so well with the unicorn. Then I foam mounted the image on top of the patterned paper and 2 strip of white cardstock as well, on which I stamped a sentiment.

Prima di tutto ho stampato l'immagine su del cartoncino bianco, l'ho colorata con pennarelli ad alcol e l'ho ritagliata. Ho usato i colori rosa e acqua insieme perché si sposavano benissimo con una carta patterned che avevo da un po' e che sta benissimo insieme all'unicorno. Poi l'ho incollato con del nastro gommato insieme a 2 strisce di cartoncino bianco, su cui ho timbrato l'augurio.


Finally I added a silver touch on the corn with a gel pen.

Infine ho aggiunto come tocco finale un pizzico di argento sul corno, con delle penna gel bianca.
Share
Tweet
Pin
Share
No commenti


Hello my friends! This time I decided to create a summer card with all the new penguins designed by Some Odd Girl for Whimsy Stamps. At first I wanted to focus on the Slushie Penguin only, but then I decided to create a slimline card with all of them.

Ciao a tutti! Questa volta mi sono buttata su una card estiva, realizzata con i nuovi pinguini disegnati da Some Odd Girl per Whimsy Stamps. All'inizio avevo deciso di concentrarmi solo sulla femminuccia, ma poi ho deciso di creare una card slimline utilizzandoli tutti e 3.

I printed all the images on a white cardstock, colored them with alcohol markers and fussy cut. In particular I chose pastel colors and warm greys. I framed every penguin with a colorful squared cardstock and a little polaroid with a stamped sentiment.

Ho stampato tutte le immagini su del cartoncino bianco, le ho colorate con i pennarelli ad alcohol e ritagliate. In particolare ho scelto delle tinte pastello e dei grigi caldi. Ho incorniciato ogni pinguino con del cartoncino colorato e una piccola polaroid con una scritta timbrata.


I added some little images on top the background for a tone-on-tone look.

Ho aggiunto anche qualche piccola timbrata su ogni sfondo per un effetto tono su tono.


Finally I glued everything on a white cardbase, fixing the penguins with foam tape to make them pop.

Infine ho incollato il tutto su una base bianca, fissando i pinguini con del nastro gommato per farli risaltare maggiormente.
Share
Tweet
Pin
Share
No commenti


Hello my friends, today I'm back after some busy and stressing weeks without any creative inspiration. Coloring is so relaxing and therapeutic! The image I chose to color is one from the latest release by Whimsy Stamps, in particular the Antartic Mermaid by Some Odd Girl. She has such a classy look and her little friends are so cute!

Ciao amici, eccomi di ritorno dopo alcune settimane frenetiche e stressanti, con pochissimo estro creativo. Colorare però è sempre così rilassante e terapeutico! L'immagine che ho scelto di colorare fa parte dell'ultima release di Whimsy Stamps, in particolare l'Antartic Mermaid di Some Odd Girl. Ha un aspetto molto elegante e i suoi amichetti sono così teneri!


I printed the image on white cardstock and colored it with alcohol markers, adding white and silver dots here and there to make her dress and tail even more elegant. Then I fussy cut her, cutting off all the sea waves, since I wanted to put her on a blended background. 

Ho stampato l'immagine su del cartoncino bianco e l'ho colorata con i pennarelli ad alcol, aggiungendo puntini bianchi e argento per rendere il suo vestito e la sua coda ancora più eleganti. Poi l'ho ritagliata, eliminando le onde in basso perché avevo intenzione di posizionarla su uno sfondo sfumato con gli inchiostri.


For the background I used 3 Distress Oxides: Evergreen Bough, Cracked Pistachio and Antique Linen. Once they dried, I added some water splashes and some silver splashes too. Finally I put everything on a white cardbase, fixing the mermaid on top of a vellum circle and gluing a little sentiment on the left of the mermaid. 

Per lo sfondo ho utilizzato 3 diversi Distress Oxides: Evergreen Bough, Cracked Pistachio e Antique Linen. Una volta asciutti, ho aggiunto gocce d'acqua e d'argento. Infine ho posizionato il tutto su una base banca, incollando la sirenetta su un cerchio in vellum e incollando l'augurio a sinistra della sirenetta.
Share
Tweet
Pin
Share
1 commenti


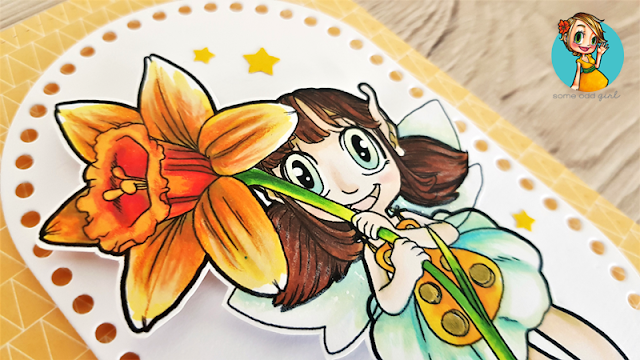
Hello my friends! Fairies, critters and flowers are my favorite subjects, especially for coloring. This Daffodil Fairy is part of the new Digi Release by Some Odd Girl for Whimsy Stamps and I needed to print and color it - the details on the daffodil are amazing. This time I decided to combine alcohol markers with prismacolor pencils to reinforce highlights and shadows.

Ciao a tutti! Fate, animaletti e fiori sono i miei soggetti preferiti, specialmente quando parliamo di colorazione. Questa Daffodil Fairy fa parte della nuova Digi Release di Some Odd Girl per Whimsy Stamps e ho sentito il bisogno di stamparla e colorarla (manco a dirlo, i dettagli del narciso sono stupendi). Questa volta ho deciso di combinare pennarelli ad alcol e matite prismacolor per far risaltare punti luce e ombre.


First of all I printed the image on a regular cardstock, colored it and fussy cut. As I used lots of orange, I picked a patterned paper of the same color for the front panel. Then I die cut an oval shape from white cardstock and glued the fairy on top with some foam tape. Finally I added a sentiment by heat embossing it on a strip of brown cardstock and a bunch of yellow stars too.

Prima di tutto ho stampato l'immagine su del cartoncino bianco, l'ho colorata e ritagliata. Visto che ho utilizzato molto arancione, ho scelto una carta decorativa dello stesso colore del pannello frontale. Poi ho fustellato un ovale da del cartoncino bianco e ho incollato la fatina con del nastro gommato. Infine ho aggiunto la scritta, embossandola su una striscia di cartoncino marrone, e un po' di stelline gialle.
Share
Tweet
Pin
Share
No commenti


Hello there! It's been a while since I used googly eyes on a project. As soon as I saw this Loveable Kitty by Some Odd Girl for Whimsy Stamps, I wanted to make this image super cute with them! I created my own background with the Buffalo Background stamp by Crackerbox & Suzy Stamps: I stamped it with grey ink on top of grey cardstock.

Ciao a tutti! E' passato un po' di tempo da quando ho utilizzato gli occhi finti su una card. Non appena ho visto il digi Loveable Kitty di Some Odd Girl per Whimsy Stamps, ho deciso di rendere ancora più tenera questa immagine con un paio di occhietti roteanti! Ho realizzato il mio sfondo personalizzato con il timbro Buffalo Background di Crackerbox & Suzy Stamps: l'ho timbrato con dell'inchiostro grigio su del cartoncino grigio.


Then I printed the kitty on white cardstock, colored it with alcohol markers and fussy cut. At this point I added a couple of googly eyes, then I die cut a frame from white cardstock and a speech bubble with a red heart on top. I put everything on a cardbase and used some foam tape to fix the kitty. Finally I added a thin layer of Wink of Stella on top of the bow and of the heart.

In seguito ho stampato il gattino su del cartoncino bianco, l'ho colorato con pennarelli ad alcohol e l'ho ritagliato. A questo punto ho aggiunto gli occhietti, poi ho fustellato una cornice da del cartoncino bianco e una nuvoletta con un cuore rosso al centro. Ho messo tutto insieme e ho usato un po' di nastro gommato per fissare il gattino. Infine ho aggiunto un sottile strato di Wink of Stella sul nastro e sul cuore.

Share
Tweet
Pin
Share
No commenti
Older Posts

About me

About me
I'm Giada, an italian cardmaker. I love clean and simple cards...and coloring critters! Thank for being here!

Follow Me

  • Facebook
  • Instagram
  • Youtube

Contact me

Nome

Email *

Messaggio *

Blog Archive

  • ▼  2023 (3)
    • ▼  nov 2023 (1)
      • Winter Friends
    • ►  giu 2023 (1)
    • ►  feb 2023 (1)
  • ►  2022 (14)
    • ►  ott 2022 (1)
    • ►  ago 2022 (1)
    • ►  lug 2022 (2)
    • ►  giu 2022 (1)
    • ►  mag 2022 (1)
    • ►  apr 2022 (1)
    • ►  mar 2022 (3)
    • ►  feb 2022 (1)
    • ►  gen 2022 (3)
  • ►  2021 (27)
    • ►  dic 2021 (1)
    • ►  nov 2021 (1)
    • ►  ott 2021 (2)
    • ►  set 2021 (2)
    • ►  ago 2021 (3)
    • ►  lug 2021 (2)
    • ►  giu 2021 (1)
    • ►  mag 2021 (2)
    • ►  apr 2021 (2)
    • ►  mar 2021 (2)
    • ►  feb 2021 (5)
    • ►  gen 2021 (4)
  • ►  2020 (72)
    • ►  dic 2020 (2)
    • ►  nov 2020 (2)
    • ►  ott 2020 (4)
    • ►  set 2020 (8)
    • ►  ago 2020 (4)
    • ►  lug 2020 (7)
    • ►  giu 2020 (8)
    • ►  mag 2020 (5)
    • ►  apr 2020 (12)
    • ►  mar 2020 (7)
    • ►  feb 2020 (7)
    • ►  gen 2020 (6)
  • ►  2019 (68)
    • ►  dic 2019 (6)
    • ►  nov 2019 (8)
    • ►  ott 2019 (9)
    • ►  set 2019 (9)
    • ►  ago 2019 (8)
    • ►  lug 2019 (8)
    • ►  giu 2019 (3)
    • ►  mag 2019 (4)
    • ►  apr 2019 (2)
    • ►  mar 2019 (3)
    • ►  feb 2019 (4)
    • ►  gen 2019 (4)
  • ►  2018 (59)
    • ►  dic 2018 (2)
    • ►  nov 2018 (7)
    • ►  ott 2018 (7)
    • ►  set 2018 (7)
    • ►  ago 2018 (7)
    • ►  lug 2018 (6)
    • ►  giu 2018 (4)
    • ►  mag 2018 (4)
    • ►  apr 2018 (4)
    • ►  mar 2018 (4)
    • ►  feb 2018 (3)
    • ►  gen 2018 (4)
  • ►  2017 (45)
    • ►  nov 2017 (6)
    • ►  ott 2017 (3)
    • ►  set 2017 (5)
    • ►  ago 2017 (3)
    • ►  lug 2017 (3)
    • ►  giu 2017 (3)
    • ►  mag 2017 (3)
    • ►  apr 2017 (5)
    • ►  mar 2017 (3)
    • ►  feb 2017 (6)
    • ►  gen 2017 (5)
  • ►  2016 (32)
    • ►  dic 2016 (1)
    • ►  nov 2016 (6)
    • ►  ott 2016 (3)
    • ►  set 2016 (3)
    • ►  ago 2016 (3)
    • ►  lug 2016 (4)
    • ►  giu 2016 (4)
    • ►  mag 2016 (2)
    • ►  apr 2016 (1)
    • ►  mar 2016 (2)
    • ►  feb 2016 (2)
    • ►  gen 2016 (1)
  • ►  2015 (21)
    • ►  dic 2015 (1)
    • ►  nov 2015 (2)
    • ►  set 2015 (1)
    • ►  ago 2015 (2)
    • ►  lug 2015 (1)
    • ►  mag 2015 (1)
    • ►  apr 2015 (2)
    • ►  mar 2015 (4)
    • ►  feb 2015 (4)
    • ►  gen 2015 (3)
  • ►  2014 (31)
    • ►  dic 2014 (2)
    • ►  nov 2014 (2)
    • ►  ott 2014 (2)
    • ►  set 2014 (4)
    • ►  ago 2014 (1)
    • ►  lug 2014 (3)
    • ►  giu 2014 (3)
    • ►  mag 2014 (3)
    • ►  apr 2014 (2)
    • ►  mar 2014 (3)
    • ►  feb 2014 (3)
    • ►  gen 2014 (3)
  • ►  2013 (33)
    • ►  dic 2013 (4)
    • ►  nov 2013 (5)
    • ►  ott 2013 (4)
    • ►  set 2013 (3)
    • ►  ago 2013 (4)
    • ►  lug 2013 (5)
    • ►  giu 2013 (8)

Search

Labels

  • crackerbox & suzy stamps
  • craftin desert divas
  • create a smile stamps
  • lawnfawn
  • mft stamps
  • rinea foiled paper
  • so suzy stamps
  • someoddgirl
  • whimsy stamps
  • wplus9

Created with by BeautyTemplates