Copyright giadaelesuenuvole.blogspot.it. Powered by Blogger.

giadalesuenuvole

Pagine

  • Chi sono
  • Privacy Policy


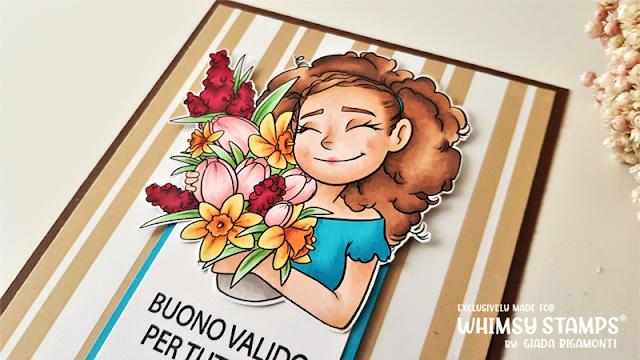
Hello everyone! Today I want to share a Spring card with a beautiful digi stamp available at Whimsy Stamps shop. It's a simple one, very quick to make since the stamp I'm using is so gorgeous and detailed! I printed Bouquet Piper stamp on white cardstock, colored it with Illustrator markers and fussy cut.

Ciao a tutti! Oggi voglio condividere una card primaverile realizzata con il bellissimo digi disponibile su Whimsy Stamps. Si tratta di un biglietto molto semplice e veloce da realizzare, visto che il timbro che sto utilizzando è splendido e dettagliato! Ho stampato il timbro Bouquet Piper su del cartoncino bianco, colorato con i pennarelli Illustrator e ritagliato.


I stamped a sentiment on a strip of white cardstock and framed it with another one, that I colored with the same marker I used for Piper's shirt. Finally I put everything on a digi patterned paper and chose a brown cardstock for my cardbase.

Ho timbrato la scritta su del cartoncino bianco e l'ho incorniciato con un altro, che ho colorato con lo stesso pennarello che ho utilizzato per la maglietta di Piper. Infine ho fissato il tutto su una carta digitale e ho optato per un cartoncino marrone come base.

Share
Tweet
Pin
Share
No commenti

Hello stampers, today is the day: the new release by Impronte d'Autore is now live! This is one of my favorite ever because it's full of playful critters! I decided to stamp, color and put part of them (all that I can, but the Party Time set is very big) on a side step card.

Ciao a tutti! Oggi è il gran giorno: la nuova release di Impronte d'Autore è ora online! Questa è una delle mie preferite di sempre perché ricca di animaletti festosi! Ho deciso di timbrare, colorare e posizionare parte di loro (il set Party Time è davvero grandino e non ci stavano tutti!) su una side step card.

So I colored all of them with the Illustrator markers and used coordinated dies to cut them. I created the cardbase, adding Cracked Pistachio Distress Ink for the sky and Vintage Photo on the hills - which I die cut using the die from the Bordo Alberi Slimline set.

Quindi li ho colorati tutti con i pennarelli Illustrator e ho utilizzato le fustelle coordinate per ritagliarli. Ho creato la base della card, aggiungendo del Distress Ink Cracked Pistachio per il cielo e del Vintage Photo sulle colline - ottenute utilizzando la fustella del set Bordo Alberi Slimline.

Finally I placed the critters here and there, some in the foreground and other in the background. I added a couple of sentiments and some birthday candles. This card is one of my favorite ever, it's so full of joy!

Infine ho scelto dove posizionare e incollare i vari animaletti, alcuni in primo piano e altri in secondo piano. Ho incollato un paio di auguri e qualche candelina qua e là. Questa card è una delle mie preferite di sempre, è così piena di gioia!

Share
Tweet
Pin
Share
No commenti


Hello my friends! Today I'm showing you a card with my very first CCDesign digi stamp, Cinnamon and Bunnies, available at Whimsy Stamps. Easter is near and this image really inspired me! I printed it on white cardstock, colored it with alcohol markers and then added some details with Prismacolor pencils.

Ciao amici! Oggi vorrei mostrarvi una card realizzata con il mio primissimo timbro digitale Cinnamon and Bunnies di CCDesigns, disponibile sul sito di Whimsy Stamps. Pasqua si sta avvicinando e questa immagine mi ha davvero ispirato! L'ho timbrata su del cartoncino bianco, colorata con i pennarelli ad alcol ed ho poi aggiunto qualche dettaglio con le matite colorate Prismacolor.


I finally traced a line for the ground and stamped a sentiment at the bottom of the panel. Next I framed it with a strip of red cardstock and glued everything on a blue panel. This is just so sweet!

Ho tracciato una linea per il terreno e ho timbrato una scritta nella parte bassa del pannello frontale. L'ho mattato con del cartoncino rosso e ho incollato il tutto su un pannello azzurro. La trovo davvero dolce come card!
Share
Tweet
Pin
Share
2 commenti


Hello my friends! Today I'm super happy to share a project I made as DT member of Impronte d'Autore, an italian brand which realizes and sells unique and beautiful stamps and dies (you can find the project I made for the DT call here). These polar bears are a great example of their designs: big, soft and cute! They are part of the Polar Bear stampset, available both in Italian and English.

Ciao a tutti! Oggi sono felicissima di condividere il progetto che ho realizzato come membro del DT di Impronte d'Autore (non vi dico la gioia, potete recuperare il progetto che ho realizzato per la loro call proprio qui). Questi orsi polari sono un esempio perfetto del design di Impronte: grandi, pucciosi e oltremodo dolci! Entrambi fanno parte del set Polar Bear, disponibile sia in italiano che in inglese.


First of all I decided to blend two background panels with a couple of Distress Oxide: for the first one I chose Walnut Stain, Fired Brick and Candied Apple, while for the second one Cracked Pistachio and Evergreen Bough. Then I sprinkled some water droplets.

Prima di tutto ho deciso di sfumare due sfondi per card con alcuni Distress Oxide: per il primo ho utilizzato Walnut Stain, Fired Brick e Candied Apple, mentre per il secondo ho scelto Cracked Pistachio e Evergreen Bough. Poi ci ho spruzzato sopra qualche goccia d'acqua.


Next I die cut another panel multiple time by using the Abeti Cut Me Light die. I decided to not throw away anything, so I kept both the negative and the positive pieces apart.

In seguito ho fustellato un pannello bianco più volte, utilizzando le fustelle Cut Me Light - Abeti. Ho deciso di non buttare via nulla per questo progetto, infatti ho utilizzato sia la parte positiva che negativa delle fustellate.


For the red background I used the negative piece, while I glued the die-cut trees on top of the aqua panel, using some foam tape.

Per lo sfondo rosso ho utilizzato la parte negativa delle fustellate, mentre ho incollato gli alberi fustellati sul pannello azzurro, utilizzato del nastro gommato.


Finally I stamped two polar bears and I colored them with my new Illustrator Markers, using light brown, red and green colors. Then I fussy cut them with the coordinated dies.

Infine ho timbrato due orsi polari e li ho colorati con i miei nuovissimi pennarelli Illustrator, optando per marroni chiari, rossi e verde. Poi ho fustellato i due orsi con le fustelle coordinate.

I put the bear with a cup on top of the red background with some foam tape, adding an embossed sentiment on a piece of black cardstock.

Ho incollato l'orsetto con la tazza sullo sfondo rosso con del nastro gommato, aggiungendo un augurio embossato su del cartoncino nero.

For the aqua panel, I cut the hands of the bear in order to fix the sentiment piece as it was hold by the bear. At the end I added the hat and the scarf in the stampset.  

Per il pannello azzurro, ho inciso le zampetto dell'orso in modo da fissare la scritta come se fosse tenuta in mano proprio da lui. Alla fine ho aggiunto anche un berretto ed una sciarpa.
Share
Tweet
Pin
Share
No commenti


Hi there! I'm back with an Autumn card with neutral colors: it's is my favorite season so I'm trying to put its atmosphere on a card. This time I chose the Hay Scarecrow by Whimsy Stamps and I colored it with alcohol markers. I picked brown, yellow and red colors. Then I fussy cut.

Ciao a tutti! Oggi vi mostro una card autunnale dai colori neutri: si tratta della mia stagione preferita, che ho cercato di riportare in questa card. Ho scelto il digi Hay Scarecrow di Whimsy Stamps e l'ho colorato con i pennarelli ad alcohol. Ho optato per i colori marrone, giallo e rosso. Poi l'ho ritagliato.

Finally I put it on a digi patterned paper with foam tape, framed it and glued everything on a white cardbase. Finally I added a speech bubble for the sentiment. A very simple card full of autumn vibes! 

Infine ho posizionato l'immagine sul della carta patterned digitale, l'ho incorniciata con una fustella e ho incollato il tutto su una base bianca. Infine ho aggiunto una nuvoletta con l'augurio e... questo è tutto! Una card veloce ricca di atmosfera autunnale.
Share
Tweet
Pin
Share
No commenti


Hello everyone! Summer holidays are over, but the benefits are not vanished (yet): I feel relaxed and full of ideas and creativity. This is a magical period, since I'm getting ready for the activities that I will do, but everything is still calm and quiet. So I picked the Pretty Unicorn by Whimsy Stamps and I created a simple but sweet card.

Ciao a tutti! Le vacanze sono finite, ma gli effetti benefici non sono ancora svaniti: mi sento rilassata e piena di idee e creatività. Questo è un periodo magico e me lo sto gustando: mi sto preparando a tutte le attività che arriveranno in autunno, ma per ora tutto è ancora calmo e tranquillo. Per cui ho scelto il timbro digitale Pretty Unicorn di Whimsy Stamps e ho creato una card semplice ma dolce.


First of all I printed my image on regular cardstock, colored it with alcohol markers and fussy cut. I used both rose and aqua shades because they matches a patterned paper that I think work so well with the unicorn. Then I foam mounted the image on top of the patterned paper and 2 strip of white cardstock as well, on which I stamped a sentiment.

Prima di tutto ho stampato l'immagine su del cartoncino bianco, l'ho colorata con pennarelli ad alcol e l'ho ritagliata. Ho usato i colori rosa e acqua insieme perché si sposavano benissimo con una carta patterned che avevo da un po' e che sta benissimo insieme all'unicorno. Poi l'ho incollato con del nastro gommato insieme a 2 strisce di cartoncino bianco, su cui ho timbrato l'augurio.


Finally I added a silver touch on the corn with a gel pen.

Infine ho aggiunto come tocco finale un pizzico di argento sul corno, con delle penna gel bianca.
Share
Tweet
Pin
Share
No commenti
Older Posts

About me

About me
I'm Giada, an italian cardmaker. I love clean and simple cards...and coloring critters! Thank for being here!

Follow Me

  • Facebook
  • Instagram
  • Youtube

Contact me

Nome

Email *

Messaggio *

Blog Archive

  • ▼  2023 (3)
    • ▼  nov 2023 (1)
      • Winter Friends
    • ►  giu 2023 (1)
    • ►  feb 2023 (1)
  • ►  2022 (14)
    • ►  ott 2022 (1)
    • ►  ago 2022 (1)
    • ►  lug 2022 (2)
    • ►  giu 2022 (1)
    • ►  mag 2022 (1)
    • ►  apr 2022 (1)
    • ►  mar 2022 (3)
    • ►  feb 2022 (1)
    • ►  gen 2022 (3)
  • ►  2021 (27)
    • ►  dic 2021 (1)
    • ►  nov 2021 (1)
    • ►  ott 2021 (2)
    • ►  set 2021 (2)
    • ►  ago 2021 (3)
    • ►  lug 2021 (2)
    • ►  giu 2021 (1)
    • ►  mag 2021 (2)
    • ►  apr 2021 (2)
    • ►  mar 2021 (2)
    • ►  feb 2021 (5)
    • ►  gen 2021 (4)
  • ►  2020 (72)
    • ►  dic 2020 (2)
    • ►  nov 2020 (2)
    • ►  ott 2020 (4)
    • ►  set 2020 (8)
    • ►  ago 2020 (4)
    • ►  lug 2020 (7)
    • ►  giu 2020 (8)
    • ►  mag 2020 (5)
    • ►  apr 2020 (12)
    • ►  mar 2020 (7)
    • ►  feb 2020 (7)
    • ►  gen 2020 (6)
  • ►  2019 (68)
    • ►  dic 2019 (6)
    • ►  nov 2019 (8)
    • ►  ott 2019 (9)
    • ►  set 2019 (9)
    • ►  ago 2019 (8)
    • ►  lug 2019 (8)
    • ►  giu 2019 (3)
    • ►  mag 2019 (4)
    • ►  apr 2019 (2)
    • ►  mar 2019 (3)
    • ►  feb 2019 (4)
    • ►  gen 2019 (4)
  • ►  2018 (59)
    • ►  dic 2018 (2)
    • ►  nov 2018 (7)
    • ►  ott 2018 (7)
    • ►  set 2018 (7)
    • ►  ago 2018 (7)
    • ►  lug 2018 (6)
    • ►  giu 2018 (4)
    • ►  mag 2018 (4)
    • ►  apr 2018 (4)
    • ►  mar 2018 (4)
    • ►  feb 2018 (3)
    • ►  gen 2018 (4)
  • ►  2017 (45)
    • ►  nov 2017 (6)
    • ►  ott 2017 (3)
    • ►  set 2017 (5)
    • ►  ago 2017 (3)
    • ►  lug 2017 (3)
    • ►  giu 2017 (3)
    • ►  mag 2017 (3)
    • ►  apr 2017 (5)
    • ►  mar 2017 (3)
    • ►  feb 2017 (6)
    • ►  gen 2017 (5)
  • ►  2016 (32)
    • ►  dic 2016 (1)
    • ►  nov 2016 (6)
    • ►  ott 2016 (3)
    • ►  set 2016 (3)
    • ►  ago 2016 (3)
    • ►  lug 2016 (4)
    • ►  giu 2016 (4)
    • ►  mag 2016 (2)
    • ►  apr 2016 (1)
    • ►  mar 2016 (2)
    • ►  feb 2016 (2)
    • ►  gen 2016 (1)
  • ►  2015 (21)
    • ►  dic 2015 (1)
    • ►  nov 2015 (2)
    • ►  set 2015 (1)
    • ►  ago 2015 (2)
    • ►  lug 2015 (1)
    • ►  mag 2015 (1)
    • ►  apr 2015 (2)
    • ►  mar 2015 (4)
    • ►  feb 2015 (4)
    • ►  gen 2015 (3)
  • ►  2014 (31)
    • ►  dic 2014 (2)
    • ►  nov 2014 (2)
    • ►  ott 2014 (2)
    • ►  set 2014 (4)
    • ►  ago 2014 (1)
    • ►  lug 2014 (3)
    • ►  giu 2014 (3)
    • ►  mag 2014 (3)
    • ►  apr 2014 (2)
    • ►  mar 2014 (3)
    • ►  feb 2014 (3)
    • ►  gen 2014 (3)
  • ►  2013 (33)
    • ►  dic 2013 (4)
    • ►  nov 2013 (5)
    • ►  ott 2013 (4)
    • ►  set 2013 (3)
    • ►  ago 2013 (4)
    • ►  lug 2013 (5)
    • ►  giu 2013 (8)

Search

Labels

  • crackerbox & suzy stamps
  • craftin desert divas
  • create a smile stamps
  • lawnfawn
  • mft stamps
  • rinea foiled paper
  • so suzy stamps
  • someoddgirl
  • whimsy stamps
  • wplus9

Created with by BeautyTemplates