Copyright giadaelesuenuvole.blogspot.it. Powered by Blogger.

giadalesuenuvole

Pagine

  • Chi sono
  • Privacy Policy


Hi there! When I want to clear my mind and keep it focused on something, I usually color or watercolor an image. For watercoloring a stamp I love to use Distress inks, even if it's time consuming for me, and today I picked a couple of fairies by Impronte d'Autore and chose a monochromatic look.

Ciao a tutti! Quando voglio sgombrare la mente e mantenerla focalizzata su qualcosa adoro colorare e acquerellare un'immagine. Per acquerellare un timbro, processo per me molto lungo in termini di tempo, adoro utilizzare i Distress Inks - sono gli unici che mi mettono a mio agio - ed oggi ho scelto un paio di fatine di Impronte d'Autore, scegliendo un look monocromatico.

I stamped two fairies from the Tinker Bell stampset with Vintage Photo Distress ink on a piece of watercolor paper. Next I watercolored them using Vintage Photo, Tea Dye and Tattered Rose Distress Inks. I added a touch of shimmer magic with Gansai Tambi White Gold watercolor on the wings and the headband.

Ho timbrato due fatine del set Tinker Bell con il Distress ink Vintage Photo su della carta acquerellabile. Poi le ho acquerellate utilizzando i Distress ink Vintage Photo, Tea Dye e Tattered Rose. Ho aggiunto un pizzico di magia utilizzando dell'acquerello White Gold Gansai Tambi su ali e cerchietto.

Finally I added few stars here and there with Tattered Rose Distress Oxide and a sentiment at the bottom of the panel, both included in the Tinker Bell set. Then I framed the watercolor piece on a chocolate cardstock and that's all.

Infine ho aggiunto qualche stellina qua e là con del Distress Oxide Tattered Rose, insieme a una scritta nella parte bassa del pannello, entrambi inclusi nel set Tinker Bell. Poi ho montato il tutto su dei cartoncini marroni di base.

When I'm in mood for watercoloring I like to color more then one image, so I stamped another fairy and colored it with the same ink pads I used for the first one. 

Quando mi sento in vena di acquerellare mi piace colorare più di un'immagine, per cui ho timbrato un'altra fatina e l'ho colorata con gli stessi inchiostri che ho utilizzato per la prima.

Since I love Fantasy books, I decided to create a page corner bookmark with the Segnalibro die, using brown and cream colors.

Visto che adoro la letteratura fantasy, ho deciso di realizzare un segnalibro angolare con la fustella Segnalibro, utilizzando colori marroni e crema. 
Share
Tweet
Pin
Share
No commenti


Hello... it's never too early to get ready for Christmas, right? Well, it's so hot outside that I'm dreaming of Christmas time! I decided to create a slimline card with dies by Impronte d'Autore and a beautiful digital stamp by Whimsy Stamps.

Ciao... non è mai troppo presto per cominciare a pensare al Natale, vero? Beh, fuori da così caldo che pensare all'autunno ed al Natale è quasi automatico per me! Ho pensato di realizzare una card slimline con fustelle di Impronte d'Autore e un bellissimo timbro digitale di Whimsy Stamps.


First of all I die cut the base from kraft cardstock and the border from white cardstock, as well as the sentiment and some pines with a bit of snow on top. I added some snow on kraft using a white gel pen.

Prima di tutto ho scelto di utilizzare un cartoncino kraft come base, poi ho fustellato il bordo bianco, insieme alla scritta e agli abeti con la punta innevata. Ho aggiunto anche della neve su kraft grazie ad una penna gel bianca.


Then I printed the Cinnamon and Reindeer digital stamp on white cardstock and colored it with Illustrator markers, looking for colors that matched with the card. I fussy cut and added some details with a gold gel pen. Finally I placed everything on the card base and glued each element with regular and foam adhesives. I just can't wait for Christmas!

Poi ho stampato il timbro Cinnamon and Reindeer su del cartoncino bianco e l'ho colorato con i pennarelli Illustrator, cercando i colori che più i sposavano con gli altri elementi presenti sulla card. Ho ritagliato l'immagine e ho aggiunto alcuni dettagli con la penna gel oro. Infine ho posizionato il tutto sulla base ed ho incollato ogni elemento utilizzando anche il nastro gommato. Non vedo l'ora che arrivi il Natale!

Share
Tweet
Pin
Share
No commenti


Hello my friends! Today I'm showing you a card with my very first CCDesign digi stamp, Cinnamon and Bunnies, available at Whimsy Stamps. Easter is near and this image really inspired me! I printed it on white cardstock, colored it with alcohol markers and then added some details with Prismacolor pencils.

Ciao amici! Oggi vorrei mostrarvi una card realizzata con il mio primissimo timbro digitale Cinnamon and Bunnies di CCDesigns, disponibile sul sito di Whimsy Stamps. Pasqua si sta avvicinando e questa immagine mi ha davvero ispirato! L'ho timbrata su del cartoncino bianco, colorata con i pennarelli ad alcol ed ho poi aggiunto qualche dettaglio con le matite colorate Prismacolor.


I finally traced a line for the ground and stamped a sentiment at the bottom of the panel. Next I framed it with a strip of red cardstock and glued everything on a blue panel. This is just so sweet!

Ho tracciato una linea per il terreno e ho timbrato una scritta nella parte bassa del pannello frontale. L'ho mattato con del cartoncino rosso e ho incollato il tutto su un pannello azzurro. La trovo davvero dolce come card!
Share
Tweet
Pin
Share
2 commenti


Hello my friends! For today's card I used a digital stamp from the previous year, since I loved the mini Valentine release 2021 by Some Odd Girl, sold by Whimsy Stamps - you can see the blog post here. I printed the Valentine Delivery Pup and colored it with warm grey, blue and red markers, then I fussy cut.

Ciao a tutti! Per la card di oggi ho deciso di utilizzare un timbro digitale dell'anno scorso, visto che ho adorato la mini release di Some Odd Girl dedicata a San Valentino e venduta da Whimsy Stamps - il vecchio post lo trovate qui. Ho stampato il timbro Valentine Delivery Pup e l'ho colorato con i pennarelli ad alcol, utilizzando in particolare grigi caldi, rossi e azzurri. Poi l'ho ritagliato.


Because it's a pawstie, I built a customized background with postage stamps and created a little envelope, that can be used for a special message or a gift card too. Finally I added a sentiment, a little heart and some shimmer here and there with a clear Wink of Stella glitter pen. So adorable!

Dato che si tratta di un cucciolo da consegna, ho realizzato uno sfondo personalizzato con dei timbri francobollo e ho realizzato una piccola bustina, che può essere utilizzata per inserire un messaggio speciale o anche per una gift card. Infine ho aggiunto l'augurio, un piccolo cuoricino e un pizzico di glitter grazie alla penna Wink of Stella. Lo trovo davvero adorabile!
Share
Tweet
Pin
Share
1 commenti


Hello my friends! Today I'm super happy to share a project I made as DT member of Impronte d'Autore, an italian brand which realizes and sells unique and beautiful stamps and dies (you can find the project I made for the DT call here). These polar bears are a great example of their designs: big, soft and cute! They are part of the Polar Bear stampset, available both in Italian and English.

Ciao a tutti! Oggi sono felicissima di condividere il progetto che ho realizzato come membro del DT di Impronte d'Autore (non vi dico la gioia, potete recuperare il progetto che ho realizzato per la loro call proprio qui). Questi orsi polari sono un esempio perfetto del design di Impronte: grandi, pucciosi e oltremodo dolci! Entrambi fanno parte del set Polar Bear, disponibile sia in italiano che in inglese.


First of all I decided to blend two background panels with a couple of Distress Oxide: for the first one I chose Walnut Stain, Fired Brick and Candied Apple, while for the second one Cracked Pistachio and Evergreen Bough. Then I sprinkled some water droplets.

Prima di tutto ho deciso di sfumare due sfondi per card con alcuni Distress Oxide: per il primo ho utilizzato Walnut Stain, Fired Brick e Candied Apple, mentre per il secondo ho scelto Cracked Pistachio e Evergreen Bough. Poi ci ho spruzzato sopra qualche goccia d'acqua.


Next I die cut another panel multiple time by using the Abeti Cut Me Light die. I decided to not throw away anything, so I kept both the negative and the positive pieces apart.

In seguito ho fustellato un pannello bianco più volte, utilizzando le fustelle Cut Me Light - Abeti. Ho deciso di non buttare via nulla per questo progetto, infatti ho utilizzato sia la parte positiva che negativa delle fustellate.


For the red background I used the negative piece, while I glued the die-cut trees on top of the aqua panel, using some foam tape.

Per lo sfondo rosso ho utilizzato la parte negativa delle fustellate, mentre ho incollato gli alberi fustellati sul pannello azzurro, utilizzato del nastro gommato.


Finally I stamped two polar bears and I colored them with my new Illustrator Markers, using light brown, red and green colors. Then I fussy cut them with the coordinated dies.

Infine ho timbrato due orsi polari e li ho colorati con i miei nuovissimi pennarelli Illustrator, optando per marroni chiari, rossi e verde. Poi ho fustellato i due orsi con le fustelle coordinate.

I put the bear with a cup on top of the red background with some foam tape, adding an embossed sentiment on a piece of black cardstock.

Ho incollato l'orsetto con la tazza sullo sfondo rosso con del nastro gommato, aggiungendo un augurio embossato su del cartoncino nero.

For the aqua panel, I cut the hands of the bear in order to fix the sentiment piece as it was hold by the bear. At the end I added the hat and the scarf in the stampset.  

Per il pannello azzurro, ho inciso le zampetto dell'orso in modo da fissare la scritta come se fosse tenuta in mano proprio da lui. Alla fine ho aggiunto anche un berretto ed una sciarpa.
Share
Tweet
Pin
Share
No commenti


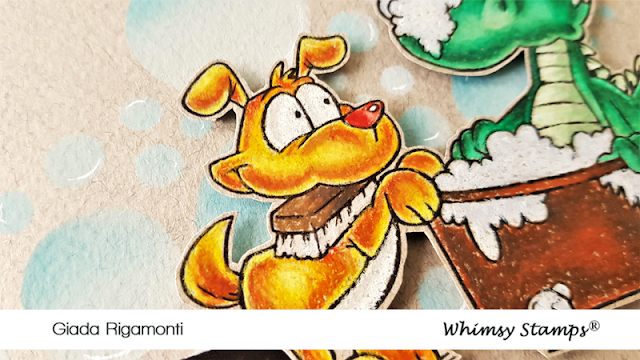
Hello my friends! I'm finally back after a very busy month with a post for the new digi release by Whimsy Stamps. Well, it seems that I can't resist Dudley's faces and, in particular, this grumpy one during the bath time! Plus the dog that it's trying to wash him reminded me of Bravo, the dog of the cartoon "Inspector Gadget" - and so I colored it.

Ciao amici! Sono finalmente tornata su questi schermi dopo un mese impegnativo, con un post dedicato alla nuova release digitale di Whimsy Stamps. Bene, sembra proprio che non possa resistere alle espressioni del draghetto Dudley e, in particolare, a quella scontrosa che sta facendo durante il bagno! In più, il cane che sta cercando di lavarlo mi ricorda molto Bravo, il cagnolino del cartone "L'ispettore Gadget" - e l'ho colorato proprio allo stesso modo.


First of all I printed the stamp on a kraft cardstock and colored the critters with prismacolor pencils. Then I fussy cut the image and added some details with a white gel pen.

Prima di tutto ho stampato l'immagine su del cartoncino kraft e ho colorato gli animaletti con le matite prismacolor. Poi ho ritagliato il tutto e aggiunto i dettagli con la penna gel bianca. 


For the background I blended some circles in various sizes with Broken China and Tumbled Glass Distress Oxides and a bit of white pigment ink, as if they were a bunch of bubbles. I added some highlights with a white gel pen and I put everything on a black panel. 

Per lo sfondo ho sfumato dei cerchi di varie dimensioni con i Distress Oxides Broken China e Tumbled Glass e dell'inchiostro bianco, come se si trattasse di un bel po' di bolle di sapone. Ho aggiunto qualche punto luce con la penna gel bianco e ho fissato il tutto su un pannello nero.
Share
Tweet
Pin
Share
No commenti


Hello crafty friends! Dragons are fascinating creatures, aren't they? The ones by Whimsy Stamps are cute too! Today I'm showing you a romantic card with Dudley and Dahlia: she's swinging on a swing and he is pushing her.

Ciao amici creativi! I draghi sono creature affascinanti, vero? Quelli di Whimsy Stamps sono anche tenerissimi! Oggi vi mostro una card romantica, realizzata con la coppia Dudley e Dahlia: lei è seduta sull'altalena e lui la sta spingendo.


I printed them on white cardstock and colored with alcohol markers, one with with roses and one with blues. Then I fussy cut the full scene leaving a white border all around.

Li ho stampati su del cartoncino bianco e li ho colorati con i pennarelli ad alcol, una con i toni del rosa e l'altro dell'azzurro. Poi ho ritagliato l'intera scena molto minuziosamente, lasciando un bordo bianco tutto intorno.


Next I ink blended the background in order to create a cloudy sky and added an handmade hill for the ground. Finally I glued the dragons at the center of the panel with a bunch of foam tape!

In seguito ho realizzato uno sfondo con dell'inchiostro azzurro per ricreare un cielo nuvoloso, ho aggiunto una collina ed infine ho incollato i dragone al centro della scena, con un bel po' di nastro gommato. 
Share
Tweet
Pin
Share
No commenti


Hi there! I'm back with another card made for Whimsy Stamps. This time I chose Farmer Tobie, a new digi by Some Odd Girl, and I tried to create a soft sky and a realistic grass... I love the final result! First of all I printed it on a piece of white cardstock and colored with alcohol markers, adding some details with prismacolor pencils. In particular both the markers and the pencils worked great for the grass, since I used different shades of them to build the ground.

Ciao a tutti! Sono di nuovo qui con una card realizzata per Whimsy Stamps. Questa volta ho scelto Farmer Tobie, un nuovo digi di Some Odd Girl, e ho provato a ricreare l'effetto del cielo e quello di un prato realistico... e adoro i risultato finale! Prima di tutto ho stampato l'immagine su del cartoncino bianco e l'ho colorata con i pennarelli ad alcohol, aggiungendo dettagli con le matite prismacolor. In particolare sia i pennarelli che le matite hanno avuto un ruolo cruciale per l'erba, avendo utilizzato diverse sfumature di entrambi per costruire il suolo.


It took my a while but the grass has a great depth effect at the end! Then I cut the scene and I decided to blend some Tumbled Glass Distress Oxide at the edges for the sky, avoiding to touch the image. Finally I placed it on top of the Cocoa Stripe digital paper from the Sweetness Digital Pack and I added a sentiment with a strip of kraft cardstock.

Mi ci è voluto un po' per finire il prato, ma alla fine sono riuscita a dargli un bell'effetto di profondità! Poi ho tagliato la scena e ho deciso di sfumare del Distress Oxide Tubled Glass ai bordi, per realizzare il cielo. Infine ho posto il pannello su una base realizzata con la carta digitale Cocoa Stripe del pack Sweetness e ho aggiunto l'augurio con una striscia di cartoncino kraft.
Share
Tweet
Pin
Share
No commenti


Hello stampers! Are you looking for some Easter inspiration? Here I am with a couple of cards made with Lawn Fawn Chirpy Chirp stampset, one of my favorite ever. Well, it's been ages since I used Lawn Fawn supplies and I really miss their cute critters!

Ciao a tutti! Cercate un po' di ispirazione per Pasqua? Ecco un paio di card realizzate con i pulcini del set Chirpy Chirp di Lawn Fawn, uno dei miei preferiti di sempre. Beh, sono passati mesi (se non anni!) da quando ho creato con gli animaletti di Lawn Fawn... quanto mi sono mancati!


For my first card I stamped the critters with soft brown ink (something new for me!), as I was inspired by Mona Toth videos. Then I took a three shades of yellow and orange markers, colored the chicks and fussy cut. I did the same with the eggshells. Next I chose a couple of patterned papers, created a tag and glued everything on a white cardbase, building a nice scene and adding an embossed sentiment.

Per realizzare la prima card di oggi ho timbrato gli animaletti con dell'inchiostro marrone (una novità per me!), poiché sono rimasta incantata dai video e dalla colorazione di Mona Toth. Poi ho scelto tre sfumature di gialli e arancioni, ho colorato i pulcini e li ho ritagliati. Ho fatto lo stessi con i gusci d'uovo. In seguito ho individuato un paio di carte decorative, ho creato una tag e ho incollato il tutto su una base bianca, mettendo insieme una scenetta e aggiungendo la scritta d'auguri.


For my second card I stamped other chicks and eggshells with soft brown ink, colored with alcohol markers and fussy cut. Since I had a bunch of them, I decided to create a crowded scene with a pastel color palette. 

Per la seconda card di oggi ho timbrato altri pulcini e gusci d'uovo con dell'inchiostro marrone, li ho colorati con i pennarelli ad alcohol e li ho ritagliati. Visto che ne avevo un bel po', ho deciso di creare una scenetta affollata con una palette di colori pastello.


I chose a patterned paper with flowers for the front panel, I die cut an oval shape from woodgrain paper and built a chicky scene. In order to fix everything I used both regular and foam tape. I really love how these cards turned out!

Come pannello frontale ho scelto una carta decorativa, ho fustellato un ovale da una carta effetto legno e ho costruito una scena piena di pulcini. Per incollare il tutto ho utilizzato sia nastro normale che gommato. Adoro il risultato finale!
Share
Tweet
Pin
Share
No commenti


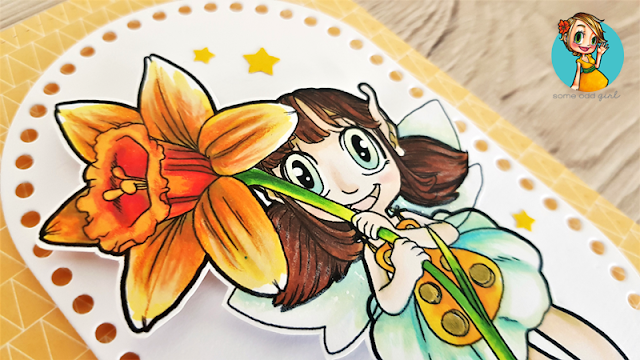
Hello my friends! Fairies, critters and flowers are my favorite subjects, especially for coloring. This Daffodil Fairy is part of the new Digi Release by Some Odd Girl for Whimsy Stamps and I needed to print and color it - the details on the daffodil are amazing. This time I decided to combine alcohol markers with prismacolor pencils to reinforce highlights and shadows.

Ciao a tutti! Fate, animaletti e fiori sono i miei soggetti preferiti, specialmente quando parliamo di colorazione. Questa Daffodil Fairy fa parte della nuova Digi Release di Some Odd Girl per Whimsy Stamps e ho sentito il bisogno di stamparla e colorarla (manco a dirlo, i dettagli del narciso sono stupendi). Questa volta ho deciso di combinare pennarelli ad alcol e matite prismacolor per far risaltare punti luce e ombre.


First of all I printed the image on a regular cardstock, colored it and fussy cut. As I used lots of orange, I picked a patterned paper of the same color for the front panel. Then I die cut an oval shape from white cardstock and glued the fairy on top with some foam tape. Finally I added a sentiment by heat embossing it on a strip of brown cardstock and a bunch of yellow stars too.

Prima di tutto ho stampato l'immagine su del cartoncino bianco, l'ho colorata e ritagliata. Visto che ho utilizzato molto arancione, ho scelto una carta decorativa dello stesso colore del pannello frontale. Poi ho fustellato un ovale da del cartoncino bianco e ho incollato la fatina con del nastro gommato. Infine ho aggiunto la scritta, embossandola su una striscia di cartoncino marrone, e un po' di stelline gialle.
Share
Tweet
Pin
Share
No commenti


Hello friends! I made a card with this digi yet, but since it's so cute I decided to create another project with it. The image is designed by Some Odd Girl for Whimsy Stamps and it's called Valentine Delivery Pup. I combined it with a couple of stampsets by Create a Smile Stamps, using a map of the world in particular: I have friends and pieces of heart all around the world, so I thought to put the pawstie on a globe with lots of letters on the background. 

Ciao a tutti! Ho già realizzato una card con questo digi, ma visto che è troppo carino ho deciso di crearne un'altra. L'immagine è stata disegnata da Some Odd Girl per Whimsy Stamps ed è chiamata Valentine Delivery Pup. Ho deciso di abbinarlo a un paio di set di Create a Smile Stamps, utilizzando un mappamondo: ho amici e affetti sparsi in giro per il mondo, per cui ho pensato di posizionare il postino su un globo con un sacco di lettere sullo sfondo. 

First of all I printed the digi on white cardstock, colored it with alcohol markers and fussy cut. I stamped the globe and the sentiment on top of a white cardstock too and colored them as well. I used a long piece of kraft cardstock and customized it with tone-on-tone letters and packages.

Prima di tutto ho stampato il digi su del cartoncino bianco, l'ho colorato con i pennarelli ad alcohol e ritagliato. Ho timbrato il mappamondo e l'augurio su del cartoncino bianco, colorando e ritagliando anche loro. Ho utilizzato un lungo pezzo di cartoncino kraft e l'ho personalizzato con lettere e pacchetti tono su tono.


Finally I added some shimmer with Clear Wink of Stella on top of the hearts.

Infine ho aggiunto del luccichio con del wink of stella trasparente al di sopra dei cuoricini.
Share
Tweet
Pin
Share
No commenti


Hi all! One month left to Valentine's Day, I don't know how it will be but I need positive vibes. Luckily the January release of Whimsy Stamps is full of new adorable critters designed by Some Odd Girl, such as the super-cute Balloon Bunny digi stamp.

Ciao a tutti! Manca un mese a San Valentino, non so cosa ci aspetta ma c'è bisogno di vibrazioni positive. Per fortuna la release di gennaio di Whimsy Stamps è ricca di adorabili animaletti disegnati da Some Odd Girl, così come il tenerissimo digital Balloon Bunny.


I printed the bunny on regular white cardstock, then I colored it with alcohol markers and fussy cut. I decided to color the balloon in red and added white touches with a gel pen.

Ho stampato il coniglietto su del cartoncino bianco, poi l'ho colorato con i pennarelli ad alcohol e ritagliato. Ho deciso di colorare i palloncini con il rosso e ho aggiunto dei dettagli con la penna gel bianca.


I combined it with a patterned paper full of golden details that I used for the background of my card. 

Ho combinato il coniglietto con una carta decorativa ricca di dettagli dorati, che ho utilizzato come sfondo per la mia card.


I heat embossed a big sentiment with golden powder and fussy cut it. I used foam tape for the sentiment as well as for the bunny. I think that this card is so elegant and romantic!

Ho embossato la grande scritta con della polvere dorata, poi l'ho ritagliata. Ho utilizzato del nastro gommato per la scritta, così come per il coniglietto. Penso che questa sia proprio una card elegante e romantica!

Share
Tweet
Pin
Share
No commenti


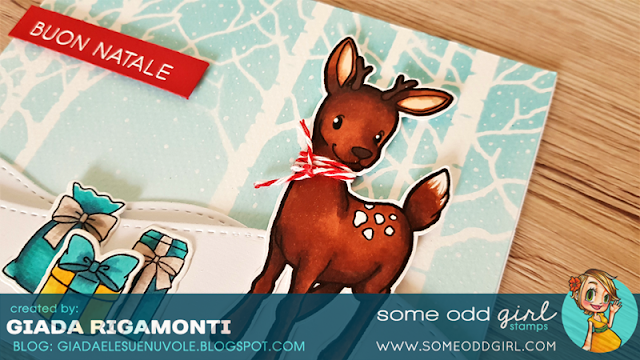
Hello stampers! It's December and I'm finally back on my blog. I joined the 11 Coloring Challenge on Instagram and worked to some new Holiday cards, that I hope I'm going to share here soon. Today I'm showing a couple of them, made with one of my favorite subject for Christmas: the deer. I used this sweet one by Some Odd Girl and Whimsy Stamps, dressed it with a scarf made of twine and put it on a snowy landscape.

Ciao a tutti! E' finalmente dicembre ed eccomi tornata sul blog. Nel frattempo ho partecipato alla 11 Coloring Challenge su Instagram e ho lavorato ad alcune nuove card natalizie, che spero di condividere presto anche qui. Oggi vi mostro un paio di queste card, realizzate con uno dei miei soggetti preferiti: la renna. Ho utilizzato questa dolce renna di Some Odd Girl e Whimsy Stamps, l'ho vestita con una sciarpa fatta di twine e l'ho posizionata su del paesaggio nevoso.


I made two different versions of the same card, using the same subject but changing colors and little details like the presents and che die cut for the ground.

Ho realizzato due versioni diverse della stessa card, utilizzando lo stesso soggetto ma cambiando colori e piccoli dettagli (come i regalini e i bordi fustellati).


I printed the deers multiple times on white cardstock, colored with alcohol markers and fussy cut. I added a scarf to them made with a red or blue twine, as well as some white details with a gel pen. I stamped some presents, colored and die cut them as well.

Ho stampato le renne più volte su del cartoncino bianco, colorato con pennarelli ad alcohol e ritagliati. Ho aggiunto la sciarpa realizzata con del twine rosso o azzurro, così come dei dettagli con la penna gel bianca. Ho timbrato i regali, li ho colorati e fustellati.


For the background I combined stencils with Distress Inks and white border die cuts. I kept everything clean, simple and soft, so that the deer could be the focus with the heat embossed sentiments.

Per lo sfondo ho abbinato stencils con Distress Inks e terreni bianchi fustellati. Ho mantenuto tutto molto semplice, pulito ed etereo, così che la renna possa rimanere il focus della card, insieme agli auguri embossati.

Share
Tweet
Pin
Share
No commenti


Boo stampers! Here I am with another Halloween card made with one of the super-cute ghost stamps designed by Some Odd Girl and available at Whimsy Stamps shop. I created a spooky scene with ink and stencil. This time I chose the mummy ghost, that I printed on white cardstock and colored.

Boo a tutti! Eccomi con un'altra card di Halloween, realizzata con uno dei fantasmini super-carini disegnati da Some Odd Girl e disponibili sullo shop di Whimsy Stamps. Ho creato una scena spaventosa con inchiostro e stencil. Questa volta ho scelto un fantasma vestito da mummia, che ho stampato su del cartoncino bianco e colorato.


I picked few markers, that I used especially for the bandages - I really want to use different colors to make everything pop. Then I fussy cut it.

Ho scelto pochissimi pennarelli, che ho utilizzato in particolare per il bendaggio - ho voluto utilizzare colori diversi per far risaltare le diverse parti. Poi ho ritagliato il fantasmino.


For the background, I blended some white pigment ink on a blakc cardstock, using a stencil with a forest design. Finally I added some white highlights with a gel pen and the sentiment on top of a strip of white paper.

Per lo sfondo, ho sfumato dell'inchiostro bianco su del cartoncino nero, utilizzando uno stencil per realizzare una foresta. Infine ho aggiunto qualche punto luce con della penna bianca e l'augurio su del cartoncino bianco.
Share
Tweet
Pin
Share
No commenti


Hello stampers! This is a bittersweet post, since it's my last one as DT member of Crackerbox & Suzy Stamps - my very first DT experience. I've been part of this family since June 2016: it was an hard choice, but moving, furnishing my new home and working full-time are activities that are getting me too busy. I created this card in the evening, using some new pieces together with some leftovers.

Ciao a tutti! Questo è un post dolce-amaro, dato che si tratta dell'ultimo che scrivo come membro del DT di Crackerbox & Suzy Stamps - che costituisce la mia primissima esperienza come DT. Ho fatto parte di questa famiglia da giugno 2016: si è trattato di una scelta difficile, ma trasloco, arredamento e lavorare full-time sono attività che mi tengono occupata... fin troppo. Ho realizzato questa card di sera, utilizzando elementi nuovi ed avanzi di lavori passati.


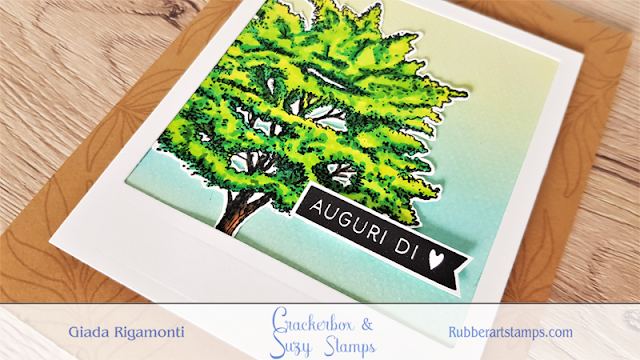
First of all, I stamped the Big Tree 1 on a piece of white cardstock with Tuxedo Memento Black ink and colored it with alcohol markers. Then I fussy cut.

Prima di tutto, ho timbrato l'immagine Big Tree 1 su del cartoncino bianco con dell'inchiostro Memento Tuxedo nero, poi l'ho colorato con dei pennarelli ad alcohol e ritagliato.


I blended a couple of Distress Oxide inks (Shabby Shutters and Broken China) on a piece of watercolor paper and put both the tree and the blended piece under a polaroid die cut.

Ho sfumato un paio di Distress Oxide (Shabby Shutters e Broken China) su della carta acquerellabile, posizionando sia l'albero che il foglio distressato sotto ad una polaroid fustellata.


I used a kraft panel as my cardbase, that I customized with some tone-on-tone leaves. I glued everything together with foam tape, adding a sentiment on top of the tree. This could be a very unique masculine card too!

Ho utilizzato un pannello kraft come base, che ho personalizzato con delle foglie tono-su-tono. Ho incollato il tutto con del nastro gommato, aggiungendo un augurio sopra l'albero. Questa potrebbe essere una card maschile originale!

Supplies used:

Big Tree 1


Share
Tweet
Pin
Share
No commenti
Older Posts

About me

About me
I'm Giada, an italian cardmaker. I love clean and simple cards...and coloring critters! Thank for being here!

Follow Me

  • Facebook
  • Instagram
  • Youtube

Contact me

Nome

Email *

Messaggio *

Blog Archive

  • ▼  2023 (3)
    • ▼  nov 2023 (1)
      • Winter Friends
    • ►  giu 2023 (1)
    • ►  feb 2023 (1)
  • ►  2022 (14)
    • ►  ott 2022 (1)
    • ►  ago 2022 (1)
    • ►  lug 2022 (2)
    • ►  giu 2022 (1)
    • ►  mag 2022 (1)
    • ►  apr 2022 (1)
    • ►  mar 2022 (3)
    • ►  feb 2022 (1)
    • ►  gen 2022 (3)
  • ►  2021 (27)
    • ►  dic 2021 (1)
    • ►  nov 2021 (1)
    • ►  ott 2021 (2)
    • ►  set 2021 (2)
    • ►  ago 2021 (3)
    • ►  lug 2021 (2)
    • ►  giu 2021 (1)
    • ►  mag 2021 (2)
    • ►  apr 2021 (2)
    • ►  mar 2021 (2)
    • ►  feb 2021 (5)
    • ►  gen 2021 (4)
  • ►  2020 (72)
    • ►  dic 2020 (2)
    • ►  nov 2020 (2)
    • ►  ott 2020 (4)
    • ►  set 2020 (8)
    • ►  ago 2020 (4)
    • ►  lug 2020 (7)
    • ►  giu 2020 (8)
    • ►  mag 2020 (5)
    • ►  apr 2020 (12)
    • ►  mar 2020 (7)
    • ►  feb 2020 (7)
    • ►  gen 2020 (6)
  • ►  2019 (68)
    • ►  dic 2019 (6)
    • ►  nov 2019 (8)
    • ►  ott 2019 (9)
    • ►  set 2019 (9)
    • ►  ago 2019 (8)
    • ►  lug 2019 (8)
    • ►  giu 2019 (3)
    • ►  mag 2019 (4)
    • ►  apr 2019 (2)
    • ►  mar 2019 (3)
    • ►  feb 2019 (4)
    • ►  gen 2019 (4)
  • ►  2018 (59)
    • ►  dic 2018 (2)
    • ►  nov 2018 (7)
    • ►  ott 2018 (7)
    • ►  set 2018 (7)
    • ►  ago 2018 (7)
    • ►  lug 2018 (6)
    • ►  giu 2018 (4)
    • ►  mag 2018 (4)
    • ►  apr 2018 (4)
    • ►  mar 2018 (4)
    • ►  feb 2018 (3)
    • ►  gen 2018 (4)
  • ►  2017 (45)
    • ►  nov 2017 (6)
    • ►  ott 2017 (3)
    • ►  set 2017 (5)
    • ►  ago 2017 (3)
    • ►  lug 2017 (3)
    • ►  giu 2017 (3)
    • ►  mag 2017 (3)
    • ►  apr 2017 (5)
    • ►  mar 2017 (3)
    • ►  feb 2017 (6)
    • ►  gen 2017 (5)
  • ►  2016 (32)
    • ►  dic 2016 (1)
    • ►  nov 2016 (6)
    • ►  ott 2016 (3)
    • ►  set 2016 (3)
    • ►  ago 2016 (3)
    • ►  lug 2016 (4)
    • ►  giu 2016 (4)
    • ►  mag 2016 (2)
    • ►  apr 2016 (1)
    • ►  mar 2016 (2)
    • ►  feb 2016 (2)
    • ►  gen 2016 (1)
  • ►  2015 (21)
    • ►  dic 2015 (1)
    • ►  nov 2015 (2)
    • ►  set 2015 (1)
    • ►  ago 2015 (2)
    • ►  lug 2015 (1)
    • ►  mag 2015 (1)
    • ►  apr 2015 (2)
    • ►  mar 2015 (4)
    • ►  feb 2015 (4)
    • ►  gen 2015 (3)
  • ►  2014 (31)
    • ►  dic 2014 (2)
    • ►  nov 2014 (2)
    • ►  ott 2014 (2)
    • ►  set 2014 (4)
    • ►  ago 2014 (1)
    • ►  lug 2014 (3)
    • ►  giu 2014 (3)
    • ►  mag 2014 (3)
    • ►  apr 2014 (2)
    • ►  mar 2014 (3)
    • ►  feb 2014 (3)
    • ►  gen 2014 (3)
  • ►  2013 (33)
    • ►  dic 2013 (4)
    • ►  nov 2013 (5)
    • ►  ott 2013 (4)
    • ►  set 2013 (3)
    • ►  ago 2013 (4)
    • ►  lug 2013 (5)
    • ►  giu 2013 (8)

Search

Labels

  • crackerbox & suzy stamps
  • craftin desert divas
  • create a smile stamps
  • lawnfawn
  • mft stamps
  • rinea foiled paper
  • so suzy stamps
  • someoddgirl
  • whimsy stamps
  • wplus9

Created with by BeautyTemplates