Copyright giadaelesuenuvole.blogspot.it. Powered by Blogger.

giadalesuenuvole

Pagine

  • Chi sono
  • Privacy Policy


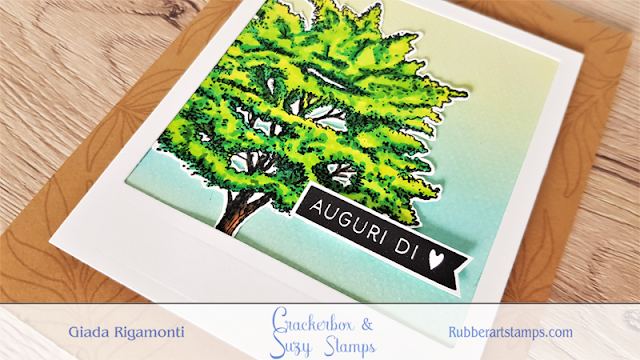
Hello stampers! This is a bittersweet post, since it's my last one as DT member of Crackerbox & Suzy Stamps - my very first DT experience. I've been part of this family since June 2016: it was an hard choice, but moving, furnishing my new home and working full-time are activities that are getting me too busy. I created this card in the evening, using some new pieces together with some leftovers.

Ciao a tutti! Questo è un post dolce-amaro, dato che si tratta dell'ultimo che scrivo come membro del DT di Crackerbox & Suzy Stamps - che costituisce la mia primissima esperienza come DT. Ho fatto parte di questa famiglia da giugno 2016: si è trattato di una scelta difficile, ma trasloco, arredamento e lavorare full-time sono attività che mi tengono occupata... fin troppo. Ho realizzato questa card di sera, utilizzando elementi nuovi ed avanzi di lavori passati.


First of all, I stamped the Big Tree 1 on a piece of white cardstock with Tuxedo Memento Black ink and colored it with alcohol markers. Then I fussy cut.

Prima di tutto, ho timbrato l'immagine Big Tree 1 su del cartoncino bianco con dell'inchiostro Memento Tuxedo nero, poi l'ho colorato con dei pennarelli ad alcohol e ritagliato.


I blended a couple of Distress Oxide inks (Shabby Shutters and Broken China) on a piece of watercolor paper and put both the tree and the blended piece under a polaroid die cut.

Ho sfumato un paio di Distress Oxide (Shabby Shutters e Broken China) su della carta acquerellabile, posizionando sia l'albero che il foglio distressato sotto ad una polaroid fustellata.


I used a kraft panel as my cardbase, that I customized with some tone-on-tone leaves. I glued everything together with foam tape, adding a sentiment on top of the tree. This could be a very unique masculine card too!

Ho utilizzato un pannello kraft come base, che ho personalizzato con delle foglie tono-su-tono. Ho incollato il tutto con del nastro gommato, aggiungendo un augurio sopra l'albero. Questa potrebbe essere una card maschile originale!

Supplies used:

Big Tree 1


Share
Tweet
Pin
Share
No commenti

Hello stampers! The Christmas countdown seems to be started, so I decided to create an Holiday card with a traditional look (and a vintage touch too). I chose the beautiful image Santa with Toys by Crackerbox & Suzy Stamps and I heat embossed it in gold on red cardstock, avoding any coloring process.

Ciao a tutti! Sembra proprio che il countdown per il Natale sia cominciato, per cui ho deciso di creare una card a tema, dall'effetto tradizionale (e anche con un tocco vintage). Ho scelto la bellissima immagine Santa with Toys di Crackerbox & Suzy Stamps e l'ho embossata con dell'oro su un cartoncino rosso, evitando qualsiasi tipo di colorazione.


First of all, I stamped this image at the center of a red panel with Versamark ink, then covered it with gold powder and heat set.

Prima di tutto, ho timbrato questa immagine al centro di un pannello rosso con dell'inchiostro Versamark, poi l'ho coperta con della polvere oro e l'ho embossata.


Next I ink blended the edges of the panel with Vintage Photo and Black Soot Distress inks, in order to leave an halo at the center.

In seguito ho sfumato i bordi del pannello con i Distress Inks Vintage Photo e Black Soot, al fine di lasciare un alone chiaro al centro.


Finally I heat embossed a sentiment on a strip of black cardstock with the same embossing powder.

Infine ho embossato l'augurio su una striscia di cartoncino nero con la stessa polvere da embossing che avevo già utilizzato.


I decided to add some golden splashes all around the image, so I covered it with a piece of paper and sprikled some golden watercolor everywhere. I love how elegant the card looks!

Ho deciso di aggiungere un po' di gocce dorate tutto attorno all'immagine, per cui l'ho coperta con un pezzetto di carta e ho spruzzato dell'acquerello dorato ovunque. Adoro quanto questa card risulta elegante!

Supplies used:

Santa with Toys

Share
Tweet
Pin
Share
No commenti

Hello stampers! I'm a busy bee in this period, but night coloring is relaxing for me...so yesterday evening I decided to fullfill a whole background with the Line Flower by Crackerbox & Suzy Stamps. I created a similar background years ago, in red instead of blue.

Ciao a tutti! Sono abbastanza indaffarata in questo periodo, ma di sera adoro colorare: è così rilassante. Per questo ieri sera ho deciso di riempire un intero sfondo con il timbro Line Flower di Crackerbox & Suzy Stamps. Ho creato uno sfondo simile anni fa, ma utilizzando il rosso invece del blu.


First of all I stamped the Line Flower on a whole panel of white cardstock with Memento Tuxedo Black ink. I let it dry, then I colored every flower with blue shades of alcohol markers.

Prima di tutto ho timbrato l'immagine Line Flower un pannello bianco con dell'inchiostro Memento Tuxedo Black. L'ho lasciato asciugare, poi ho colorato ogni singolo fiore con tinte blu di pennarelli ad alcohol.


I used two markers for each petal and the black for the center of the flowers.

Ho utilizzato due pennarelli per ciascun petalo e il nero per la parte centrale dei fiori.


Finally I stamped the sentiment with Versamark ink on top of a strip of black cardstock. I covered it with white powder and heat embossed. I put it at the center of the panel, that I framed with black cardstock.

Infine ho timbrato la scritta con dell'inchiostro Versamark sopra del cartoncino nero. L'ho ricoperta con la polvere bianca e l'ho embossato. Ho posizionato la scritta al centro del pannello, che ho incorniciato con del cartoncino nero.

Finally I changed my mind and I used some embellishments at the center of the flowers. The blue shades are so elegant!

Infine ho cambiato idea e ho utilizzato delle mezze perle al centro dei fiori. Le sfumature blu sono così eleganti!

Supplies used:

Line Flower

Happy Birthday Muggle

Share
Tweet
Pin
Share
No commenti


Hello stampers! Since I saw lots of Halloween inspirations on internet, today I created a Fall card with a little bit of magic in it. I used the Pumpkin Plump by Crackerbox & Suzy Stamps as the focal point of my card and customized one of them with the Harry Potter Glasses and a Broom.

Ciao a tutti! Avendo visto moltissime ispirazioni per Halloween su internet, oggi ho pensato di creare un biglietto autunnale con un tocco di magia. Ho utilizzato il timbro Pumpkin Plump di Crackerbox & Suzy Stamps come punto focale della mia card e una l'ho personalizzata con gli occhiali di Harry Potter e una scopa.


First of all I stamped a pumpkin on white cardstock and colored it with my alcohol markers.

Prima di tutto ho timbrato una zucca su del cartoncino bianco e l'ho colorata con i pennarelli ad alcohol.


Next I added a pair of glasses on top of the pumpkin and stamped a bunch of them on another white panel. I used a piece of masking paper to cover the pumpkins in order to arrange them on a pile. Then I colored everything with the same markers.

In seguito ho aggiunto un paio di occhiali alla zucca e ne ho timbrate altre su un altro cartoncino bianco. Ho utilizzato della carta masking per coprire le zucche allo scopo di posizionarle su una pila. Poi ho colorato il tutto con gli stessi pennarelli.


I decided to create a ground around the pumpkins with a bunch of brown markers and lots of dots.

Ho deciso di realizzare un terreno intorno alle zucche con un bel po' di pennarelli marroni e un sacco di puntini.


Finally I fussy cut the magical pumpkin and a broom, then I heat embossed the sentiment in white on black cardstock.

Infine ho ritagliato la zucca magica e una scopa, poi ho embossato la scritta su del cartoncino nero con della polvere bianca.


I glued the magical pumpkin on top of the broom with foam tape, fixed the sentiment on the panel and framed everything on a black cardbase.

Ho incollato la zucca magica al di sopra della scopa con del nastro gommato, fissato l'augurio sul pannello e incorniciato tutto su una base nera.


As my final touch, I decided to add a layer of clear glossy accent on top of the glasses.

Come tocco finale, ho deciso di aggiungere uno strato di glossy accent trasparente sopra le lenti degli occhiali.


Supplies used:

Pumpkin Plump
Glasses & Lightening Bolt Set of 3

Witch's Broom
Share
Tweet
Pin
Share
No commenti


Hello stampers! After moving and having some rest, I'm back with cardmaking! This colorful card was made with stamps from the "Remember the 60's" new release by Crackerbox & Suzy Stamps.

Ciao a tutti! Dopo aver traslocato ed essermi rilassata, sono tornata al cardmaking! Questo biglietto colorato è stato realizzato con timbri della nuova release "Remember the 60's" di Crackerbox & Suzy Stamps.

First of all, I stamped all the images of the 5 Petal Flowers (set of 3) on a white card base.

Prima di tutto, ho timbrato tutte le immagini del set "5 Petal Flowers" su una base bianca.

Then I colored every single flower with grey and yellow alcohol markers.

In seguito ho colorato i singoli fiori con pennarelli ad alcohol grigi e gialli.

Finally I decided to cover all the white spots on the background with a pink marker, tracing some dots made with a white gel pen. I stamped the Good Vibrations sentiment and framed it with a black cardstock.

Infine ho deciso di ricoprire tutto lo sfondo con un pennarello rosa, tracciando anche qualche puntino bianco realizzato con una penna gel. Ho timbrato la scritta Good Vibrations e l'ho contornata con del cartoncino nero.

I glued the whole panel on a piece of black cardstock and added some shadows around the petals of the flowers with grey markers. The bright pink was so loved in 60's!

Ho incollato l'intero pannello su del cartoncino nero e ho aggiunto un po' di ombre intorno ai petali dei fiori con dei pennarelli neri. Il rosa acceso era così amato negli anni '60!

Supplies used:

5 Petal Flower - Set of 3
Good Vibrations
Share
Tweet
Pin
Share
No commenti


Hello stampers! Today I wanted to recreate the same card I did some weeks ago, using the Peony Lg. stamp by Crackerbox & Suzy Stamps to build my own background. This time I used a kraft cardstock as my cardbase and I colored the flowers with the blending free coloring, a technique shared recently by Yana Smakula.

Ciao a tutti! Oggi voglio ricreare la stessa card che ho creato qualche settimana fa, utilizzando il timbro Peony Lg. di Crackerbox & Suzy Stamps per realizzare lo sfondo di una card. Questa volta ho utilizzato del cartoncino kraft come base e ho colorato i fiori con la tecnica "blending free", recentemente condivisa da Yana Smakula.


I stamped lots of peonies in black on kraft cardstock using masking paper.

Ho timbrato tantissime peonie con dell'inchiostro nero su cartoncino kraft, aiutandomi con della carta per masking.


Then I followed the technique explained by Yana and colored flowers and leaves with one marker only (the lightest one).

Poi ho seguito la tecnica spiegata da Yana e ho colorato fiori e foglie con soltanto un pennarello (il più chiaro).


I kept on coloring without blending anything, but selecting different areas for different colors of markers (3 shades for the flowers and 3 for the leaves too).

Ho continuato a colorare senza sfumare nulla, ma selezionando diverse aree per utilizzare colori diversi (3 sfumature per i fiori e 3 anche per le foglie).


Finally I colored every little space left on the background with cold grey and added white dots with a gel pen.

Infine ho colorato ogni singolo spazio lasciato vuoto con del grigio scuro e ho aggiunto puntini bianchi qua e là con una penna gel.


The only thing left was stamping the Happy Birthday sentiment and fussy cut. I didn't want to cover this beautiful background too much! Finally I put the whole panel on a white cardbase.

L'unica cosa che mancava da fare è stato timbrare la scritta Happy Birthday e ritagliarla. Non ho voluto coprire troppo questo bellissimo sfondo! Infine ho messo l'intero pannello su una base bianca e ho concluso così la card.


Supplies used:


Peony Lg.
Birthday 1

Share
Tweet
Pin
Share
No commenti
Older Posts

About me

About me
I'm Giada, an italian cardmaker. I love clean and simple cards...and coloring critters! Thank for being here!

Follow Me

  • Facebook
  • Instagram
  • Youtube

Contact me

Nome

Email *

Messaggio *

Blog Archive

  • ▼  2023 (3)
    • ▼  nov 2023 (1)
      • Winter Friends
    • ►  giu 2023 (1)
    • ►  feb 2023 (1)
  • ►  2022 (14)
    • ►  ott 2022 (1)
    • ►  ago 2022 (1)
    • ►  lug 2022 (2)
    • ►  giu 2022 (1)
    • ►  mag 2022 (1)
    • ►  apr 2022 (1)
    • ►  mar 2022 (3)
    • ►  feb 2022 (1)
    • ►  gen 2022 (3)
  • ►  2021 (27)
    • ►  dic 2021 (1)
    • ►  nov 2021 (1)
    • ►  ott 2021 (2)
    • ►  set 2021 (2)
    • ►  ago 2021 (3)
    • ►  lug 2021 (2)
    • ►  giu 2021 (1)
    • ►  mag 2021 (2)
    • ►  apr 2021 (2)
    • ►  mar 2021 (2)
    • ►  feb 2021 (5)
    • ►  gen 2021 (4)
  • ►  2020 (72)
    • ►  dic 2020 (2)
    • ►  nov 2020 (2)
    • ►  ott 2020 (4)
    • ►  set 2020 (8)
    • ►  ago 2020 (4)
    • ►  lug 2020 (7)
    • ►  giu 2020 (8)
    • ►  mag 2020 (5)
    • ►  apr 2020 (12)
    • ►  mar 2020 (7)
    • ►  feb 2020 (7)
    • ►  gen 2020 (6)
  • ►  2019 (68)
    • ►  dic 2019 (6)
    • ►  nov 2019 (8)
    • ►  ott 2019 (9)
    • ►  set 2019 (9)
    • ►  ago 2019 (8)
    • ►  lug 2019 (8)
    • ►  giu 2019 (3)
    • ►  mag 2019 (4)
    • ►  apr 2019 (2)
    • ►  mar 2019 (3)
    • ►  feb 2019 (4)
    • ►  gen 2019 (4)
  • ►  2018 (59)
    • ►  dic 2018 (2)
    • ►  nov 2018 (7)
    • ►  ott 2018 (7)
    • ►  set 2018 (7)
    • ►  ago 2018 (7)
    • ►  lug 2018 (6)
    • ►  giu 2018 (4)
    • ►  mag 2018 (4)
    • ►  apr 2018 (4)
    • ►  mar 2018 (4)
    • ►  feb 2018 (3)
    • ►  gen 2018 (4)
  • ►  2017 (45)
    • ►  nov 2017 (6)
    • ►  ott 2017 (3)
    • ►  set 2017 (5)
    • ►  ago 2017 (3)
    • ►  lug 2017 (3)
    • ►  giu 2017 (3)
    • ►  mag 2017 (3)
    • ►  apr 2017 (5)
    • ►  mar 2017 (3)
    • ►  feb 2017 (6)
    • ►  gen 2017 (5)
  • ►  2016 (32)
    • ►  dic 2016 (1)
    • ►  nov 2016 (6)
    • ►  ott 2016 (3)
    • ►  set 2016 (3)
    • ►  ago 2016 (3)
    • ►  lug 2016 (4)
    • ►  giu 2016 (4)
    • ►  mag 2016 (2)
    • ►  apr 2016 (1)
    • ►  mar 2016 (2)
    • ►  feb 2016 (2)
    • ►  gen 2016 (1)
  • ►  2015 (21)
    • ►  dic 2015 (1)
    • ►  nov 2015 (2)
    • ►  set 2015 (1)
    • ►  ago 2015 (2)
    • ►  lug 2015 (1)
    • ►  mag 2015 (1)
    • ►  apr 2015 (2)
    • ►  mar 2015 (4)
    • ►  feb 2015 (4)
    • ►  gen 2015 (3)
  • ►  2014 (31)
    • ►  dic 2014 (2)
    • ►  nov 2014 (2)
    • ►  ott 2014 (2)
    • ►  set 2014 (4)
    • ►  ago 2014 (1)
    • ►  lug 2014 (3)
    • ►  giu 2014 (3)
    • ►  mag 2014 (3)
    • ►  apr 2014 (2)
    • ►  mar 2014 (3)
    • ►  feb 2014 (3)
    • ►  gen 2014 (3)
  • ►  2013 (33)
    • ►  dic 2013 (4)
    • ►  nov 2013 (5)
    • ►  ott 2013 (4)
    • ►  set 2013 (3)
    • ►  ago 2013 (4)
    • ►  lug 2013 (5)
    • ►  giu 2013 (8)

Search

Labels

  • crackerbox & suzy stamps
  • craftin desert divas
  • create a smile stamps
  • lawnfawn
  • mft stamps
  • rinea foiled paper
  • so suzy stamps
  • someoddgirl
  • whimsy stamps
  • wplus9

Created with by BeautyTemplates