Copyright giadaelesuenuvole.blogspot.it. Powered by Blogger.

giadalesuenuvole

Pagine

  • Chi sono
  • Privacy Policy


Hello my friends, today I have exciting news! I was asked to enter the Digital Team of Whimsy Stamps and I said "yes"! So I'll keep on creating with Some Odd Girl digis and using more images designed by different designers. Today I'm sharing my very first card for which I chose Rainy Day Dudley, the super-cute dragon. I decided to print Dudley on top of kraft cardstock, in order to color it with Prismacolor pencils.

Ciao amici, oggi ho un annuncio importante! Dopo la collaborazione con Whimsy Stamps mi è stato chiesto di entrare a far parte del Team Digital... ed ho risposto "sì"! In questo modo potrò continuare a creare con i digi di Some Odd Girl e utilizzare più immagini, realizzate da diversi designer. Oggi vi mostro la mia primissima card, per la quale ho scelto di utilizzare Rainy Day Dudley, il draghetto super-carino. Ho deciso di stamparlo su del cartoncino kraft, così da poterlo colorare con le matite Prismacolor.

Since I really wanted to make it pop against the background, I used blue and orange colors, with a touch of white for the highlights. For the rain I combined dash lines made with a white gel pen as well as a white pencil. Finally I built the ground with green pencils and added a sentiment with strips of paper.

Visto che volevo far risaltare il draghetto rispetto allo sfondo, ho utilizzato matite blu ed arancioni, con un tocco di bianco per enfatizzare i punti luce. Per la pioggia ho utilizzato un tratteggio, realizzato con penna gel bianca e matita bianca. Infine ho costruito il prato con le matite verdi e ho aggiunto l'augurio, suddiviso su più strisce di carta.
Share
Tweet
Pin
Share
No commenti


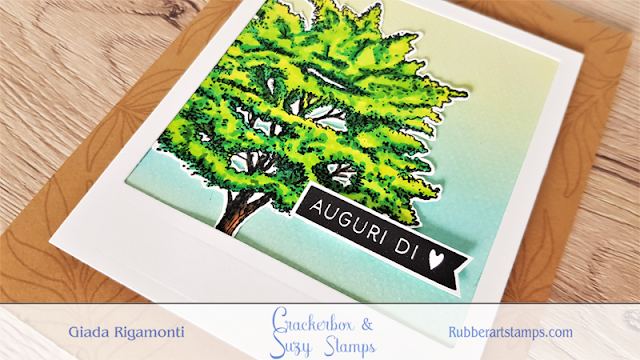
Hello stampers! This is a bittersweet post, since it's my last one as DT member of Crackerbox & Suzy Stamps - my very first DT experience. I've been part of this family since June 2016: it was an hard choice, but moving, furnishing my new home and working full-time are activities that are getting me too busy. I created this card in the evening, using some new pieces together with some leftovers.

Ciao a tutti! Questo è un post dolce-amaro, dato che si tratta dell'ultimo che scrivo come membro del DT di Crackerbox & Suzy Stamps - che costituisce la mia primissima esperienza come DT. Ho fatto parte di questa famiglia da giugno 2016: si è trattato di una scelta difficile, ma trasloco, arredamento e lavorare full-time sono attività che mi tengono occupata... fin troppo. Ho realizzato questa card di sera, utilizzando elementi nuovi ed avanzi di lavori passati.


First of all, I stamped the Big Tree 1 on a piece of white cardstock with Tuxedo Memento Black ink and colored it with alcohol markers. Then I fussy cut.

Prima di tutto, ho timbrato l'immagine Big Tree 1 su del cartoncino bianco con dell'inchiostro Memento Tuxedo nero, poi l'ho colorato con dei pennarelli ad alcohol e ritagliato.


I blended a couple of Distress Oxide inks (Shabby Shutters and Broken China) on a piece of watercolor paper and put both the tree and the blended piece under a polaroid die cut.

Ho sfumato un paio di Distress Oxide (Shabby Shutters e Broken China) su della carta acquerellabile, posizionando sia l'albero che il foglio distressato sotto ad una polaroid fustellata.


I used a kraft panel as my cardbase, that I customized with some tone-on-tone leaves. I glued everything together with foam tape, adding a sentiment on top of the tree. This could be a very unique masculine card too!

Ho utilizzato un pannello kraft come base, che ho personalizzato con delle foglie tono-su-tono. Ho incollato il tutto con del nastro gommato, aggiungendo un augurio sopra l'albero. Questa potrebbe essere una card maschile originale!

Supplies used:

Big Tree 1


Share
Tweet
Pin
Share
No commenti

Hello my friends! Today I'm back with a birthday card for Crackerbox & Suzy Stamps. The layout is very versatile: it can be used for anniversary, congratulation or thank you cards too, depending on the sentiment you choose. Plus, this card has no coloring at all since is full of stamping and heat embossing.

Ciao amici! Oggi sono tornata con una card di compleanno per Crackerbox & Suzy Stamps. Il design della card è molto versatile: può essere utilizzato per card di anniversario, di congratulazioni o anche solo per ringraziare qualcuno, in base all'augurio che si intende utilizzare. In più, questa card non prevede alcuna colorazione, visto che si basa su stamping e heat embossing.


First of all, I stamped the Solid Branch multiple times on the edges of a lilac cardstock. I used a similar color of ink to achieve a tone-on-tone look.

Prima di tutto ho timbrato il Solid Branch più volte, sui bordi di un cartoncino lillà. Ho utilizzato un tampone dal colore simile per ottenere un effetto tono-su-tono. 


Then I stamped it again with other inks of the same color family.

Poi l'ho nuovamente timbrato con altri tamponi della stessa famiglia cromatica.


I decided to add a bit of interest by stamping these Solid Butterflies with Versamark Ink on vellum. Next I covered everything with gold embossing powder, heat embossed and fussy cut.

Ho deciso di aggiungere un po' di interesse timbrando il Solid Butterflies con dell'inchiostro Versamark su del vellum. In seguito ho coperto il tutto con della polvere dorata, ho embossato con l'heat gun e ritagliato.


Finally I took a strip of white cardstock and I stamped the Celebrate sentiment on top.

Infine ho preso una striscia di cartoncino bianco e ho timbrato la scritta Celebrate.


I placed the lilac panel on a white cardbase, adhered all the butterflies and glued the sentiment with foam tape. I love the clean but elegant look of the result!

Ho posizionato il pannello lillà su un cartoncino bianco di base, ho incollato le farfalle e fissato la scritta con del nastro adesivo. Adoro il risultato pulito ma elegante!


Supplies used:

Solid Branch
Butterflies Solid Lg.
Celebrate
Share
Tweet
Pin
Share
No commenti

Hello spookies! Probably this is my last Halloween card of the season - and it's one of my favorite too. The main subject of the card is the Mini Headless Horseman by Some Odd Girl, that I colored with Prismacolor pencils.

Ciao spaventevoli creature! Probabilmente questa è l'ultima card a tema Halloween della stagione - ed è anche una delle mie preferite. Il soggetto in questione è il Cavaliere senza testa di Some Odd Girl, che ho colorato con le matite Prismacolor.


I think that using the image on the site as a reference was very useful, especially for drawing lights and shadows. After fussy cutting the image, I colored the edges with a black marker in order to hide the white on top of a dark cardstock.

Penso che utilizzare l'immagine sul sito come reference sia stato molto utile, specialmente per tracciare punti di luce e ombre. Dopo aver ritagliato l'immagine, ho colorato i bordi con un pennarello nero per nascondere il margine bianco - troppo in contrasto con il cartoncino nero.


For my scene I decided to blend a bit of Fossilized Amber Distress Oxide on black cardstock, adding some golden dots here and there.

Per la mia scena ho deciso di sfumare del Distress Oxide Fossilized Amber su del cartoncino nero, aggiungendo qualche puntino dorato qua e là.


Finally I picked a patterned paper that matches the horseman and I used it as my cardbase.

Infine ho scelto una carta patterned che si sposava benissimo con i colori utilizzati per il Cavaliere e che ho utilizzato come base.
Share
Tweet
Pin
Share
No commenti


Hello stampers! As I saw this video made by Jennifer McGuire, I needed to try this very versatile and easy to made pop-up shadow box card. So today I want to share with you this type of card inspired by the upcoming spring.

Buona domenica a tutti! Non appena ho visto questo video di Jennifer McGuire, ho dovuto provare questa pop-up shadow box card, una struttura molto versatile e anche facile da fare. Per cui oggi voglio condividere con voi la mia versione, ispirata dall'imminente arrivo della primavera.


To build up the scene I decided to use the Morning Glory - set of 5 stamps, so that I could made different clusters of flowers and leaves. I stamped them with Memento Tuxedo Black Ink multiple times and colored with alcohol markers, following the coloring scheme of the real flowers.

Per riempire la struttura ho deciso di utilizzare il set Morning Glory, così da poter creare diversi gruppi di fiori e foglie. Ho timbrato il tutto con del Memento Tuxedo Black Ink più volte e ho colorato ogni cosa con i pennarelli ad alcohol, cercando di seguire i colori reali del fiore.


I added some dots in the center of the flowers with a gel pen and fussy cut. I did the same for the leaves.

Ho aggiunto qualche puntino al centro dei fiori con una penna gel dorata e ho ritagliato il tutto. Ho fatto lo stesso con le foglie.


Next I did what Jennifer explained in the video, cutting 2 cardstock and folding them at the edges. I used an oval die cut to create the window on the front panel.

In seguito ho fatto tutto ciò che Jennifer spiegava nel suo video, ritagliando due cartoncini e piegandoli ai lati. Ho utilizzato una fustella ovale per creare la finestra sul pannello frontale.


At this point I glued everything together, fixing the flowers and the leaves in the foreground as well as in the background for a 3D effect. I also used some foam tape on the front panel to pop the morning glories even more.

A questo punto ho incollato ogni cosa, appiccicando fiori e foglie sia in primo piano che sullo sfondo per un effetto 3D. Ho anche utilizzato del nastro gommato sul pannello frontale così da far risaltare ancora di più i fiori in primo piano.


For the sentiment I decided to heat embossed the Smiles from Heaven stamp on a strip of vellum, using Versamark Ink and gold embossing powder. 

Per la scritta ho deciso di embossare le parole Smiles From Heaven su una striscia di vellum, grazie a del Versamark Ink e a della polvere da embossing dorata.


The card fits perfectly a standard sized envelope... and the recipient would be very surprised! I think this is a great idea also for Easter and Christmas cards.

Questa card sta perfettamente in una busta di grandezza standard...e il destinatario ne rimarrà molto colpito! Penso sia anche un'ottima struttura per creare card di Pasqua e di Natale.


Supplies used:

Smiles from Heaven
Morning Glory set of 5

Share
Tweet
Pin
Share
8 commenti

Hi everyone and Happy New Year! I hope to fullfill this one with love, creativity and happiness... and I wish the same for all of you! Today I'm back with a couple of cards for Crackerbox & Suzy Stamps, which has a scent of spring.

Ciao a tutti e buon anno! Spero di riempire questi 365 giorni che mi trovo davanti con amore, creatività e felicità...ed auguro lo stesso a tutti voi! Oggi sono di nuovo qui con un paio di card per Crackerbox & Suzy Stamps, che hanno un profumo già primaverile.


In fact I decided to realize a couple of cards with the tulip bouquet by Crackerbox & Suzy Stamps, combining it with two different sentiment... and two different colors.

Infatti ho deciso di realizzare un paio di card con il bouquet di tulipani di Crackerbox & Suzy Stamps, abbinandolo con 2 diversi auguri...e due diverse palette di colori.


I love both the colorful one and the romantic one, that I colored with my alcohol markers (Promarkers and Touchfive).

Adoro entrambe le versioni, sia quella più gioiosa che quella romantica, che ho colorato con i miei pennarelli ad alcol (sia Promarkers che Touchfive).


First I stamped the tulips with Memento Tuxedo Black Ink, I colored them and fussy cut. I added at the bottom of the romantic one a string.

Prima di tutto ho timbrato i tulipani con dell'inchiostro nero Memento, li ho colorati e ritagliati. Ho anche aggiunto un po' di spago alla base del bouquet romantico.


Then I took a patterned paper with some wood grain in it and I heat embossed in white on black a couple of sentiments from Crackerbox & Suzy Stamps as well.

Poi ho scelto una carta pattern tramata in stile legno e ho embossato in bianco su nero un paio di auguri sempre di Crackerbox & Suzy Stamps.


Finally I put everything together on a cardbase, adding the image and the sentiment with some foam tape. The romantic version has some white Nuvo Drops here and there.

Infine ho messo tutto insieme su una base, aggiungendo immagine e augurio con del nastro gommato. Nella versione romantica ho anche aggiunto qualche Nuvo Drops bianca qua e là.


I love winter, but I missed coloring flowers so much! 

Amo l'inverno, ma colorare fiori mi mancava troppo! 


Supplies used:

Tulips


Thinking of you Simple

Celebrate

Share
Tweet
Pin
Share
No commenti
Older Posts

About me

About me
I'm Giada, an italian cardmaker. I love clean and simple cards...and coloring critters! Thank for being here!

Follow Me

  • Facebook
  • Instagram
  • Youtube

Contact me

Nome

Email *

Messaggio *

Blog Archive

  • ▼  2023 (3)
    • ▼  nov 2023 (1)
      • Winter Friends
    • ►  giu 2023 (1)
    • ►  feb 2023 (1)
  • ►  2022 (14)
    • ►  ott 2022 (1)
    • ►  ago 2022 (1)
    • ►  lug 2022 (2)
    • ►  giu 2022 (1)
    • ►  mag 2022 (1)
    • ►  apr 2022 (1)
    • ►  mar 2022 (3)
    • ►  feb 2022 (1)
    • ►  gen 2022 (3)
  • ►  2021 (27)
    • ►  dic 2021 (1)
    • ►  nov 2021 (1)
    • ►  ott 2021 (2)
    • ►  set 2021 (2)
    • ►  ago 2021 (3)
    • ►  lug 2021 (2)
    • ►  giu 2021 (1)
    • ►  mag 2021 (2)
    • ►  apr 2021 (2)
    • ►  mar 2021 (2)
    • ►  feb 2021 (5)
    • ►  gen 2021 (4)
  • ►  2020 (72)
    • ►  dic 2020 (2)
    • ►  nov 2020 (2)
    • ►  ott 2020 (4)
    • ►  set 2020 (8)
    • ►  ago 2020 (4)
    • ►  lug 2020 (7)
    • ►  giu 2020 (8)
    • ►  mag 2020 (5)
    • ►  apr 2020 (12)
    • ►  mar 2020 (7)
    • ►  feb 2020 (7)
    • ►  gen 2020 (6)
  • ►  2019 (68)
    • ►  dic 2019 (6)
    • ►  nov 2019 (8)
    • ►  ott 2019 (9)
    • ►  set 2019 (9)
    • ►  ago 2019 (8)
    • ►  lug 2019 (8)
    • ►  giu 2019 (3)
    • ►  mag 2019 (4)
    • ►  apr 2019 (2)
    • ►  mar 2019 (3)
    • ►  feb 2019 (4)
    • ►  gen 2019 (4)
  • ►  2018 (59)
    • ►  dic 2018 (2)
    • ►  nov 2018 (7)
    • ►  ott 2018 (7)
    • ►  set 2018 (7)
    • ►  ago 2018 (7)
    • ►  lug 2018 (6)
    • ►  giu 2018 (4)
    • ►  mag 2018 (4)
    • ►  apr 2018 (4)
    • ►  mar 2018 (4)
    • ►  feb 2018 (3)
    • ►  gen 2018 (4)
  • ►  2017 (45)
    • ►  nov 2017 (6)
    • ►  ott 2017 (3)
    • ►  set 2017 (5)
    • ►  ago 2017 (3)
    • ►  lug 2017 (3)
    • ►  giu 2017 (3)
    • ►  mag 2017 (3)
    • ►  apr 2017 (5)
    • ►  mar 2017 (3)
    • ►  feb 2017 (6)
    • ►  gen 2017 (5)
  • ►  2016 (32)
    • ►  dic 2016 (1)
    • ►  nov 2016 (6)
    • ►  ott 2016 (3)
    • ►  set 2016 (3)
    • ►  ago 2016 (3)
    • ►  lug 2016 (4)
    • ►  giu 2016 (4)
    • ►  mag 2016 (2)
    • ►  apr 2016 (1)
    • ►  mar 2016 (2)
    • ►  feb 2016 (2)
    • ►  gen 2016 (1)
  • ►  2015 (21)
    • ►  dic 2015 (1)
    • ►  nov 2015 (2)
    • ►  set 2015 (1)
    • ►  ago 2015 (2)
    • ►  lug 2015 (1)
    • ►  mag 2015 (1)
    • ►  apr 2015 (2)
    • ►  mar 2015 (4)
    • ►  feb 2015 (4)
    • ►  gen 2015 (3)
  • ►  2014 (31)
    • ►  dic 2014 (2)
    • ►  nov 2014 (2)
    • ►  ott 2014 (2)
    • ►  set 2014 (4)
    • ►  ago 2014 (1)
    • ►  lug 2014 (3)
    • ►  giu 2014 (3)
    • ►  mag 2014 (3)
    • ►  apr 2014 (2)
    • ►  mar 2014 (3)
    • ►  feb 2014 (3)
    • ►  gen 2014 (3)
  • ►  2013 (33)
    • ►  dic 2013 (4)
    • ►  nov 2013 (5)
    • ►  ott 2013 (4)
    • ►  set 2013 (3)
    • ►  ago 2013 (4)
    • ►  lug 2013 (5)
    • ►  giu 2013 (8)

Search

Labels

  • crackerbox & suzy stamps
  • craftin desert divas
  • create a smile stamps
  • lawnfawn
  • mft stamps
  • rinea foiled paper
  • so suzy stamps
  • someoddgirl
  • whimsy stamps
  • wplus9

Created with by BeautyTemplates