Copyright giadaelesuenuvole.blogspot.it. Powered by Blogger.

giadalesuenuvole

Pagine

  • Chi sono
  • Privacy Policy


Hello my friends! After lots and lots of coloring through the month of April, I finally decided to go back to basics with these two card, full of ink blending, heat embossing and die cutting techniques.

Ciao amici! Dopo aver condiviso un sacco di card con colorazione per tutto il mese di aprile, ho finalmente deciso di tornare alle basi con queste due card, ricche di inchiostro sfumato, embossing a caldo e fustellate.


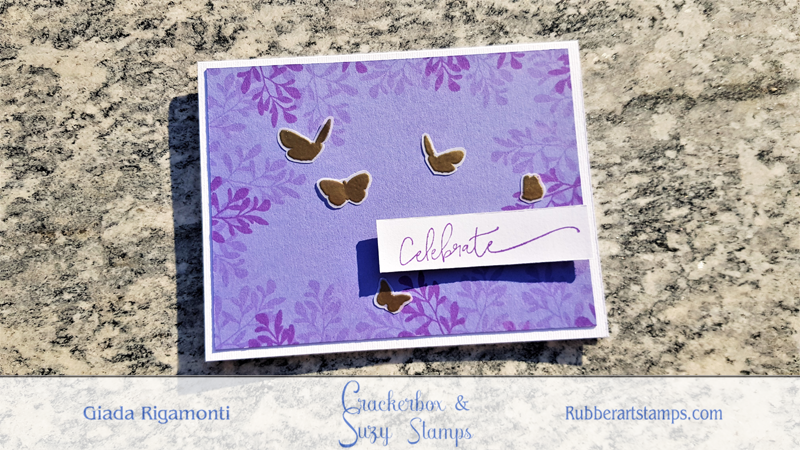
First of all I built a customized heat embossed background by stamping the Leafy Branch Tall multiple times on brown cardstock. I decided to use white embossing powder to achieve a more dramatic look.

Prima di tutto ho messo insieme uno sfondo embossato timbrando più volte l'immagine Leafy Branch Tall su del cartoncino marrone. Ho deciso di utilizzare la polvere da embossing bianca per ottenere un effetto più drammatico.


Then I blended the edges with Vintage Photo Distress Ink and a little bit of Black Soot at the very edges, leaving the center lighter.

In seguito ho sfumato i lati con il Distress Ink Vintage Photo e anche un pochino di Black Soot proprio sui bordi.


Finally I die cut the word "wishes" in italian out of white cardstock and white foam. I glued every single piece of foam with the corresponding cardstock piece.

Infine ho fustellato la parola "auguri" da del cartoncino bianco e da del foam. Ho incollato ogni lettera in gomma con la corrispondente di cartoncino.


Finally I fixed everything on top of the panel, placing two letters per lines at the center.

Infine ho fissato il tutto su una base, posizionando 2 lettere alla volta al centro.


I did the same with a light blue cardstock, blended with Peacock Feathers, Mermaid Lagoon and Blueprint Sketch Distress Inks.

Ho seguito lo stesso procedimento con un cartoncino azzurro, sfumato con i Distress Inks Peacock Feathers, Mermaid Lagoon e Blueprint Sketch.


In this case I decided to use clear embossing powder for the leaves, which stands out less than the white ones. I love both the cards, especially because they could work for male and female recipients.

In questo caso ho deciso di utilizzare la polvere da embossing clear, che sicuramente risalta meno di quella bianca. Adoro entrambe le versioni, specialmente perché entrambe si adattano tanto a un destinatario maschile quanto femminile.


Supplies used:

Leafy Branch Tall

Share
Tweet
Pin
Share
No commenti

Hello my friends! Today I'm back with a birthday card for Crackerbox & Suzy Stamps. The layout is very versatile: it can be used for anniversary, congratulation or thank you cards too, depending on the sentiment you choose. Plus, this card has no coloring at all since is full of stamping and heat embossing.

Ciao amici! Oggi sono tornata con una card di compleanno per Crackerbox & Suzy Stamps. Il design della card è molto versatile: può essere utilizzato per card di anniversario, di congratulazioni o anche solo per ringraziare qualcuno, in base all'augurio che si intende utilizzare. In più, questa card non prevede alcuna colorazione, visto che si basa su stamping e heat embossing.


First of all, I stamped the Solid Branch multiple times on the edges of a lilac cardstock. I used a similar color of ink to achieve a tone-on-tone look.

Prima di tutto ho timbrato il Solid Branch più volte, sui bordi di un cartoncino lillà. Ho utilizzato un tampone dal colore simile per ottenere un effetto tono-su-tono. 


Then I stamped it again with other inks of the same color family.

Poi l'ho nuovamente timbrato con altri tamponi della stessa famiglia cromatica.


I decided to add a bit of interest by stamping these Solid Butterflies with Versamark Ink on vellum. Next I covered everything with gold embossing powder, heat embossed and fussy cut.

Ho deciso di aggiungere un po' di interesse timbrando il Solid Butterflies con dell'inchiostro Versamark su del vellum. In seguito ho coperto il tutto con della polvere dorata, ho embossato con l'heat gun e ritagliato.


Finally I took a strip of white cardstock and I stamped the Celebrate sentiment on top.

Infine ho preso una striscia di cartoncino bianco e ho timbrato la scritta Celebrate.


I placed the lilac panel on a white cardbase, adhered all the butterflies and glued the sentiment with foam tape. I love the clean but elegant look of the result!

Ho posizionato il pannello lillà su un cartoncino bianco di base, ho incollato le farfalle e fissato la scritta con del nastro adesivo. Adoro il risultato pulito ma elegante!


Supplies used:

Solid Branch
Butterflies Solid Lg.
Celebrate
Share
Tweet
Pin
Share
No commenti


Hi! Heat embossing is one of my favorite techniques, since it always seems a kind of magic to me. For today's card I decided to mix heat embossing with customized ombré background: the final result is clean and elegant. For this type of Christmas cards I always like to use all the snowflakes by Crackerbox and Suzy Stamps.

Ciao! Una delle mie tecniche preferite è l'embossing a caldo, visto che a me sembra sempre qualcosa di magico. Per quanto riguarda la card di oggi ho deciso di unire questa tecnica ad uno sfondo sfumato personalizzato: il risultato è una card pulita ed elegante. Per questo genere di card natalizie mi piace sempre utilizzare tutti i fiocchi di neve di Crackerbox & Suzy Stamps.


First of all I took a piece of blue cardstock and blended Tumbled Glass, Broken China and Faded Jeans Distress Oxides, from the bottom to the top. In this way I achieved a night sky with a chalk effect on it. On the edge I added a bit of Black Soot Distress Ink.

Prima di tutto ho preso del cartoncino blue e ho sfumato i Distress Oxides Tumbled Glass, Broken China e Faded Jeans, dal basso verso l'alto. In questo modo ho ottenuto un cielo notturno con effetto gesso. Ai bordi esterni ho aggiunto anche una punta di Distress Ink Black Soot.


After everything was dry, I stamped lots of snowflakes (small, medium and large) on the upper edge of the panel with Vesamark ink. Then I covered them with gold powder, heat embossed and stamped the same images with Tumbled Glass Distress Oxide on top.

Dopo che il tutto è asciugato, ho timbrato una miriade di fiocchi di neve (piccoli, medi e grandi) sul lato superiore del pannello, inchiostrandoli con dell'inchiostro Versamark. Poi li ho coperti con della polvere oro, li ho embossati e ho timbrato le stesse immagini con l'Oxide Tumbled Glass.


Finally I heat embossed a sentiment that says "Merry Christmas to you and people you love" on a piece of the same blue cardstock I used for the base - on which I blended the same combo of Oxides. Catching the heat embossing effect with a picture was very hard, but I hope you can imagine the metallic shine!

Infine ho embossato la scritta sempre sullo stesso cartoncino blu utilizzato per la base - e su cui ho ugualmente sfumato la stessa combinazione di inchiostri. Riuscire a catturare l'effetto dell'embossing a caldo attraverso una foto è stato davvero difficile, ma spero che riusciate a immaginarne la brillantezza metallica!


Supplies used:

Snowflakes by Olesya Lg.
Snowflakes by Olesya Med.
Snowflakes by Olesya Sm.

Share
Tweet
Pin
Share
No commenti

Hello stampers! Today I'm up on Crackerbox & Suzy Stamps blog with a Christmas card, because it's never too early for Holiday cards - every single year I try to mass produce in advance, let's see what I'll do this time. For this project I chose purple, white and silver colors, with a bit of ink blending and heat embossing.

Ciao a tutti! Oggi sono sul blog di Crackerbox & Suzy Stamps con una card di Natale, visto che non è mai troppo presto per i biglietti di Natale - ogni anno provo a produrre tutto in anticipo, vediamo cosa riuscirò a fare stavolta. Per questo progetto ho scelto viola, bianco e argento, con un pizzico di inchiostro e embossing.


I started by cutting a piece of purple cardstock and I heat embossed small, medium and large snowflakes in silver. I begun stamping the biggest ones on the edges and then I filled the gaps with the other ones, leaving some space in the center.

Ho cominciato a tagliare del cartoncino viola e ho embossato fiocchi di neve piccoli, medi e grandi con della polvere argento. Ho iniziato a timbrare i più grandi sui bordi, poi ho riempito gli spazi vuoti con gli altri più piccoli, lasciando libero al centro.


Then I decided to darken the edges by blending Seedless Preserves and Black Soot Distress Inks.

Poi ho deciso di scurire i bordi sfumando Distress Inks Seedless Preserves e Black Soot.


Finally I die cut a vellum circle and a white house. I white embossed a sentiment which says "best wishes" onto the vellum piece and I glued everything together.

Infine ho fustellato un cerchio da del vellum e una casa bianca. Ho embossato l'augurio in bianco sul vellum e ho incollato tutto insieme.


Metallic embossing is one of my favorite technique for Christmas, since it gives a bit of shining to everything!

L'embossing con colori metallici è una delle mie tecniche preferite per Natale, visto che dà un po' di lucentezza al tutto!

Supplies used:
Snowflakes Olesya Lg.

Snowflakes Olesya Med.


Snowflakes Olesya Sm.

Share
Tweet
Pin
Share
No commenti

Hello stampers! When my mojo is not collaborating, I usually focus on a couple of techniques: coloring or heat embossing. Today I went for an elegant and embossed background for Crackerbox & Suzy Stamps without any coloring, just a little bit of ink blending.

Ciao a tutti! Quando l'ispirazione non collabora, di solito mi focalizzo su un paio di tecniche: colorare o embossare. Oggi ho scelto di realizzare una card elegante con uno sfondo embossato per Crackerbox & Suzy Stamps senza alcuna colorazione, solo dell'inchiostro sui lati.


First I took a piece of lilac cardstock, because I wanted to match Shaded Lilac Distress Ink with the cardbase. Then I stamped the Skeleton Leaf 1 with Versamark Ink, trying to build up a pattern. I covered everything with silver embossing powder and heat embossed.

Prima di tutto ho preso un cartoncino lillà, perché l'idea era quella di abbinarci l'inchiostro Shaded Lilac. Poi ho timbrato il timbro Skeleton Leaf 1 con del Versamark, cercando di costruire un pattern. Ho coperto il tutto con della polvere da embossing argento


In order to add some dimension, I blended the edges of the cardstock with Shaded Lilac Distress Ink.

Per aggiungere un po' di effetto rilievo, ho applicato ai bordi l'inchiostro Shaded Lilac.


Finally I stamped the Dream Live sentiment on black cardstock, I cut it in a half and I glued it down with some foam tape.

Infine ho timbrato la scritta Dream Live su del cartoncino nero, l'ho diviso in due e ho incollato entrambi i pezzi con del nastro gommato.


As finishing touches, I added some clear sequins and Liquid Pearls. I adhered the front panel on a black cardbase and traced some dash lines all around the edges.

Come tocco finale, ho aggiunto dei sequins trasparenti e del Liquid Pearl. Ho incollato il pannello frontale su una base nera e ho tracciato una linea tratteggiata tutto intorno ai bordi.


Supplies used:

Skeleton Leaf 1
Dream Live

Share
Tweet
Pin
Share
No commenti

Hi everyone! In these days it seems like I need to put a bit of gold in every single card... and today's project for Crackerbox & Suzy Stamps is all about heat embossing technique with gold embossing powder. In my opinion, the details of heat embossing on vellum make it special.

Ciao a tutti! In questi giorni sembra proprio che debba inserire un po' di oro in ogni card che creo...e quella che vi mostro oggi per Crackerbox & Suzy Stamps è tutta dedicata alla tecnica dell'embossing a caldo con la polvere dorata. Secondo me, i dettagli dell'embossing su vellum la rendono speciale.


For this card I decided to combine 3 different colors: turquoise, gold and kraft. As I wanted to build a wreath with butterflies hanging around, I chose the Leafy Branch and the Butterflies Solid Lg stamps.

In questo biglietto ho deciso di mettere insieme 3 diversi colori: turchese, oro e kraft. Visto che l'idea era quella di mettere insieme una ghirlanda popolata da farfalle, ho scelto i timbri Leafy Branch e Butterflies Solid Lg.


First I stamped a bunch of leaves on vellum with Versamark Ink, covered them with gold embossing powder, heat set and fussy cut.

Prima di tutto ho timbrato un po' di fogliame su del vellum con dell'inchiostro Versamark, ho coperto il tutto con la polvere da embossing, ho scaldato e poi ritagliato.


I did the same with the cluster of butterflies, but this time I used turquoise powder. Then I chose an italian sentiment by ModaScrap (the same of my previous post), heat set in white on vellum and glued on a piece of kraft cardstock.

Ho fatto lo stesso con le farfalle, ma questa volta utilizzando della polvere da embossing turchese. Poi ho scelto un augurio di ModaScrap (lo stesso del post precedente), l'ho embossato in bianco sempre su vellum e ho poi incollato il tutto su del cartoncino kraft.


I fixed the leafy branches as a wreath on a kraft panel with a bit of glue, then I adhered the butterflies in the same way and the sentiment with some foam adhesive.

Ho incollato i rami di foglie con della colla su del cartoncino kraft, come se fossero una ghirlanda. Ho fatto lo stesso con il farfalle e l'augurio - per questo, però, sono passata al nastro gommato.


Heat embossing is one of my favorite technique, especially when I don't have time for coloring! This is also perfect for flowers or foliage stamps...and guess what? These stamps are 30% off during the month of March!

L'embossing è una delle mie tecniche preferite, specialmente quando non ho tempo per colorare alcunché! Tra l'altro si sposa benissimo con timbri di floreali...e indovinate un po'? Questa categoria di timbri è scontata del 30% per tutto il mese di Marzo!


Supplies used:


Butterflies Solid Lg.

Leafy Branch tall

Share
Tweet
Pin
Share
No commenti
Older Posts

About me

About me
I'm Giada, an italian cardmaker. I love clean and simple cards...and coloring critters! Thank for being here!

Follow Me

  • Facebook
  • Instagram
  • Youtube

Contact me

Nome

Email *

Messaggio *

Blog Archive

  • ▼  2023 (3)
    • ▼  nov 2023 (1)
      • Winter Friends
    • ►  giu 2023 (1)
    • ►  feb 2023 (1)
  • ►  2022 (14)
    • ►  ott 2022 (1)
    • ►  ago 2022 (1)
    • ►  lug 2022 (2)
    • ►  giu 2022 (1)
    • ►  mag 2022 (1)
    • ►  apr 2022 (1)
    • ►  mar 2022 (3)
    • ►  feb 2022 (1)
    • ►  gen 2022 (3)
  • ►  2021 (27)
    • ►  dic 2021 (1)
    • ►  nov 2021 (1)
    • ►  ott 2021 (2)
    • ►  set 2021 (2)
    • ►  ago 2021 (3)
    • ►  lug 2021 (2)
    • ►  giu 2021 (1)
    • ►  mag 2021 (2)
    • ►  apr 2021 (2)
    • ►  mar 2021 (2)
    • ►  feb 2021 (5)
    • ►  gen 2021 (4)
  • ►  2020 (72)
    • ►  dic 2020 (2)
    • ►  nov 2020 (2)
    • ►  ott 2020 (4)
    • ►  set 2020 (8)
    • ►  ago 2020 (4)
    • ►  lug 2020 (7)
    • ►  giu 2020 (8)
    • ►  mag 2020 (5)
    • ►  apr 2020 (12)
    • ►  mar 2020 (7)
    • ►  feb 2020 (7)
    • ►  gen 2020 (6)
  • ►  2019 (68)
    • ►  dic 2019 (6)
    • ►  nov 2019 (8)
    • ►  ott 2019 (9)
    • ►  set 2019 (9)
    • ►  ago 2019 (8)
    • ►  lug 2019 (8)
    • ►  giu 2019 (3)
    • ►  mag 2019 (4)
    • ►  apr 2019 (2)
    • ►  mar 2019 (3)
    • ►  feb 2019 (4)
    • ►  gen 2019 (4)
  • ►  2018 (59)
    • ►  dic 2018 (2)
    • ►  nov 2018 (7)
    • ►  ott 2018 (7)
    • ►  set 2018 (7)
    • ►  ago 2018 (7)
    • ►  lug 2018 (6)
    • ►  giu 2018 (4)
    • ►  mag 2018 (4)
    • ►  apr 2018 (4)
    • ►  mar 2018 (4)
    • ►  feb 2018 (3)
    • ►  gen 2018 (4)
  • ►  2017 (45)
    • ►  nov 2017 (6)
    • ►  ott 2017 (3)
    • ►  set 2017 (5)
    • ►  ago 2017 (3)
    • ►  lug 2017 (3)
    • ►  giu 2017 (3)
    • ►  mag 2017 (3)
    • ►  apr 2017 (5)
    • ►  mar 2017 (3)
    • ►  feb 2017 (6)
    • ►  gen 2017 (5)
  • ►  2016 (32)
    • ►  dic 2016 (1)
    • ►  nov 2016 (6)
    • ►  ott 2016 (3)
    • ►  set 2016 (3)
    • ►  ago 2016 (3)
    • ►  lug 2016 (4)
    • ►  giu 2016 (4)
    • ►  mag 2016 (2)
    • ►  apr 2016 (1)
    • ►  mar 2016 (2)
    • ►  feb 2016 (2)
    • ►  gen 2016 (1)
  • ►  2015 (21)
    • ►  dic 2015 (1)
    • ►  nov 2015 (2)
    • ►  set 2015 (1)
    • ►  ago 2015 (2)
    • ►  lug 2015 (1)
    • ►  mag 2015 (1)
    • ►  apr 2015 (2)
    • ►  mar 2015 (4)
    • ►  feb 2015 (4)
    • ►  gen 2015 (3)
  • ►  2014 (31)
    • ►  dic 2014 (2)
    • ►  nov 2014 (2)
    • ►  ott 2014 (2)
    • ►  set 2014 (4)
    • ►  ago 2014 (1)
    • ►  lug 2014 (3)
    • ►  giu 2014 (3)
    • ►  mag 2014 (3)
    • ►  apr 2014 (2)
    • ►  mar 2014 (3)
    • ►  feb 2014 (3)
    • ►  gen 2014 (3)
  • ►  2013 (33)
    • ►  dic 2013 (4)
    • ►  nov 2013 (5)
    • ►  ott 2013 (4)
    • ►  set 2013 (3)
    • ►  ago 2013 (4)
    • ►  lug 2013 (5)
    • ►  giu 2013 (8)

Search

Labels

  • crackerbox & suzy stamps
  • craftin desert divas
  • create a smile stamps
  • lawnfawn
  • mft stamps
  • rinea foiled paper
  • so suzy stamps
  • someoddgirl
  • whimsy stamps
  • wplus9

Created with by BeautyTemplates