Copyright giadaelesuenuvole.blogspot.it. Powered by Blogger.

giadalesuenuvole

Pagine

  • Chi sono
  • Privacy Policy


Hello stampers! Are you looking for some Easter inspiration? Here I am with a couple of cards made with Lawn Fawn Chirpy Chirp stampset, one of my favorite ever. Well, it's been ages since I used Lawn Fawn supplies and I really miss their cute critters!

Ciao a tutti! Cercate un po' di ispirazione per Pasqua? Ecco un paio di card realizzate con i pulcini del set Chirpy Chirp di Lawn Fawn, uno dei miei preferiti di sempre. Beh, sono passati mesi (se non anni!) da quando ho creato con gli animaletti di Lawn Fawn... quanto mi sono mancati!


For my first card I stamped the critters with soft brown ink (something new for me!), as I was inspired by Mona Toth videos. Then I took a three shades of yellow and orange markers, colored the chicks and fussy cut. I did the same with the eggshells. Next I chose a couple of patterned papers, created a tag and glued everything on a white cardbase, building a nice scene and adding an embossed sentiment.

Per realizzare la prima card di oggi ho timbrato gli animaletti con dell'inchiostro marrone (una novità per me!), poiché sono rimasta incantata dai video e dalla colorazione di Mona Toth. Poi ho scelto tre sfumature di gialli e arancioni, ho colorato i pulcini e li ho ritagliati. Ho fatto lo stessi con i gusci d'uovo. In seguito ho individuato un paio di carte decorative, ho creato una tag e ho incollato il tutto su una base bianca, mettendo insieme una scenetta e aggiungendo la scritta d'auguri.


For my second card I stamped other chicks and eggshells with soft brown ink, colored with alcohol markers and fussy cut. Since I had a bunch of them, I decided to create a crowded scene with a pastel color palette. 

Per la seconda card di oggi ho timbrato altri pulcini e gusci d'uovo con dell'inchiostro marrone, li ho colorati con i pennarelli ad alcohol e li ho ritagliati. Visto che ne avevo un bel po', ho deciso di creare una scenetta affollata con una palette di colori pastello.


I chose a patterned paper with flowers for the front panel, I die cut an oval shape from woodgrain paper and built a chicky scene. In order to fix everything I used both regular and foam tape. I really love how these cards turned out!

Come pannello frontale ho scelto una carta decorativa, ho fustellato un ovale da una carta effetto legno e ho costruito una scena piena di pulcini. Per incollare il tutto ho utilizzato sia nastro normale che gommato. Adoro il risultato finale!
Share
Tweet
Pin
Share
No commenti

Hello stampers! Today I have lots of cards to share with you: I'm working on Easter and this super-cute bunny by Some Odd Girl is one of my favorite image ever! I created a bunch of cards coloring the critter with different markers, mixing and matching it with patterned papers.

Ciao amici! Oggi ho un mucchio di card da condividere con voi: sto lavorando per la Pasqua e questo carinissimo coniglietto di Some Odd Girl è uno dei miei preferiti di sempre! Ho realizzato un bel po' di card, colorandolo con diversi pennarelli, mischiandolo e abbinandolo con diverse carte decorative.


As you can see, I printed, colored and fussy cut different bunnies - and ducks too!

Come potete vedere, ho stampato, colorato e ritagliato diversi coniglietti - e anche qualche anatra!


I  chose different die cuts, sentiments and papers to create colorful cards.

Ho scelto diversi cartoncini fustellati, qualche augurio e carta decorativa per realizzare card colorate.


Those bunnies are really adorable!

Questi coniglietti sono davvero adorabili!
Share
Tweet
Pin
Share
No commenti

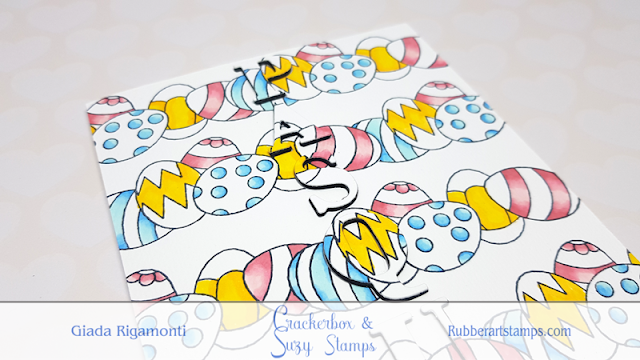
Hello stampers! I'm keeping on focusing on Easter, creating new cards and playing with color combos. Today I'm showing you a card made for Crackerbox & Suzy Stamps using the in-lay die cutting technique (which I already used here). Plus I decided to create a custom background, built by stamping a single image multiple times.

Ciao a tutti! Continuo a dedicarmi alla Pasqua, creando nuove card e giocando un po' con le combinazioni di colori. Oggi vi voglio mostrare la card che ho realizzato per Crackerbox & Suzy Stamps, utilizzando la tecnica chiamata "inlay die cutting" (e che ho già utilizzato qui). In più ho deciso di creare uno sfondo personalizzato, costruito timbrando una solo immagine più volte.


First of all I chose the Eggs decorated stamp by Crackerbox & Suzy Stamps and stamped a bunch of it on a white panel to form hotizontal stripes. To do that I stamp a first layer of eggs with Memento Tuxedo Black ink.

Prima di tutto ho scelto il timbro Eggs decorated di Crackerbox & Suzy Stamps e l'ho timbrato un po' di volte su del cartoncino bianco, cercando di creare delle linee omogenee. Per farlo ho timbrato un primo livello di uova con l'inchiostro Memento Tuxedo nero.


Then I masked the eggs with some masking paper and stamped them again on top, trying to create a sort of pattern effect.

Poi ho coperto le uova con della carta per mascherare e le ho timbrate ancora, cercando di creare una sorta di pattern.


After that, I chose 3 color families and picked some alcohol markers in yellow, light blue and pink. I colored evey single egg, switching color from one to another.

Dopodiché ho scelto 3 colori e ho preso i rispettivi pennarelli: gialli, azzurri e rosa. Ho colorato ogni singolo uovo, cambiando colore tra uno e l'altro e cercando di mantenere una certa coerenza e ripetitività.


Finally, the inlay die cutting technique: I picked some letter dies and I chose the ones for the word "Easter" in italian. I put the panel in my die cutting machine and I saved all the positive and negative pieces. I die cut a piece of black foam with the same letters.

Infine, la tecnica "inlay die cutting": ho preso il set di fustelle con le letterine e ho scelto quelle utili a comporre la parola "Pasqua". Ho messo il pannello con lo sfondo personalizzato nella mia Big Shot e ho conservato tutti i pezzettini che ne sono usciti. Ho fustellato con le stesse lettere anche della gomma foam nera.


At this point I put everything in place like a puzzle, fixing on the background panel and making sure to put the layer of foam under the corresponding letter.

A questo punto ho rimesso tutto al proprio posto come se fosse un puzzle, fissandolo allo sfondo e assicurandomi di aver messo la gomma al di sotto della lettera corrispondente.


This is the final result, very clean but still interesting. This technique makes every card so unique!

Questo è il risultato finale, molto pulito ma anche interessante. Questa tecnica rende unica qualsiasi creazione!


Supplies used:

Eggs decorated

Share
Tweet
Pin
Share
No commenti


Hello my friends! As promised, this post is all about Easter cards: Spring has begun in advance this year, so I am pretty inspired by bright colors and joyful scenes. 
First I'm going to share my second pop-up shadow box card (more details here), filled with images by Create a Smile Stamps.

Ciao amici! Come promesso, sono qui a condividere un post completamente dedicato ai biglietti di Pasqua: la primavera è cominciata con largo anticipo quest'anno, ed io mi sono lasciata ispirare da colori brillanti e scenette ricche di gioia.
Prima di tutto eccovi la mia seconda pop-up shadow box card (la prima la trovate qui), che ho affollato con soggetti di Create a Smile Stamps.


I chose the Easter Tweeting stampset, as the eggs hanging on a string are perfect for creating a foreground and a background effect. Plus I used the adorabile little chicks with pastels.

Ho scelto il set Easter Tweeting, visto che le uova penzolanti mi sembravano perfette per mettere insieme primo e secondo piano. In più ho utilizzato gli adorabili pulcini con colori pastello.


I stamped a couple of chicks on an empty spot on the string and the one upside down is just too hilarious! I need to say that fussy cutting this particular images was quite difficult.

Ho timbrato un paio di pulcini dove il filo lo permetteva e quello che si trova sottosopra mi fa sorridere ogni volta che lo guardo! Bisogna dire che ritagliare queste immagini è stato un poco difficile.


In any case, I decided to add lots of details and images here and there, while in the center I stamped the "Happy Easter" sentiment.
As you can see down below, chicks and rabbits are my favorite subjects for Easter - a good reason to use Lawn Fawn stamps that I put aside for a while:

In ogni caso ho deciso di aggiungere un sacco di dettagli e di piccole immagini qua e là, mentre al centro ho timbrato la scritta "Buona Pasqua".
Come si può vedere qui sotto, pulcini e conigli sono i miei soggetti preferiti per quanto riguarda la Pasqua - un'ottima ragione per utilizzare i timbri Lawn Fawn che stavano chiusi nel cassetto da troppo tempo:


I hope you get inspired with these card designs!

Spero di avervi ispirato con questi biglietti!
Share
Tweet
Pin
Share
No commenti

Hello crafters! Today I have no card for you, since I decided to create a little Easter treat bag with the funny egg with feet stamp from So Suzy Stamps. I also found out that, if you don't like the feet, you could just cut them off and use only the egg... or both of them, like I did here.

Buongiorno a tutti! Oggi non ho card per voi, dato che ho deciso di realizzare una piccola scatolina per la Pasqua, con protagonisti i simpatici ovetti con i piedi di So Suzy Stamps. Tra l'altro, se non vi piacciono i piedi, potete giusto tagliarli via e usare solo l'ovetto... o entrambe le varianti, come ho fatto qui.


First I stamped tree eggs onto a piece of regular cardstock with Antique Linen Distress Ink, in order to do some no-line coloring with Promarker pens. I decided to keep the coloring very simple, avoiding all the decorations of the eggs, but I liked the lines that you can see underneath. I cut off the feet of two eggs and I added some extra details with the white gel pen.

Prima di tutto ho timbrato tre ovetti su del cartoncino bianco con il Distress Ink Antique Linen, così da sfruttare la colorazione no-line con i Promarker. Ho deciso di mantenermi semplice, evitando tutte le decorazioni presenti sulle uova. Mi è piaciuto però l'effetto vedo-non-vedo delle linee al di sotto della colorazione. Ho tagliato via i piedi di due uova e ho aggiunto dei dettagli con la penna bianca.


At this point I die cut and assembled a treat bag using kraft cardstock.

A questo punto ho fustellato e assemblato una scatolina realizzata con del cartoncino kraft.


Then I die cut a white grass with the border die from Lawn Fawn and I fixed it to all the sides of the bag.

Poi ho fustellato un bordo d'erba con la fustella Lawn Fawn, incollandola su tutti i lati.


Finally I glued the three eggs - only one had its feet. This is a cute treat bag for chocolates, candies and other goodies. Until the end of the month Floral Stamps are on sale at So Suzy Stamps shop, check them out!

Infine ho incollato i tre ovetti - ed uno solo di questi ha i piedini. Questa è proprio una carinissima scatoletta per cioccolatini, caramelle e altre amenità! E ricordate che fino alla fine del mese i timbri floreali sono in saldo nello shop di So Suzy, date un'occhiata!

Supplies used:

Egg with Feet

Share
Tweet
Pin
Share
No commenti
Older Posts

About me

About me
I'm Giada, an italian cardmaker. I love clean and simple cards...and coloring critters! Thank for being here!

Follow Me

  • Facebook
  • Instagram
  • Youtube

Contact me

Nome

Email *

Messaggio *

Blog Archive

  • ▼  2023 (3)
    • ▼  nov 2023 (1)
      • Winter Friends
    • ►  giu 2023 (1)
    • ►  feb 2023 (1)
  • ►  2022 (14)
    • ►  ott 2022 (1)
    • ►  ago 2022 (1)
    • ►  lug 2022 (2)
    • ►  giu 2022 (1)
    • ►  mag 2022 (1)
    • ►  apr 2022 (1)
    • ►  mar 2022 (3)
    • ►  feb 2022 (1)
    • ►  gen 2022 (3)
  • ►  2021 (27)
    • ►  dic 2021 (1)
    • ►  nov 2021 (1)
    • ►  ott 2021 (2)
    • ►  set 2021 (2)
    • ►  ago 2021 (3)
    • ►  lug 2021 (2)
    • ►  giu 2021 (1)
    • ►  mag 2021 (2)
    • ►  apr 2021 (2)
    • ►  mar 2021 (2)
    • ►  feb 2021 (5)
    • ►  gen 2021 (4)
  • ►  2020 (72)
    • ►  dic 2020 (2)
    • ►  nov 2020 (2)
    • ►  ott 2020 (4)
    • ►  set 2020 (8)
    • ►  ago 2020 (4)
    • ►  lug 2020 (7)
    • ►  giu 2020 (8)
    • ►  mag 2020 (5)
    • ►  apr 2020 (12)
    • ►  mar 2020 (7)
    • ►  feb 2020 (7)
    • ►  gen 2020 (6)
  • ►  2019 (68)
    • ►  dic 2019 (6)
    • ►  nov 2019 (8)
    • ►  ott 2019 (9)
    • ►  set 2019 (9)
    • ►  ago 2019 (8)
    • ►  lug 2019 (8)
    • ►  giu 2019 (3)
    • ►  mag 2019 (4)
    • ►  apr 2019 (2)
    • ►  mar 2019 (3)
    • ►  feb 2019 (4)
    • ►  gen 2019 (4)
  • ►  2018 (59)
    • ►  dic 2018 (2)
    • ►  nov 2018 (7)
    • ►  ott 2018 (7)
    • ►  set 2018 (7)
    • ►  ago 2018 (7)
    • ►  lug 2018 (6)
    • ►  giu 2018 (4)
    • ►  mag 2018 (4)
    • ►  apr 2018 (4)
    • ►  mar 2018 (4)
    • ►  feb 2018 (3)
    • ►  gen 2018 (4)
  • ►  2017 (45)
    • ►  nov 2017 (6)
    • ►  ott 2017 (3)
    • ►  set 2017 (5)
    • ►  ago 2017 (3)
    • ►  lug 2017 (3)
    • ►  giu 2017 (3)
    • ►  mag 2017 (3)
    • ►  apr 2017 (5)
    • ►  mar 2017 (3)
    • ►  feb 2017 (6)
    • ►  gen 2017 (5)
  • ►  2016 (32)
    • ►  dic 2016 (1)
    • ►  nov 2016 (6)
    • ►  ott 2016 (3)
    • ►  set 2016 (3)
    • ►  ago 2016 (3)
    • ►  lug 2016 (4)
    • ►  giu 2016 (4)
    • ►  mag 2016 (2)
    • ►  apr 2016 (1)
    • ►  mar 2016 (2)
    • ►  feb 2016 (2)
    • ►  gen 2016 (1)
  • ►  2015 (21)
    • ►  dic 2015 (1)
    • ►  nov 2015 (2)
    • ►  set 2015 (1)
    • ►  ago 2015 (2)
    • ►  lug 2015 (1)
    • ►  mag 2015 (1)
    • ►  apr 2015 (2)
    • ►  mar 2015 (4)
    • ►  feb 2015 (4)
    • ►  gen 2015 (3)
  • ►  2014 (31)
    • ►  dic 2014 (2)
    • ►  nov 2014 (2)
    • ►  ott 2014 (2)
    • ►  set 2014 (4)
    • ►  ago 2014 (1)
    • ►  lug 2014 (3)
    • ►  giu 2014 (3)
    • ►  mag 2014 (3)
    • ►  apr 2014 (2)
    • ►  mar 2014 (3)
    • ►  feb 2014 (3)
    • ►  gen 2014 (3)
  • ►  2013 (33)
    • ►  dic 2013 (4)
    • ►  nov 2013 (5)
    • ►  ott 2013 (4)
    • ►  set 2013 (3)
    • ►  ago 2013 (4)
    • ►  lug 2013 (5)
    • ►  giu 2013 (8)

Search

Labels

  • crackerbox & suzy stamps
  • craftin desert divas
  • create a smile stamps
  • lawnfawn
  • mft stamps
  • rinea foiled paper
  • so suzy stamps
  • someoddgirl
  • whimsy stamps
  • wplus9

Created with by BeautyTemplates