Copyright giadaelesuenuvole.blogspot.it. Powered by Blogger.

giadalesuenuvole

Pagine

  • Chi sono
  • Privacy Policy


Hello my friends! I really love dragons, so I had to color this one by Whimsy Stamps, called Autumn Happiness. This time I chose Prismacolor pencils after printing the image on regular cardstock: I'm so happy that the dragon turned out so nice! I chose my favorite color for the skin and I mixed it with an autumn palette for the leaves. Then I fussy cut.

Ciao amici! Adoro i draghi, per cui non ho resistito a colorare quest'ultimo di Whimsy Stamps, chiamato Autumn Happiness. Questa volta ho scelto di utilizzare le matite Prismacolor dopo aver stampato l'immagine su del cartoncino bianco: sono così felice che il draghetto è saltato fuori così carino! Ho scelto il mio colore preferito per lui e ho messo insieme una palette di colori autunnali per le foglie. Poi l'ho ritagliato.


I decided to create a shaker card, so I die cut a white panel with a circle shape and glued a piece of acetate behind it. Then I added a bunch of sequins (blue, iridescent and yellow), used a lot of foam tape and adhered it on top of a white cardbase. Shaker cards are always so nice! 

Ho deciso di realizzare una shaker card, per cui ho fustellato un pannello bianco con una forma a cerchio e dietro di esso ho incollato dell'acetato. Poi ho aggiunto un sacco di sequins (blu, iridescenti e gialli), ho incollato il tutto con moltissimo nastro gommato e ho fissato il tutto sulla base. Le shaker card sono sempre così belle!

Share
Tweet
Pin
Share
No commenti


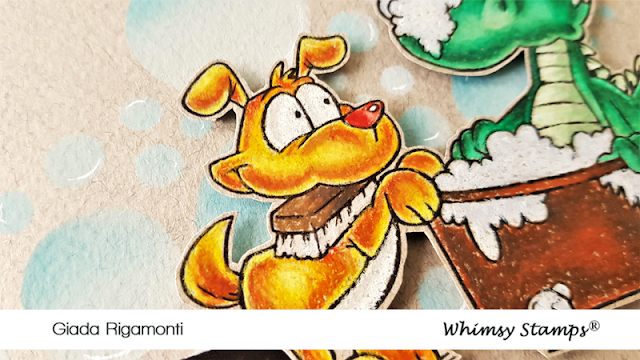
Hello my friends! I'm finally back after a very busy month with a post for the new digi release by Whimsy Stamps. Well, it seems that I can't resist Dudley's faces and, in particular, this grumpy one during the bath time! Plus the dog that it's trying to wash him reminded me of Bravo, the dog of the cartoon "Inspector Gadget" - and so I colored it.

Ciao amici! Sono finalmente tornata su questi schermi dopo un mese impegnativo, con un post dedicato alla nuova release digitale di Whimsy Stamps. Bene, sembra proprio che non possa resistere alle espressioni del draghetto Dudley e, in particolare, a quella scontrosa che sta facendo durante il bagno! In più, il cane che sta cercando di lavarlo mi ricorda molto Bravo, il cagnolino del cartone "L'ispettore Gadget" - e l'ho colorato proprio allo stesso modo.


First of all I printed the stamp on a kraft cardstock and colored the critters with prismacolor pencils. Then I fussy cut the image and added some details with a white gel pen.

Prima di tutto ho stampato l'immagine su del cartoncino kraft e ho colorato gli animaletti con le matite prismacolor. Poi ho ritagliato il tutto e aggiunto i dettagli con la penna gel bianca. 


For the background I blended some circles in various sizes with Broken China and Tumbled Glass Distress Oxides and a bit of white pigment ink, as if they were a bunch of bubbles. I added some highlights with a white gel pen and I put everything on a black panel. 

Per lo sfondo ho sfumato dei cerchi di varie dimensioni con i Distress Oxides Broken China e Tumbled Glass e dell'inchiostro bianco, come se si trattasse di un bel po' di bolle di sapone. Ho aggiunto qualche punto luce con la penna gel bianco e ho fissato il tutto su un pannello nero.
Share
Tweet
Pin
Share
No commenti


Hello my friends, today I have exciting news! I was asked to enter the Digital Team of Whimsy Stamps and I said "yes"! So I'll keep on creating with Some Odd Girl digis and using more images designed by different designers. Today I'm sharing my very first card for which I chose Rainy Day Dudley, the super-cute dragon. I decided to print Dudley on top of kraft cardstock, in order to color it with Prismacolor pencils.

Ciao amici, oggi ho un annuncio importante! Dopo la collaborazione con Whimsy Stamps mi è stato chiesto di entrare a far parte del Team Digital... ed ho risposto "sì"! In questo modo potrò continuare a creare con i digi di Some Odd Girl e utilizzare più immagini, realizzate da diversi designer. Oggi vi mostro la mia primissima card, per la quale ho scelto di utilizzare Rainy Day Dudley, il draghetto super-carino. Ho deciso di stamparlo su del cartoncino kraft, così da poterlo colorare con le matite Prismacolor.

Since I really wanted to make it pop against the background, I used blue and orange colors, with a touch of white for the highlights. For the rain I combined dash lines made with a white gel pen as well as a white pencil. Finally I built the ground with green pencils and added a sentiment with strips of paper.

Visto che volevo far risaltare il draghetto rispetto allo sfondo, ho utilizzato matite blu ed arancioni, con un tocco di bianco per enfatizzare i punti luce. Per la pioggia ho utilizzato un tratteggio, realizzato con penna gel bianca e matita bianca. Infine ho costruito il prato con le matite verdi e ho aggiunto l'augurio, suddiviso su più strisce di carta.
Share
Tweet
Pin
Share
No commenti


Hello everyone! I'm keeping on being obsessed by flowers, so today I want to show you my latest card for Crackerbox & Suzy Stamps using the Morning Glory - set of 5 stamps. I love them because I can build a cluster of flowers and leaves as my focal point on the card.

Ciao a tutti! Continuo ad essere ossessionata dai fiori e a smarmellarli su ogni card che mi capiti a tiro! La card di oggi, realizzata per Crackerbox & Suzy Stamps, vede come protagonista il set composto da 5 timbri "Morning Glory". Adoro questo set perché mi permette di costruire un bel gruppo di fiori e foglie, perfetto per riempire una card.


First of all, I stamped all the pieces of the set on a piece of kraft cardstock, colored everything with prismacolor pencils and fussy cut. I like to place my stamps on a MISTI tool so I can stamp them again and again, in order to achieve a dark outline after the coloring process.

Prima di tutto ho timbrato tutti i pezzi di cui è composto il set su del cartoncino kraft, ho colorato tutto con le matite prismacolor e ho ritagliato. Mi piace posizionare i timbri nel mio MISTI, così posso timbrarli di nuovo una volta che li ho colorati per far risaltare nuovamente i contorni dell'immagine.


Then I took another piece of kraft cardstock and an embossed white panel. I heat embossed the sentiment with gold embossing powder on white cardstock and fussy cut it too.

Poi ho preso dell'altro cartoncino kraft e una base bianca precedentemente embossata. Ho embossato a caldo l'augurio, utilizzando della polvere da embossing oro su del cartoncino bianco. Ho ritagliato anche questo, seguendo i contorni.


At this point I arranged the flowers on the kraft piece and fixed all the images with regular and foam adhesive. I glued the sentiment under the cluster of flowers and the entire panel on a white cardbase.

A questo punto ho sistemato i fiori sul cartoncino kraft, fissando tutte le singole immagini con del biadesivo sia normale che gommato. Ho incollato l'augurio sotto il gruppo floreale e l'interno pannello sopra la base bianca.


A quick reminder: the February sale (20% off) by Crackerbox & Suzy Stamps is all about Easter, Friendship and St.Patrick's Day stamps!

Vi ricordo che le categorie interessate dallo sconto di febbraio di Crackerbox & Suzy Stamps (scontate del 20%) sono Pasqua, amicizia e il giorno di San Patrizio!


Supplies used:

Morning Glory - set of 5

Happy Birthday open

Share
Tweet
Pin
Share
No commenti

Hello my friends! Today I'm back with flowers... I'm a bit obsessed, I know! This year winter seems like a long and sunny spring, flowers are already blooming and I feel quite inspired by them. Today I made clean and simple card, with a big flower by Some Odd Girl and a scripty sentiment.

Ciao amici! Oggi ritorno con un altro fiori...ne sono un po' ossessionata, lo riconosco! Quest'anno l'inverno sembra aver lasciato spazio a una lunga e soleggiata primavera, i fiori stanno già sbocciando ed io mi sento ispirata dalla loro bellezza. Oggi ho realizzato una card davvero semplice e veloce, con un fiore di dimensioni particolarmente importanti - disegnato da Some Odd Girl - e un augurio dallo stile calligrafico.


This image is full of details and petals, so I decided to magnify and print it. I colored the flower with alcohol makers, adding more shadows and depth with prismacolor pencils too.

Quest'immagine è ricca di dettagli e petali, per cui ho deciso di ingrandirla molto e stamparla. Ho colorato il fiore con i pennarelli ad alcohol, aggiungendo dei tocchi di matite prismacolor per aggiungere ombre e profondità.


I fussy cut the big flower and fixed it at the bottom of a lilac panel with foam adhesive. I stamped the sentiment on top, outlining it with a white gel pen. I put everything on a white cardbase and that's all!

Ho ritagliato il fiorellone e l'ho incollato su un cartoncino lillà, nella parte inferiore, con del nastro  gommato. Ho timbrato l'augurio al di sopra, contornandolo con una penna gel bianca. Ho fissato il tutto su una base bianca e...voilà!
Share
Tweet
Pin
Share
2 commenti

Hello stampers! Today I'm sharing a card with lots of vegetables. I have to say that Broccoli is one of my favorite vegetables... so I fell in love with this digital version designed by Kristy - Some Odd Girl. As I saw all those other little friends - Carrot and Radish - I decided to make a very unique friendship card.

Ciao a tutti! Oggi sono qui a condividere una card con moltissime verdure. Devo dire che i broccoli sono tra le mie preferite... per cui mi sono letteralmente innamorata della loro versione digitale, disegnata da Kristy di Some Odd Girl. Non appena ho visto anche tutti gli altri amici - Carota e Rapanello - ho deciso di realizzare una card d'amicizia davvero unica e particolare.


First of all I printed Broccoli, Carrot and Radish on a kraft cardstock and I took some Prismacolor pencils for coloring them. I love the effect of the pencils on kraft!

Prima di tutto ho stampato broccolo, carota e rapanello su del cartoncino kraft e ho preso le mie matite Prismacolor per colorarli. Adoro l'effetto delle matite su base kraft!


Coloring with pencils is time consuming, but it was worth it: the images just pop thanks to bright colors and the reference on the website is really useful to decide which color is better using. After coloring, I went over the edges with a black marker and fussy cut.

Colorare con le matite richiede tempo, ma ne vale sempre la pena: le immagini sembrano prendere vita grazie ai colori brillanti, e l'immagine presente sul sito come reference è davvero utile per decidere quali colori è meglio usare. Dopo la colorazione, sono passata sopra tutti i bordi con un pennarello nero e ho ritagliato.


Finally I put all of them on a piece of Dovecraft patterned paper with foam tape, I glued the panel on a kraft cardbase and I stamped a sentiment which says "One who finds a friends, finds a treasure".

Infine ho posizionato tutte le verdure su della carta patterned di Dovecraft con del nastro gommato, ho incollato il pannello su una base kraft e ho timbrato un augurio appropriato de "La Coppia Creativa".
Share
Tweet
Pin
Share
2 commenti

Hello stampers! What a busy month! Christmas is near and it seems I'm finishing all my Holiday cards for this year. A friend of mine asked me a traditional card, so I decided to use my prismacolor pencils on kraft cardstock with a touch of gold.

Ciao a tutti! Che mese impegnativo! Il Natale è ormai vicinissimo e sembra proprio che riesca a finire per tempo tutte le card natalizie che mi sono state commissionate. Un'amica di famiglia mi ha chiesto di realizzare una card tradizionale, quindi ho deciso di tirar fuori le matite, il cartoncino kraft e la polvere dorata.


First of all I stamped some Holly Branches by Crackerbox & Suzy Stamps on a kraft panel with a light ink. In this way I could practice some no-line coloring with Prismacolor pencils.

Prima di tutto ho timbrato qualche Holly Branch di Crackerbox & Suzy Stamps su del cartoncino kraft utilizzando un inchiostro chiaro. In questo modo ho potuto impratichirmi con la tecnica di colorazione "no-line" utilizzando le matite Prismacolor.


I picked up 3 pencils for each shade of colors in order to give a 3D effect to the images.

Ho scelto 3 matite per ciascuna sfumatura di colore, così da dare una parvenza di tridimensionalità alle immagini.


I stamped and colored one branch at a time, since I stamped it again on top of the colored image with my MISTI tool and the Versamark ink. So I covered the branches with gold embossing powder and heat set them.

Ho timbrato e colorato un ramo alla volta, visto che ognuno è stato ristampato una seconda volta sopra l'immagine colorata, con l'aiuto del MISTI e dell'inchiostro Versamark. Infatti ho coperto il tutto con la polvere da embossing dorata e l'ho fusa con l'heat gun.


Finally I heat embossed the sentiment by Modascrap in white on red cardstock and framed it with gold paper.

Infine ho embossato la scritta Modascrap in bianco su del cartoncino rosso e l'ho incorniciato con della carta dorata.


I love coloring heat embossing images with markers or pencils: in this case the MISTI tool really makes the difference! During the month of December every Crackerbox & Suzy Stamps stamp is 30% off, plus Copic markers and stencils are 20% off too:


Adoro colorare immagini embossate con pennarelli o pastelli: in questo caso il MISTI è un alleato prezioso, che fa davvero la differenza! Durante il mese di dicembre tutti i timbri Crackerbox & Suzy Stamps sono scontati del 30%, mentre Copic e stencils sono scontati del 20%!


Supplies used:

Holly Branch

Share
Tweet
Pin
Share
No commenti

Hello spookies! Probably this is my last Halloween card of the season - and it's one of my favorite too. The main subject of the card is the Mini Headless Horseman by Some Odd Girl, that I colored with Prismacolor pencils.

Ciao spaventevoli creature! Probabilmente questa è l'ultima card a tema Halloween della stagione - ed è anche una delle mie preferite. Il soggetto in questione è il Cavaliere senza testa di Some Odd Girl, che ho colorato con le matite Prismacolor.


I think that using the image on the site as a reference was very useful, especially for drawing lights and shadows. After fussy cutting the image, I colored the edges with a black marker in order to hide the white on top of a dark cardstock.

Penso che utilizzare l'immagine sul sito come reference sia stato molto utile, specialmente per tracciare punti di luce e ombre. Dopo aver ritagliato l'immagine, ho colorato i bordi con un pennarello nero per nascondere il margine bianco - troppo in contrasto con il cartoncino nero.


For my scene I decided to blend a bit of Fossilized Amber Distress Oxide on black cardstock, adding some golden dots here and there.

Per la mia scena ho deciso di sfumare del Distress Oxide Fossilized Amber su del cartoncino nero, aggiungendo qualche puntino dorato qua e là.


Finally I picked a patterned paper that matches the horseman and I used it as my cardbase.

Infine ho scelto una carta patterned che si sposava benissimo con i colori utilizzati per il Cavaliere e che ho utilizzato come base.
Share
Tweet
Pin
Share
No commenti


Hello my friends! Today I want to introduce one of the cutest Christmas stamp I've ever seen: Mini Rudolph by Some Odd Girl! Isn't he adorable? I had to put it on a Holiday card - an over-sized one!

Ciao amici! Oggi vi voglio presentare uno dei più teneri timbri di Natale che io abbia mai visto: Mini Rudolph di Some Odd Girl! Non è adorabile? Ho sentito la necessità di scaricarlo e metterlo su una card - dalle dimensioni allungate!


First of all, I printed the image in different sizes, as I don't always have a plan before coloring it. In this case I used Prismacolor pencils and the image on the website as a reference.

Prima di tutto, ho stampato l'immagine in diversi formati, visto che non sempre ho un piano prima di aver colorato quello che ho davanti. In questo caso ho utilizzato matite Prismacolor e l'immagine presente sul sito come riferimento.


Then I took a piece of watercolor paper and I blended Shaded Lilac and Blueprint Sketch Distress Inks. I sprinkled some water on top of it and I glued a couple of white snowflakes.

Poi ho preso della carta acquerellabile e ho sfumato i Distress Inks Shaded Lilac e Blueprint Sketch. Ho spruzzato dell'acqua per riattivare l'inchiostro e ho incollato un paio di fiocchi di neve bianchi.


I put everything together, I added a sentiment which means "Merry Christmas" and a little gift from a MFT stampset. Don't forget that it's ODDtober: you can find all the contests here!

Ho messo insieme il tutto, ho aggiunto un augurio e un piccolo regalo preso da un set MFT. Non dimenticate che siamo in ODDtober: potete trovare tutti i contest attivi qui!
Share
Tweet
Pin
Share
No commenti

Ohm! Today I'm sharing with you a bookmark made with the newest Zodiac digi stamp on Some Odd Girl: Libra! Her face is so relaxing... and she's free during the month of October. Plus, it's ODDtober: it means lots of events and contests you can join!

Ohm! Oggi vi voglio mostrare il segnalibro che ho realizzato con il nuovissimo timbro digitale a tema zodiacale, disegnato da Some Odd Girl: Libra! Il suo viso è così rilassante...ed è scaricabile gratuitamente durante il mese di ottobre. O meglio, ODDtober: questo significa un sacco di eventi e contest aperti a tutti!


This bookmark is the perfect project to introduce the Zodiac Challenge: use any Zodiac SOG stamp, create something and share it with us: you can win a 20$ gift certificate to the shop! You have until October 27th. More informations are available here.


Questo segnalibro è l'occasione perfetta per introdurre la Zodiac Challenge: usa un qualsiasi timbro SOG Zodiacale, crea qualcosa e condividilo con noi: puoi vincere 20$ da utilizzare sullo shop! Avete tempo fino al 27 ottobre. Tutte le informazioni sono qui.


Focusing on today's project, I simply colored Libra with Prismacolor pencils and then fussy cut. I saw an old washi tape in my stash with the same hue I used for Libra's dress: I decided to put it as the base of the bookmark. Finally I add an italian sentiment dedicated to women.

Per tornare al progetto di oggi, ho semplicemente colorato Libra con le matite Prismacolor e poi l'ho ritagliata. Ho visto tra le cose che ho buttato qua e là un vecchio washi tape dello stesso colore del vestito di Libra: ho deciso di utilizzarlo come base del segnalibro, aggiungendo un divertentissimo augurio dedicato alle donne.
Share
Tweet
Pin
Share
No commenti

Hello my friends! Finally I made a card dedicated to my favorite season: autumn. This Foxy Tia by Some Odd Girl is perfect for celebrating fall, with warm colors and sweet eyes.

Ciao amici! Finalmente ho realizzato una card dedicata alla mia stagione preferita: autunno. Questa Foxy Tia di Some Odd Girl è perfetta per festeggiare l'autunno, soprattutto con colori caldi e occhi dolci.


I colored this digi stamp with Prismacolor pencils using brown, mustard and red shades - following the image on the website as a reference.

Ho colorato questo digi con le matite Prismacolor utilizzando sfumature di marrone, senape e rosso - seguendo l'immagine sul sito come referenza.


The face of Tia is so cute, especially in those foxy colors!

Il volto di Tia è tenerissimo, specialmente in questi colori volposi!


For finishing the card I chose a patterned paper and a kraft die cut, as well as a speech bubble by Lawn Fawn.

Per finire la card ho scelto una carta pattern, una fustellata kraft e una nuvoletta di Lawn Fawn.
Share
Tweet
Pin
Share
No commenti

Hello my friends! Today I'm sharing this card with Some Odd Girl Polar Bear at the center. This image is just too cute and I decided to color it with prismacolor pencils on kraft cardstock.

Ciao a tutti! Oggi vi voglio mostrare questa card con l'orso polare di Some Odd Girl al centro. Questa immagine è troppo carina e ho deciso di colorarla con matite prismacolor su cartoncino kraft.


I printed it and used prismacolor pencils in white, red and rose shades.

L'ho stampato e ho utilizzato matite nei colori del bianco, rosso e rosa.


Then I masked the bear and the ground in order to blend the sky with Distress Inks (Twisted Citron, Mermaid Lagoon and Chipped Sapphire). I also added lots of white dots here and there as if they were stars or snowflakes.

Poi ho mascherato l'orsetto e la base per poter sfumare il cielo con i Distress Inks (Twisted Citron, Mermaid Lagoon e Chipped Sapphire). Ho anche aggiunto moltissimi puntini bianchi come se fossero stelle o fiocchi di neve.


For the ground I sponged some white pigment ink layer by layer.

Per il terreno ho applicato più livello di inchiostro bianco.


At this point I trimmed down the panel and I glued it onto a red cardbase on which I stamped lots of snowflakes in white.

A questo punto ho ritagliato il pannello centrale e ho incollato il tutto su una base di cartoncino rosso, su cui avevo timbrato tantissimi fiocchi di neve bianchi.


This close-up photo shows the magic of coloring on kraft cardstock!

Questo dettaglio mostra perfettamente la magia della colorazione su cartoncino kraft!
Share
Tweet
Pin
Share
No commenti
Older Posts

About me

About me
I'm Giada, an italian cardmaker. I love clean and simple cards...and coloring critters! Thank for being here!

Follow Me

  • Facebook
  • Instagram
  • Youtube

Contact me

Nome

Email *

Messaggio *

Blog Archive

  • ▼  2023 (3)
    • ▼  nov 2023 (1)
      • Winter Friends
    • ►  giu 2023 (1)
    • ►  feb 2023 (1)
  • ►  2022 (14)
    • ►  ott 2022 (1)
    • ►  ago 2022 (1)
    • ►  lug 2022 (2)
    • ►  giu 2022 (1)
    • ►  mag 2022 (1)
    • ►  apr 2022 (1)
    • ►  mar 2022 (3)
    • ►  feb 2022 (1)
    • ►  gen 2022 (3)
  • ►  2021 (27)
    • ►  dic 2021 (1)
    • ►  nov 2021 (1)
    • ►  ott 2021 (2)
    • ►  set 2021 (2)
    • ►  ago 2021 (3)
    • ►  lug 2021 (2)
    • ►  giu 2021 (1)
    • ►  mag 2021 (2)
    • ►  apr 2021 (2)
    • ►  mar 2021 (2)
    • ►  feb 2021 (5)
    • ►  gen 2021 (4)
  • ►  2020 (72)
    • ►  dic 2020 (2)
    • ►  nov 2020 (2)
    • ►  ott 2020 (4)
    • ►  set 2020 (8)
    • ►  ago 2020 (4)
    • ►  lug 2020 (7)
    • ►  giu 2020 (8)
    • ►  mag 2020 (5)
    • ►  apr 2020 (12)
    • ►  mar 2020 (7)
    • ►  feb 2020 (7)
    • ►  gen 2020 (6)
  • ►  2019 (68)
    • ►  dic 2019 (6)
    • ►  nov 2019 (8)
    • ►  ott 2019 (9)
    • ►  set 2019 (9)
    • ►  ago 2019 (8)
    • ►  lug 2019 (8)
    • ►  giu 2019 (3)
    • ►  mag 2019 (4)
    • ►  apr 2019 (2)
    • ►  mar 2019 (3)
    • ►  feb 2019 (4)
    • ►  gen 2019 (4)
  • ►  2018 (59)
    • ►  dic 2018 (2)
    • ►  nov 2018 (7)
    • ►  ott 2018 (7)
    • ►  set 2018 (7)
    • ►  ago 2018 (7)
    • ►  lug 2018 (6)
    • ►  giu 2018 (4)
    • ►  mag 2018 (4)
    • ►  apr 2018 (4)
    • ►  mar 2018 (4)
    • ►  feb 2018 (3)
    • ►  gen 2018 (4)
  • ►  2017 (45)
    • ►  nov 2017 (6)
    • ►  ott 2017 (3)
    • ►  set 2017 (5)
    • ►  ago 2017 (3)
    • ►  lug 2017 (3)
    • ►  giu 2017 (3)
    • ►  mag 2017 (3)
    • ►  apr 2017 (5)
    • ►  mar 2017 (3)
    • ►  feb 2017 (6)
    • ►  gen 2017 (5)
  • ►  2016 (32)
    • ►  dic 2016 (1)
    • ►  nov 2016 (6)
    • ►  ott 2016 (3)
    • ►  set 2016 (3)
    • ►  ago 2016 (3)
    • ►  lug 2016 (4)
    • ►  giu 2016 (4)
    • ►  mag 2016 (2)
    • ►  apr 2016 (1)
    • ►  mar 2016 (2)
    • ►  feb 2016 (2)
    • ►  gen 2016 (1)
  • ►  2015 (21)
    • ►  dic 2015 (1)
    • ►  nov 2015 (2)
    • ►  set 2015 (1)
    • ►  ago 2015 (2)
    • ►  lug 2015 (1)
    • ►  mag 2015 (1)
    • ►  apr 2015 (2)
    • ►  mar 2015 (4)
    • ►  feb 2015 (4)
    • ►  gen 2015 (3)
  • ►  2014 (31)
    • ►  dic 2014 (2)
    • ►  nov 2014 (2)
    • ►  ott 2014 (2)
    • ►  set 2014 (4)
    • ►  ago 2014 (1)
    • ►  lug 2014 (3)
    • ►  giu 2014 (3)
    • ►  mag 2014 (3)
    • ►  apr 2014 (2)
    • ►  mar 2014 (3)
    • ►  feb 2014 (3)
    • ►  gen 2014 (3)
  • ►  2013 (33)
    • ►  dic 2013 (4)
    • ►  nov 2013 (5)
    • ►  ott 2013 (4)
    • ►  set 2013 (3)
    • ►  ago 2013 (4)
    • ►  lug 2013 (5)
    • ►  giu 2013 (8)

Search

Labels

  • crackerbox & suzy stamps
  • craftin desert divas
  • create a smile stamps
  • lawnfawn
  • mft stamps
  • rinea foiled paper
  • so suzy stamps
  • someoddgirl
  • whimsy stamps
  • wplus9

Created with by BeautyTemplates