Copyright giadaelesuenuvole.blogspot.it. Powered by Blogger.

giadalesuenuvole

Pagine

  • Chi sono
  • Privacy Policy

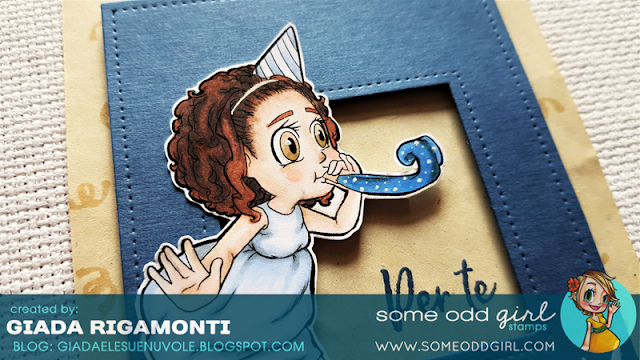
Hello Oddies! For today's card I focused on a color combination: when I feel like I need new inspiration, I search for videos, images or new color combinations. In this case I worked with blues, kraft, brown and white colors, which I used to color and match the Party Tia digi stamp by Some Odd Girl.
Everything is quite simple here: I printed and colored Tia using alcohol markers. Then I fussy cut.

Ciao a tutti! Per realizzare la card di oggi mi sono concentrata su una combinazione di colori: quando mi sembra di creare sempre le stesse cose, cerco nuovi video, immagini...o nuove combo di colori. In questo caso ho deciso di lavorare con i blu, il kraft, il marrone ed il bianco, tutti colori che ho utilizzato sull'immagine Party Tia di Some Odd Girl.
Il risultato finale è davvero molto semplice: ho stampato e colorato Tia utilizzando i pennarelli ad alcohol, poi l'ho ritagliata.


Next I took a piece of kraft cardstock, fullfilled by stamping a little image here and there. Finally I die cut a piece of blue cardstock to create a sort of frame and a piece of white cardstock with a grass border. The sentiment says "For you"!

Poi ho preso del cartoncino kraft, che ho riempito timbrando qua e là una piccolissima immagine a tema. Infine ho fustellato del cartoncino blu per realizzare una sorta di cornice e del cartoncino bianco per ricavare del prato dove far poggiare Tia.
Share
Tweet
Pin
Share
No commenti

Hello stampers! Today I'm here with another Holiday card in red and light blue colors. I used lots of stamps by Crackerbox & Suzy Stamps and in particular the Viney Wreath from the latest release. I decided to pair it with the snowflakes and the small pinecone stamps.

Ciao a tutti! Oggi vi mostro un'altra card natalizia nei colori rosso e azzurro. Ho utilizzato molti timbri di Crackerbox & Suzy Stamps, in particolare la ghirlanda dell'ultima release. Ho deciso di abbinarla ai bellissimi fiocchi di neve e ad una piccola pigna.


First of all I stamped the wreath on some kraft paper with brown ink. Then I took my time and I fussy cut it (outside and inside edges). To make it look more realistic, I went over with some brown pencils.

Prima di tutto ho timbrato la ghirlanda su del cartoncino kraft con dell'inchiostro marrone. Poi mi sono presa il mio tempo e ho ritagliato il contorno sia interno che esterno. Per rendere il tutto più realistico, ho ripassato i rametti con dei pastelli marroni.


Then I stamped some big, medium and small snowflakes in white on light blue cardstock. I covered the whole panel with them and I set it aside to dry.

Poi ho timbrato alcuni fiocchi di neve piccoli, medi e grandi in bianco su cartoncino azzurro. Ho coperto l'intero pannello con tali immagini e ho lasciato asciugare.


Finally I cut a red banner and heat embossed both the sentiment and the small pinecone in white.

Infine ho tagliato un bannero rosso e ho embossato sia la scritta sia la piccola pigna in bianco.


As final touches, I added some Nuvo Drops all around the wreath and some white dots near the snowflakes. I love how light blue and red colors match together, I'm going to use this combo for other cards too!

Come tocchi finali, ho aggiunto qualche goccia di Nuvo Drops tutto intorno alla ghirlanda e qualche puntino bianco vicino ai fiocchi di neve. Adoro come l'azzurro e il rosso stanno bene insieme, per cui penso proprio che utilizzerò ancora questa combinazione di colori per altre card!

Supplies used:

Viney Wreath

Snowflakes
Pinecone Sm.


Share
Tweet
Pin
Share
No commenti

Hello my friends! Today I'm sharing this card with Some Odd Girl Polar Bear at the center. This image is just too cute and I decided to color it with prismacolor pencils on kraft cardstock.

Ciao a tutti! Oggi vi voglio mostrare questa card con l'orso polare di Some Odd Girl al centro. Questa immagine è troppo carina e ho deciso di colorarla con matite prismacolor su cartoncino kraft.


I printed it and used prismacolor pencils in white, red and rose shades.

L'ho stampato e ho utilizzato matite nei colori del bianco, rosso e rosa.


Then I masked the bear and the ground in order to blend the sky with Distress Inks (Twisted Citron, Mermaid Lagoon and Chipped Sapphire). I also added lots of white dots here and there as if they were stars or snowflakes.

Poi ho mascherato l'orsetto e la base per poter sfumare il cielo con i Distress Inks (Twisted Citron, Mermaid Lagoon e Chipped Sapphire). Ho anche aggiunto moltissimi puntini bianchi come se fossero stelle o fiocchi di neve.


For the ground I sponged some white pigment ink layer by layer.

Per il terreno ho applicato più livello di inchiostro bianco.


At this point I trimmed down the panel and I glued it onto a red cardbase on which I stamped lots of snowflakes in white.

A questo punto ho ritagliato il pannello centrale e ho incollato il tutto su una base di cartoncino rosso, su cui avevo timbrato tantissimi fiocchi di neve bianchi.


This close-up photo shows the magic of coloring on kraft cardstock!

Questo dettaglio mostra perfettamente la magia della colorazione su cartoncino kraft!
Share
Tweet
Pin
Share
No commenti

Hello and happy summer! Today I'm sharing my version of a popular DIY bookmark using Beachy Tia by Some Odd Girl Stamps. This bookmark is very easy to make and I thought it could be a cool and useful gift for all the bookeaters on the beach!

Ciao a tutti e buona estate! Oggi vi mostro la mia versione di un popolare segnalibro fatto a mano, realizzato utilizzando il timbro digitale Beachy Tia di Some Odd Girl Stamps. Questo segnalibro è davvero facile da riprodurre e ho pensato potesse essere un regalo sfizioso e utile per tutti i divoratori seriali di libri sotto l'ombrellone!


You can see the structure of the origami bookmark on the right - yeah, I chose black color. On the left I printed and colored Tia, using bright shades of orange, mint and yellow. Then I fussy cut.

Potete vedere la struttura del segnalibro origami sulla destra - eh sì, ho scelto il nero. Sulla sinistra invece ho timbrato e colorato Tia, utilizzando colori vibranti come l'arancione, il verde menta e il giallo. Poi ho ritagliato.


The best part of her outfit are the sunglasses: I made them sparkle by using metallic gel pens with a bit of shimmer in them.

La parte migliore del suo outfit sono gli occhiali da sole: li ho fatti luccicare grazie a delle penne gel metalliche che contengono anche qualche brillantino.


Finally I picked a matchy patterned paper, added a sentiment and some stars. Enjoy the reading now!

Infine ho scelto una carta patterned abbinata, ho aggiunto l'augurio e qualche stellina. Ed ora, buona lettura!
Share
Tweet
Pin
Share
No commenti

Hi! Finally I'm on holiday! I really need some rest and relax, which basically consist in doing what I want - or doing nothing. I created a lot during the month of July, so that I could share lots of projects during August too. Today I made a western-themed card for Crackerbox & Suzy Stamps, that I know it could be appreciated by at least a couple of men I know.

Ciao a tutti! Finalmente sono in vacanza! Avevo davvero bisogno di rilassarmi e staccare la spina, e ciò consiste nel fare ciò che ho voglia e se ne ho voglia (è contemplato anche il non fare nulla!). Ho creato moltissimo durante il mese di luglio, così da poter condividere molti progetti anche durante tutto agosto. Oggi ho realizzato questa card a tema western per Crackerbox & Suzy Stamps, che so potrebbe essere apprezzata da almeno un paio di ometti di mia conoscenza. 


First of all I made a sunset background by blending Candied Apple and Fossilized Amber Distress Oxide Inks on a piece of white cardstock. I went back and forth in order to achieve a smooth blending.

Prima di tutto ho creato un tramonto personalizzato sfumando i Distress Oxide Inks Candied Apple e Fossilized Amber su del cartoncino bianco. Sono andata avanti e indietro più volte per ottenere una sfumatura graduale.


As soon as it dried, I stamped the Trail Break image using the MISTI tool so that I could stamp it again and again to have a bold impression. I did the same for the sentiment.

Non appena è asciugato, ho timbrato l'immagine Trail Break utilizzando il MISTI, così da poter timbrare ripetutamente nello stesso punto e ottenere una timbrata nitida e piena. Ho fatto lo stesso con il sentiment.


At the end I took a black card base and I put my panel on top. 

Alla fine ho preso del cartoncino nero e l'ho utilizzato come base del pannello.


These stamps and all the ones in Western category are 20% off during the month of August!

Questi timbri a tutti quelli della categoria Western sono scontati del 20% durante tutto agosto!


Supplies used:

Trail Break


Be fearless

Share
Tweet
Pin
Share
No commenti


Hello stampers! Today I have a quick project for you: a birthday card for a mom. I love the sweetness of this Momma chicken protecting her chicks, that is a new digi stamp by Some Odd Girl. The scene is very simple, since it is composed by a fence and a patterned paper.

Ciao amici! Oggi ho un progetto molto veloce da mostrarvi: una card di compleanno per una mamma. Adoro la dolcezza racchiusa nella chioccia che protegge i propri piccoli, immagine che è una delle novità dello shop di Some Odd Girl. La scena che ho creato è davvero molto semplice, visto che è composta da una staccionata e da della carta patterned.


As I saw the image on the shop, I had to print it in two different sizes and color them with promarkers. At the end I decided to use the bigger one.

Come ho visto l'immagine nello shop, ho dovuto stamparla in due diverse dimensioni e colorarla con i promarkers. Alla fine ho deciso di utilizzare quella più grande.


I used a big die by Sizzix on kraft cardstock for the fence, while I chose a Dovecraft paper for the background. The sentiment says "Best wishes to my super mom!" in italian.

Ho poi utilizzato una fustella Sizzix con del cartoncino kraft per la staccionata, mentre ho optato per una carta Dovecraft per lo sfondo.


Share
Tweet
Pin
Share
No commenti


Hello stampers! I'm trying to get ready for Christmas since I don't want to be behind as usual...and so these months will be full of Holiday cards that I hope could inspire you. Let's start with this card, made with the new holly stamp by Crackerbox & Suzy Stamps.

Ciao a tutti! Sto cercando di prepararmi al Natale con un un certo anticipo, visto che non voglio trovarmi in ritardo su tutto (come al solito)...per questo nei prossimi mesi troverete moltissime card natalizie, che spero possano ispirare anche voi. Cominciamo con questo biglietto, realizzato con il nuovo agrifoglio di Crackerbox & Suzy Stamps.


I started by stamping the holly multiple times on a piece of white cardstock with green ink.

Ho cominciato timbrando più volte l'agrifoglio su del cartoncino bianco con dell'inchiostro verde.


In order to achieve a good result with the color of the berries, I decided to cover them with white Nuvo Drops and let it dry.

Per raggiungere un buon risultato con il colore delle bacche, ho deciso di coprirle con delle Nuvo Drops bianche e lasciar asciugare.


At this point I colored every single berry with a red gel pen.

A questo punto ho colorato ogni singola bacca con una penna gel rossa.


Finally I heat embossed an italian sentiment which says "Merry Christmas to you" in gold on red cardstock.

Infine ho embossato con polvere dorata con cartoncino rosso il mio sentiment.


I decided to create another version of this card, using kraft cardstock and two different brown inks for the holly. The sentiment is heat embossed in white on brown. I can't decide which one is my favorite, and you?

Ho deciso di realizzare anche un'altra versione, utilizzando cartoncino kraft e due diversi inchiostri marroni per l'agrifoglio. Questa volta l'augurio è embossato in bianco su cartoncino marrone. Non riesco a scegliere quale è la mia preferita, e voi?

Supplies used:

Viney Holly

Share
Tweet
Pin
Share
No commenti
Newer Posts
Older Posts

About me

About me
I'm Giada, an italian cardmaker. I love clean and simple cards...and coloring critters! Thank for being here!

Follow Me

  • Facebook
  • Instagram
  • Youtube

Contact me

Nome

Email *

Messaggio *

Blog Archive

  • ▼  2023 (3)
    • ▼  nov 2023 (1)
      • Winter Friends
    • ►  giu 2023 (1)
    • ►  feb 2023 (1)
  • ►  2022 (14)
    • ►  ott 2022 (1)
    • ►  ago 2022 (1)
    • ►  lug 2022 (2)
    • ►  giu 2022 (1)
    • ►  mag 2022 (1)
    • ►  apr 2022 (1)
    • ►  mar 2022 (3)
    • ►  feb 2022 (1)
    • ►  gen 2022 (3)
  • ►  2021 (27)
    • ►  dic 2021 (1)
    • ►  nov 2021 (1)
    • ►  ott 2021 (2)
    • ►  set 2021 (2)
    • ►  ago 2021 (3)
    • ►  lug 2021 (2)
    • ►  giu 2021 (1)
    • ►  mag 2021 (2)
    • ►  apr 2021 (2)
    • ►  mar 2021 (2)
    • ►  feb 2021 (5)
    • ►  gen 2021 (4)
  • ►  2020 (72)
    • ►  dic 2020 (2)
    • ►  nov 2020 (2)
    • ►  ott 2020 (4)
    • ►  set 2020 (8)
    • ►  ago 2020 (4)
    • ►  lug 2020 (7)
    • ►  giu 2020 (8)
    • ►  mag 2020 (5)
    • ►  apr 2020 (12)
    • ►  mar 2020 (7)
    • ►  feb 2020 (7)
    • ►  gen 2020 (6)
  • ►  2019 (68)
    • ►  dic 2019 (6)
    • ►  nov 2019 (8)
    • ►  ott 2019 (9)
    • ►  set 2019 (9)
    • ►  ago 2019 (8)
    • ►  lug 2019 (8)
    • ►  giu 2019 (3)
    • ►  mag 2019 (4)
    • ►  apr 2019 (2)
    • ►  mar 2019 (3)
    • ►  feb 2019 (4)
    • ►  gen 2019 (4)
  • ►  2018 (59)
    • ►  dic 2018 (2)
    • ►  nov 2018 (7)
    • ►  ott 2018 (7)
    • ►  set 2018 (7)
    • ►  ago 2018 (7)
    • ►  lug 2018 (6)
    • ►  giu 2018 (4)
    • ►  mag 2018 (4)
    • ►  apr 2018 (4)
    • ►  mar 2018 (4)
    • ►  feb 2018 (3)
    • ►  gen 2018 (4)
  • ►  2017 (45)
    • ►  nov 2017 (6)
    • ►  ott 2017 (3)
    • ►  set 2017 (5)
    • ►  ago 2017 (3)
    • ►  lug 2017 (3)
    • ►  giu 2017 (3)
    • ►  mag 2017 (3)
    • ►  apr 2017 (5)
    • ►  mar 2017 (3)
    • ►  feb 2017 (6)
    • ►  gen 2017 (5)
  • ►  2016 (32)
    • ►  dic 2016 (1)
    • ►  nov 2016 (6)
    • ►  ott 2016 (3)
    • ►  set 2016 (3)
    • ►  ago 2016 (3)
    • ►  lug 2016 (4)
    • ►  giu 2016 (4)
    • ►  mag 2016 (2)
    • ►  apr 2016 (1)
    • ►  mar 2016 (2)
    • ►  feb 2016 (2)
    • ►  gen 2016 (1)
  • ►  2015 (21)
    • ►  dic 2015 (1)
    • ►  nov 2015 (2)
    • ►  set 2015 (1)
    • ►  ago 2015 (2)
    • ►  lug 2015 (1)
    • ►  mag 2015 (1)
    • ►  apr 2015 (2)
    • ►  mar 2015 (4)
    • ►  feb 2015 (4)
    • ►  gen 2015 (3)
  • ►  2014 (31)
    • ►  dic 2014 (2)
    • ►  nov 2014 (2)
    • ►  ott 2014 (2)
    • ►  set 2014 (4)
    • ►  ago 2014 (1)
    • ►  lug 2014 (3)
    • ►  giu 2014 (3)
    • ►  mag 2014 (3)
    • ►  apr 2014 (2)
    • ►  mar 2014 (3)
    • ►  feb 2014 (3)
    • ►  gen 2014 (3)
  • ►  2013 (33)
    • ►  dic 2013 (4)
    • ►  nov 2013 (5)
    • ►  ott 2013 (4)
    • ►  set 2013 (3)
    • ►  ago 2013 (4)
    • ►  lug 2013 (5)
    • ►  giu 2013 (8)

Search

Labels

  • crackerbox & suzy stamps
  • craftin desert divas
  • create a smile stamps
  • lawnfawn
  • mft stamps
  • rinea foiled paper
  • so suzy stamps
  • someoddgirl
  • whimsy stamps
  • wplus9

Created with by BeautyTemplates