Copyright giadaelesuenuvole.blogspot.it. Powered by Blogger.

giadalesuenuvole

Pagine

  • Chi sono
  • Privacy Policy

Hello there! January was an hard month, especially for a friend of mine: I made this card for her, because she must be strong and fight like a superhero. I was searching for the best idea when I saw the Super Mae digi stamp by Some Odd Girl. I printed it on white cardstock and I used promarkers, gel pens and pencil to color her.

Ciao a tutti! Gennaio è stato un mese difficile, specialmente per una mia cara amica: ho realizzato questa card per lei, visto che deve essere forte e combattere come un supereroe. Mentre stavo cercando un'idea per questa card, mi sono imbattuta nel timbro Super Mae di Some Odd Girl. L'ho stampato su del cartoncino bianco e ho preso pennarelli, penne e matite per colorarla.


I chose pink and gold since she loves sparkling - so I need to re-create a trendy superhero! Then I fussy cut her and added a couple of white dots for the eyes.

Ho scelto il rosa e l'oro perché adora gli sbrilluccichii - per cui mi sono impegnata a ricreare una supergirl alla moda! Poi l'ho ritagliata e le ho aggiunto un paio di puntini bianchi per gli occhi.


Next I picked a white cardbase and blended some Fossilized Amber Distress Oxide on top of a Create a Smile stencil. I glued Super Mae with foam tape, I added some golden stars here and there and stamped the sentiment that says "For you".

Per finire ho predisposto la base per la card e ho sfumato del Distress Oxide Fossilized Amber su uno stencil di Create a Smile. Ho incollato Super Mae con del nastro gommato, ho aggiunto qualche stella dorata e ho timbrato l'augurio.
Share
Tweet
Pin
Share
No commenti

Hello my friends! Today I'm up on Some Odd Girl blog with this card full of magic. I created this starry background a couple of month ago in order to use it for a Christmas card, but I couldn't find the best match with the stamps so I left it behind. When I decided to use these two mini fairies by Some Odd Girl for a card, I picked it and... love!

Ciao a tutti! Oggi sono sul blog di Some Odd Girl con questa card ricca di magia. Ho creato questo sfondo stellato ormai 2 mesi fa, con l'intento di utilizzarlo per una card natalizia...ma non sono riuscita a trovare un timbro abbinato che mi convincesse. Quando ho deciso di usare queste piccole fatine di Some Odd Girl all'interno di una card, l'ho ripreso in mano e...è stato amore a prima vista!


To build this background I placed a Create a Smile stencil on top of a kraft cardstock, then I covered it with 2 BoBunny glitter pastes and set it aside to dry. The thickness and shining of the stars are amazing!

Per realizzare questo sfondo ho posizionato lo stencil di Create a Smile sopra del cartoncino kraft, poi ho coperto il tutto con 2 paste glitter di BoBunny e ho lasciato ad asciugare. Lo spessore e la brillantezza delle stelline sono godibilissime al tatto e alla vista!


Then I printed the two fairies on white cardstock, colored them with alcohol markers and fussy cut, using the same hues I used for the background (kraft, blue, white).

Poi ho stampato le due fatine su del cartoncino bianco, le ho colorate con pennarelli ad alcohol e ho ritagliato, utilizzando le stesse tinte che avevo scelto per lo sfondo (beige, blu e bianco).


To finish the card, I glued the fairies on a strip of vellum on which I heat embossed a sentiment that says "Best wishes to a special friend".

Per finire, ho incollato le fatine su una striscia di vellum su cui avevo precedentemente embossato l'augurio con della polvere dorata.
Share
Tweet
Pin
Share
No commenti

Hello everyone! Finally I finished off my cards for Christmas: it was hard, but I'm really satisfied! I'm going to keep on sharing my Christmas projects on Instagram, you can follow me here if you want. Today's card is a clean and simple one and it has as main focus the big Poinsettia by Crackerbox & Suzy Stamps.

Ciao a tutti! Finalmente ho finito tutte le card di Natale: è stata dura, ma sono davvero soddisfatta (sia del risultato che di me stessa)! Continuerò comunque a condividere qualche progetto natalizio su IG, potete seguirmi qui se volete. La card di oggi è "clean & simple" e vede come focus principale la grande stella di Natale di Crackerbox & Suzy Stamps.


I stamped the Poinsettia image on a piece of white cardstock with Memento Tuxedo Black ink, colored it with promarkers and fussy cut. I used 3 or 4 shades for each color family and I added some golden touches at the center of the flower.

Ho timbrato la stella di Natale su del cartoncino bianco, utilizzando dell'inchiostro nero Memento Tuxedo, l'ho colorata con i promarkers e ritagliata. Ho utilizzato 3 o 4 pennarelli per ciascuna famiglia di colore e ho aggiunto qualche tocco dorato al centro del fiore.


At this point I only had to add a heat embossed sentiment, a patterned paper and glued everything onto a red cardbase. In order to add some more interest to the card, I used foam tape to adhere the poinsettia.

A questo punto ho solo dovuto posizionare un augurio embossato, scegliere una carta patterned e incollare il tutto su una base rossa. Per dare ancora più profondità al tutto, ho utilizzato del nastro gommato per incollare la stella di Natale alla base.


Supplies used:

Poinsettia

Share
Tweet
Pin
Share
No commenti


Hello stampers! Today I'm here to show you a funny winter card with this sporty bunny by Some Odd Girl: this digi is part of a new stampset called Holiday Minis (but time ago it was a clear set!), full of critters related to the Holiday Season. I really wanted to put the bunny on top of a hill, as if it was jumping like a pro.

Ciao a tutti! Oggi sono qui a mostrarvi una card invernale divertente, con protagonista il coniglietto sportivo di Some Odd Girl: questo timbro digitale fa parte del nuovo set "Holiday Minis" (che tempo fa era un set di timbri trasparenti!), pieno di adorabili animaletti tipici del periodo natalizio. Avevo il desiderio di mettere questo coniglietto in cima ad una collina, mentre si accingeva a saltare come uno sciatore professionista.


I printed the bunny onto white cardstock, colored it with alcohol markers and fussy cut. Then I die cut a white hill and a circle shape from kraft cardstock, next I glued everything on a embossed panel and heat embossed my sentiment (that says "happy Christmas").

Ho stampato il coniglietto su del cartoncino bianco, l'ho colorato con i pennarelli ad alcohol e ritagliato. Poi ho fustellato una collina bianca e un cerchio kraft, ho incollato il tutto su un pannello embossato a freddo e ho aggiunto la scritta, embossandola a caldo su del cartoncino rosso.

Share
Tweet
Pin
Share
No commenti

Hello crafters! We're less than 2 month until Christmas and it seems like I'm getting ready in advance this year! Today I'm showing you another Christmas card made with Crackerbox & Suzy Stamps supplies. In this case I wanted to keep it quite clean and simple, with two focus: the Holly Branches and the embossed Wood Slice.

Ciao a tutti! Mancano meno di 2 mesi a Natale e sembra che stavolta mi stia preparando per tempo! Oggi vi mostro un'altra card natalizia, realizzata con timbri di Crackerbox & Suzy Stamps. In questo caso ho voluto mantenere il tutto abbastanza pulito e semplice, con 2 focus principali: i rami di agrifoglio e gli anelli dell'albero embossati.


First of all I stamped a couple of branches on white cardstock with Memento Tuxedo black ink, colored it with alcohol markers and fussy cut.

Prima di tutto ho timbrato un paio di rami su del cartoncino bianco con del Memento nero, ho colorato il tutto con i pennarelli ad alcohol e ritagliato.


Next I picked up a white panel, I stamped the Wood Slice with Versamark ink, covered it with gold embossing powder and heat embossed it on the right edge.

Poi ho preso dell'altro cartoncino bianco, ho timbrato la fetta di legno con dell'inchiostro Versamark, l'ho coperta con la polvere da embossing dorata e ho embossato l'immagine a caldo, che risulta così sul lato destro.


Finally I glued two Holly branches on top of the panel and I embossed an Italian sentiment that says "I wish you a Merry Christmas" in white on red.

Infine ho incollato due rami d'agrifoglio sul pannello e ho embossato l'augurio in italiano (in bianco su rosso).


I have to say that red is not one of my favorite colors, but it's my go-to shade for Holidays cards. The touch of gold is important too!

Devo dire che il rosso non è certo il mio colore preferito, ma è decisamente quello che prediligo quando si tratta di card natalizie. E un tocco dorato non può mancare!


Supplies used:

Wood Slice

Holly Branch

Share
Tweet
Pin
Share
No commenti

Hello stampers! The card I'm sharing today is made by using the Cancer digital stamp by Some Odd Girl: as I saw this image, I thought of a japanese warrior with scissors. This digi is free during the month of July, check it out here.

Ciao a tutti! Questa card l'ho realizzata con il timbro digitale "Cancro" della serie zodiacale di Some Odd Girl: non appena l'ho visto ho pensato ad una guerriera giapponese con in mano due paia di forbici. Questo timbro è scaricabile gratuitamente durante il mese di luglio, scoprilo qui.


First of all, I printed the Cancer image on a piece of white cardstock, then I colored it with promaker pens and fussy cut. I loved coloring this image, using unconventional shades and adding some details on the eyes and the hair.

Prima di tutto ho stampato l'immagine su del cartoncino bianco, l'ho colorata con i promarkers e ritagliata. Mi sono divertita molto a darle vita con i colori, utilizzando sfumature non convenzionali e aggiungendo dettagli a occhi e capelli.


Then I looked through my stash and I saw the perfect sentiment by Crackerbox & Suzy Stamps, that I stamped on a grey hill.

Poi ho dato un'occhiata ai miei timbri e ho trovato l'augurio perfetto di Crackerbox & Suzy Stamps, che ho timbrato su una collina grigia.


For the background I chose an old set by Sizzix and Hero Arts: I stamped the bamboo image and then I embossed it with the matching embossing folder.

Per lo sfondo ho scelto un vecchio set di Sizzix e Hero Arts: ho timbrato prima il bamboo e poi l'ho embossato a freddo con il folder corrispondente.
Share
Tweet
Pin
Share
1 commenti

Hello my friends! Today I'm sharing an easy card made for Crackerbox and Suzy Stamps with floral images, a great combo when you don't have a lot of time. Since it's a very simple one, the explanation will be very short.

Ciao a tutti! Oggi vi voglio mostrare una card molto semplice, realizzata per Crackerbox and Suzy Stamps con immagini floreali. Una combo invincibile se avete poco tempo! Visto che si tratta di una card molto veloce, la spiegazioni sarà molto corta.


First of all, I stamped the big Peony with Memento Tuxedo Black ink, coloured it with Promarkers and fussy cut. I made three of them as the idea was to create a sort of heart shape with them.

Prima di tutto, ho timbrato la Peonia grande con dell'inchiostro Memento nero, l'ho colorata con i Promarkers e ritagliata. Ne ho realizzate 3, visto che l'idea era quella di creare una sorta di forma a cuore utilizzando i fiori.


I arranged them on a patterned paper by Dovecraft and I stamped the You're amazing sentiment on a thin strip of white cardstock. I glued everything down with foam tape and that's it!
I'm planning to create more floral cards in the near future, as well as sharing a blog post with you concerning Easter cards only. In the meanwhile, check out all the games and the promotions of this month on Crackerbox and Suzy Stamps blog!


Ho posizionato le peonie su una carta patterned della Dovecraft e ho timbrato la scritta You're amazing su una sottile striscia di cartoncino bianco. Infine ho incollato il tutto con del nastro gommato.
Sto pensando di realizzare molte card floreali nel prossimo futuro, così come sto lavorando dietro le quinte per mettere insieme un post dedicato solamente alle card pasquali. Nel frattempo, date un'occhiata a giochi e promozioni attive sul blog di Crackerbox e Suzy Stamps!


Supplies used:

Peony Curly Lg.

You're Amazing

Share
Tweet
Pin
Share
No commenti

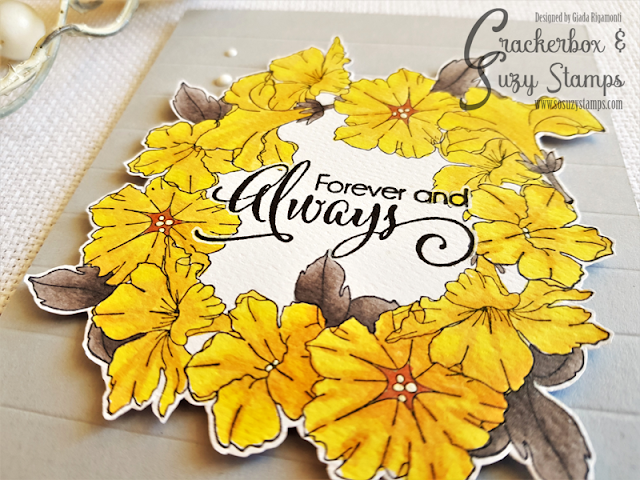
Hello stampers! Today I'm showcasing a Valentine's Day card made with stamps by Crackerbox & Suzy Stamps. The idea behind this card was creating a cluster of flowers following a heart shape and using one of my favorite sentiments, that says "Forever and always". Plus, Crackerbox & Suzy Stamps is hosting a special offer during the month of January; all the Valentine's Day stamps are 30% off:


Buongiorno creative! Oggi vi mostro una card per San Valentino, creata con timbri di Crackerbox & Suzy Stamps. Il tutto parte dall'idea di realizzare un insieme di fiori a forma di cuore, su cui timbrare uno dei miei auguri preferiti: "Forever and always". In più, Crackerbox & Suzy Stamps ha messo in promozione tutti i timbri di San Valentino: per tutto il mese di gennaio sono scontati del 30%!


First I stamped all the flowers of the "Morning Glory - set of 5" stampset on a piece of masking tape. Then I fussy cut and I draw the shape of an heart on a piece of cardstock. At this point I tried to follow this shape by stamping and masking the flowers one by one, but it ended like a circle.

Prima di tutto ho timbrato tutti i fiori del set "Morning Glory" su della carta per masking. Poi li ho ritagliati uno ad uno e ho disegnato un cuore su del cartoncino bianco. A questo punto ho provato a seguire la forma tracciata, timbrando e mascherando i fiori uno per uno, ma ho finito per creare un cerchio.


Since I liked it, I kept on stamping and I colored everything with alcohol pens in yellow and gray shades. Next I fussy cut the cluster and stamped the sentiment inside.

Visto che mi è comunque piaciuto il risultato, ho continuato a timbrare e colorare i fiori con i pennarelli ad alcohol nelle sfumature del giallo e del grigio. Poi ho ritagliato il gruppo di fiori e timbrato l'augurio all'interno.


To make it pop even more, I decided to use a light gray carstock as my cardbase, folding it every half of an inch with my bone folder. I glued the flowers with foam tape and I added some white Nuvo Drops here and there.

Per dargli ancora più rilievo, ho deciso di utilizzare un cartoncino grigio chiaro come base, tracciando una piega a intervalli regolari di mezzo pollice. Ho incollato i fiori con del nastro gommato e ho aggiunto qualche Nuvo Drops bianca qua e là.


And a close-up:

E un dettaglio:


Supplies used:

Morning glory set of 5

Forever and Always

Share
Tweet
Pin
Share
No commenti

Hi everyone and Happy New Year! I hope to fullfill this one with love, creativity and happiness... and I wish the same for all of you! Today I'm back with a couple of cards for Crackerbox & Suzy Stamps, which has a scent of spring.

Ciao a tutti e buon anno! Spero di riempire questi 365 giorni che mi trovo davanti con amore, creatività e felicità...ed auguro lo stesso a tutti voi! Oggi sono di nuovo qui con un paio di card per Crackerbox & Suzy Stamps, che hanno un profumo già primaverile.


In fact I decided to realize a couple of cards with the tulip bouquet by Crackerbox & Suzy Stamps, combining it with two different sentiment... and two different colors.

Infatti ho deciso di realizzare un paio di card con il bouquet di tulipani di Crackerbox & Suzy Stamps, abbinandolo con 2 diversi auguri...e due diverse palette di colori.


I love both the colorful one and the romantic one, that I colored with my alcohol markers (Promarkers and Touchfive).

Adoro entrambe le versioni, sia quella più gioiosa che quella romantica, che ho colorato con i miei pennarelli ad alcol (sia Promarkers che Touchfive).


First I stamped the tulips with Memento Tuxedo Black Ink, I colored them and fussy cut. I added at the bottom of the romantic one a string.

Prima di tutto ho timbrato i tulipani con dell'inchiostro nero Memento, li ho colorati e ritagliati. Ho anche aggiunto un po' di spago alla base del bouquet romantico.


Then I took a patterned paper with some wood grain in it and I heat embossed in white on black a couple of sentiments from Crackerbox & Suzy Stamps as well.

Poi ho scelto una carta pattern tramata in stile legno e ho embossato in bianco su nero un paio di auguri sempre di Crackerbox & Suzy Stamps.


Finally I put everything together on a cardbase, adding the image and the sentiment with some foam tape. The romantic version has some white Nuvo Drops here and there.

Infine ho messo tutto insieme su una base, aggiungendo immagine e augurio con del nastro gommato. Nella versione romantica ho anche aggiunto qualche Nuvo Drops bianca qua e là.


I love winter, but I missed coloring flowers so much! 

Amo l'inverno, ma colorare fiori mi mancava troppo! 


Supplies used:

Tulips


Thinking of you Simple

Celebrate

Share
Tweet
Pin
Share
No commenti

Hello everyone! This is a bittersweet post, since it's the last one as Create a Smile Challenge DT member. It was a great experience, the team was wonderful and unique, the stamps are beautiful and the challenge were always great! I'll miss all of this. By the way, the theme of this challenge is "Celebration", so I thought of an Holiday card with the adorable snowmen from the Clear Secret Ingredient stampset:

Ciao a tutti! Questo è un post dal sapore dolce e amaro, visto che si tratta del mio ultimo come membro del Challenge Team di Create a Smile Stamps. E' stata una bellissima esperienza, la squadra è stata portentosa e unica, i timbri sono bellissime e le sfide sempre... sfidanti! Mi mancherà tutto questo. Al di là di tutto, il tema di questa challenge è "Celebration", per cui ho pensato di realizzare una card natalizia con gli adorabili pupazzi di neve dal set Clear Secret Ingredient:

I started by ink blending a piece of watercolor paper with Shaded Lilac and Salty Ocean Distress Inks, I let it dry and I sprinkled it with water. When it dried completely, I heat embossed the sweetest sentiment also from the same stampset in white.

Ho cominciato sfumando della carta acquerellabile con i Distress Inks Shaded Lilac e Salty Ocean, l'ho lasciato asciugare e l'ho spruzzato con dell'acqua. Quando il tutto è completamente asciugato, ho embossato il più dolce augurio presente nello stesso set in bianco.


Then I stamped the two cooking snowmen with Memento Tuxedo Black Ink, I coloured them with alcool markers and fussy cut. I also stamped the bowl full of hearts - how adorable!

In seguito ho timbrato i due pupazzi cuochi con del Memento nero, li ho colorati con i pennarelli ad alcool e ritagliati. Ho anche timbrato la ciotola piena di cuori - è davvero adorabile!


Then I glued everything down with some foam tape and I added one of the trees from the Clear Oh Christmas Tree stampset. You can join us here and try to win a 25€ gift certificate to Create a Smile shop! 
I want to say a BIG thank you to Christine, Ale and all this little and sweet Create a Smile family. I love you and I'll keeping on joining (and enjoying) your challenges.
Merry Christmas to you all!

Poi ho incollato il tutto con del nastro gommato ed ho aggiunto uno dei due alberi dal set Clear Oh Christmas Tree. Potete partecipare qui e provare a vincere una gift card del valore di 25€ per lo shop di Create a Smile!
Voglio davvero ringraziare di cuore Christine, Ale e tutta la piccola e dolce famiglia di Create a Smile. Vi voglio bene e continuerò ad unirmi (e a divertirmi) alle vostre challenge.
Buon Natale a tutti!
Share
Tweet
Pin
Share
No commenti
Older Posts

About me

About me
I'm Giada, an italian cardmaker. I love clean and simple cards...and coloring critters! Thank for being here!

Follow Me

  • Facebook
  • Instagram
  • Youtube

Contact me

Nome

Email *

Messaggio *

Blog Archive

  • ▼  2023 (3)
    • ▼  nov 2023 (1)
      • Winter Friends
    • ►  giu 2023 (1)
    • ►  feb 2023 (1)
  • ►  2022 (14)
    • ►  ott 2022 (1)
    • ►  ago 2022 (1)
    • ►  lug 2022 (2)
    • ►  giu 2022 (1)
    • ►  mag 2022 (1)
    • ►  apr 2022 (1)
    • ►  mar 2022 (3)
    • ►  feb 2022 (1)
    • ►  gen 2022 (3)
  • ►  2021 (27)
    • ►  dic 2021 (1)
    • ►  nov 2021 (1)
    • ►  ott 2021 (2)
    • ►  set 2021 (2)
    • ►  ago 2021 (3)
    • ►  lug 2021 (2)
    • ►  giu 2021 (1)
    • ►  mag 2021 (2)
    • ►  apr 2021 (2)
    • ►  mar 2021 (2)
    • ►  feb 2021 (5)
    • ►  gen 2021 (4)
  • ►  2020 (72)
    • ►  dic 2020 (2)
    • ►  nov 2020 (2)
    • ►  ott 2020 (4)
    • ►  set 2020 (8)
    • ►  ago 2020 (4)
    • ►  lug 2020 (7)
    • ►  giu 2020 (8)
    • ►  mag 2020 (5)
    • ►  apr 2020 (12)
    • ►  mar 2020 (7)
    • ►  feb 2020 (7)
    • ►  gen 2020 (6)
  • ►  2019 (68)
    • ►  dic 2019 (6)
    • ►  nov 2019 (8)
    • ►  ott 2019 (9)
    • ►  set 2019 (9)
    • ►  ago 2019 (8)
    • ►  lug 2019 (8)
    • ►  giu 2019 (3)
    • ►  mag 2019 (4)
    • ►  apr 2019 (2)
    • ►  mar 2019 (3)
    • ►  feb 2019 (4)
    • ►  gen 2019 (4)
  • ►  2018 (59)
    • ►  dic 2018 (2)
    • ►  nov 2018 (7)
    • ►  ott 2018 (7)
    • ►  set 2018 (7)
    • ►  ago 2018 (7)
    • ►  lug 2018 (6)
    • ►  giu 2018 (4)
    • ►  mag 2018 (4)
    • ►  apr 2018 (4)
    • ►  mar 2018 (4)
    • ►  feb 2018 (3)
    • ►  gen 2018 (4)
  • ►  2017 (45)
    • ►  nov 2017 (6)
    • ►  ott 2017 (3)
    • ►  set 2017 (5)
    • ►  ago 2017 (3)
    • ►  lug 2017 (3)
    • ►  giu 2017 (3)
    • ►  mag 2017 (3)
    • ►  apr 2017 (5)
    • ►  mar 2017 (3)
    • ►  feb 2017 (6)
    • ►  gen 2017 (5)
  • ►  2016 (32)
    • ►  dic 2016 (1)
    • ►  nov 2016 (6)
    • ►  ott 2016 (3)
    • ►  set 2016 (3)
    • ►  ago 2016 (3)
    • ►  lug 2016 (4)
    • ►  giu 2016 (4)
    • ►  mag 2016 (2)
    • ►  apr 2016 (1)
    • ►  mar 2016 (2)
    • ►  feb 2016 (2)
    • ►  gen 2016 (1)
  • ►  2015 (21)
    • ►  dic 2015 (1)
    • ►  nov 2015 (2)
    • ►  set 2015 (1)
    • ►  ago 2015 (2)
    • ►  lug 2015 (1)
    • ►  mag 2015 (1)
    • ►  apr 2015 (2)
    • ►  mar 2015 (4)
    • ►  feb 2015 (4)
    • ►  gen 2015 (3)
  • ►  2014 (31)
    • ►  dic 2014 (2)
    • ►  nov 2014 (2)
    • ►  ott 2014 (2)
    • ►  set 2014 (4)
    • ►  ago 2014 (1)
    • ►  lug 2014 (3)
    • ►  giu 2014 (3)
    • ►  mag 2014 (3)
    • ►  apr 2014 (2)
    • ►  mar 2014 (3)
    • ►  feb 2014 (3)
    • ►  gen 2014 (3)
  • ►  2013 (33)
    • ►  dic 2013 (4)
    • ►  nov 2013 (5)
    • ►  ott 2013 (4)
    • ►  set 2013 (3)
    • ►  ago 2013 (4)
    • ►  lug 2013 (5)
    • ►  giu 2013 (8)

Search

Labels

  • crackerbox & suzy stamps
  • craftin desert divas
  • create a smile stamps
  • lawnfawn
  • mft stamps
  • rinea foiled paper
  • so suzy stamps
  • someoddgirl
  • whimsy stamps
  • wplus9

Created with by BeautyTemplates