Copyright giadaelesuenuvole.blogspot.it. Powered by Blogger.

giadalesuenuvole

Pagine

  • Chi sono
  • Privacy Policy


Hello guys! Even if my adventure as Create a Smile Stamps Challenge Team member is ended, I want to keep on entering the challenge. When I saw the first theme of the year, which is "use kraft", I decided to case a card made by Yana Smakula and create a sort of henna pattern background on kraft cardstock.


Ciao a tutti! Anche se la mia avventura come membro del Challenge DT di Create a Smile Stamps si è conclusa, voglio comunque continuare a partecipare alle sfide. Quando ho visto il primo tema dell'anno, che è "use kraft", ho deciso di replicare una card realizzata da Yana Smakula e realizzare una sorta di sfondo henna su del cartoncino kraft.


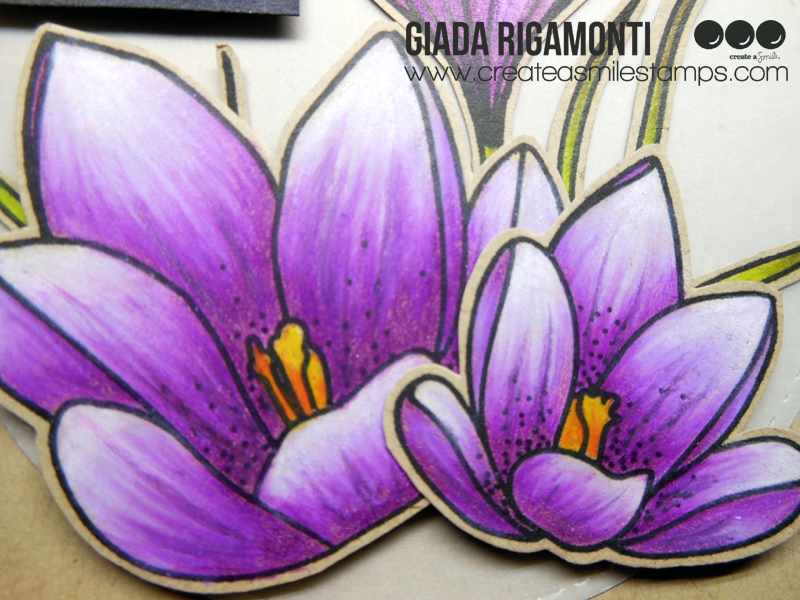
First I stamped a bunch of images from the "Clear In Bloom" stampset multiple times, following a pattern, and heat embossed in white.

Prima di tutto ho timbrato un po' di immagini del set "Clear In Bloom" più volte, seguendo una sorta di pattern ed embossandoli in bianco.


Then I chose sentiments from different stampset and I heat embossed them too, but in gold. I trimmed them down, fixed with foam tape and added few sequins here and there.


Poi ho scelto diverse scritte di diversi set ed ho embossato anche quelli, ma in oro. Li ho ritagliati, incollati con del nastro gommato e ho aggiunto qualche sequins qua e là.


Share
Tweet
Pin
Share
6 commenti

Hello everyone! This is a bittersweet post, since it's the last one as Create a Smile Challenge DT member. It was a great experience, the team was wonderful and unique, the stamps are beautiful and the challenge were always great! I'll miss all of this. By the way, the theme of this challenge is "Celebration", so I thought of an Holiday card with the adorable snowmen from the Clear Secret Ingredient stampset:

Ciao a tutti! Questo è un post dal sapore dolce e amaro, visto che si tratta del mio ultimo come membro del Challenge Team di Create a Smile Stamps. E' stata una bellissima esperienza, la squadra è stata portentosa e unica, i timbri sono bellissime e le sfide sempre... sfidanti! Mi mancherà tutto questo. Al di là di tutto, il tema di questa challenge è "Celebration", per cui ho pensato di realizzare una card natalizia con gli adorabili pupazzi di neve dal set Clear Secret Ingredient:

I started by ink blending a piece of watercolor paper with Shaded Lilac and Salty Ocean Distress Inks, I let it dry and I sprinkled it with water. When it dried completely, I heat embossed the sweetest sentiment also from the same stampset in white.

Ho cominciato sfumando della carta acquerellabile con i Distress Inks Shaded Lilac e Salty Ocean, l'ho lasciato asciugare e l'ho spruzzato con dell'acqua. Quando il tutto è completamente asciugato, ho embossato il più dolce augurio presente nello stesso set in bianco.


Then I stamped the two cooking snowmen with Memento Tuxedo Black Ink, I coloured them with alcool markers and fussy cut. I also stamped the bowl full of hearts - how adorable!

In seguito ho timbrato i due pupazzi cuochi con del Memento nero, li ho colorati con i pennarelli ad alcool e ritagliati. Ho anche timbrato la ciotola piena di cuori - è davvero adorabile!


Then I glued everything down with some foam tape and I added one of the trees from the Clear Oh Christmas Tree stampset. You can join us here and try to win a 25€ gift certificate to Create a Smile shop! 
I want to say a BIG thank you to Christine, Ale and all this little and sweet Create a Smile family. I love you and I'll keeping on joining (and enjoying) your challenges.
Merry Christmas to you all!

Poi ho incollato il tutto con del nastro gommato ed ho aggiunto uno dei due alberi dal set Clear Oh Christmas Tree. Potete partecipare qui e provare a vincere una gift card del valore di 25€ per lo shop di Create a Smile!
Voglio davvero ringraziare di cuore Christine, Ale e tutta la piccola e dolce famiglia di Create a Smile. Vi voglio bene e continuerò ad unirmi (e a divertirmi) alle vostre challenge.
Buon Natale a tutti!
Share
Tweet
Pin
Share
No commenti

Hello my friends! December is here, Christmas is coming...and my adventure with Create a Smile Stamps is almost ended. The theme of the new challenge is "Winter Time" - so I created a snowy background with a white bear:

Ciao a tutti! Dicembre è ormai arrivato, il Natale si avvicina...e la mia bellissima avventura con il challenge team di Create a Smile Stamps è quasi finita. Il tema della nuova sfida è "Winter Time" - per cui ho realizzato uno sfondo nevoso con un bell'orsetto bianco come protagonista:


First I stamped the bear from the "Dress me up!" stampset on a piece of Strathmore toned gray paper, I coloured it with my prismacolor pencils, stamped it again with the MISTI tool and fussy cut. I dressed it up with a jacket and a scarf (on this one I added some shining blue with the Nuvo glitter pen). 

Prima di tutto ho timbrato l'orso del set "Dress me up!" su della carta Strathmore toned grey, l'ho colorato con le matite prismacolor, l'ho timbrato nuovamente nello stesso punto grazie al MISTI e l'ho ritagliato. Poi l'ho letteralmente vestito, aggiungendogli una giacca ed una sciarpa (quest'ultima sbrilluccica grazie alle penne glitter della Nuvo).


I chose to keep everything monochromatic by adding two pieces of gray and dark gray cardstocks as my background. I die cut an house border in white, I drew some white dots here and there and to finish it off I stamped some Christmas lights and a sentiment from the "Joy to the world" stampset.

Ho scelto di mantenere il tutto monocromatico aggiungendo 2 cartoncini grigi (uno più chiaro ed uno più scuro) come sfondo. Ho fustellato delle case bianche, ho tracciato dei puntini bianchi qua e là e per finire ho timbrato qualche lucina natalizia e la scritta dal set "Joy to the world".


As usual, you have 2 weeks to join the challenge and try to win a 25€ gift certificate for Create a Smile shop! More inspirations and informations here.

Come sempre, ci sono due settimane di tempo per partecipare alla sfida e cercare di vincere una gift card da 25€ per lo shop di Create a Smile! Più card e informazioni sono disponibili qui.
Share
Tweet
Pin
Share
No commenti

Hello my friends! The new challenge on Create a Smile Stamps blog is live and the theme is "Giving Thanks", as we are approaching to Thanksgiving Day:

Ciao amici! E' appena partita la nuova sfida sul blog di Create a Smile Stamps e il tema è "Dire grazie", visto che ci stiamo anche avvicinando al giorno del Ringraziamento:


I don't own a stampset focused on Thanksgiving because we don't celebrate it in Italy, but as soon as I saw these wonderful poppies from the Clear Pure Poppies stampset I knew I could use them to say "thanks" to someone.

Non possiedo un set di timbri dedicati al Ringraziamento perché non lo celebriamo qui in Italia, ma non appena ho visto i bellissimi papaveri del set Clear Pure Poppies... ho capito che potevo utilizzarli per dire semplicemente "grazie" a qualcuno.


First I create my background with a big stain made of Candied Apple Distress Oxide and water, then I let it dry and I add some gold droplets on top.

Prima di tutto ho realizzato il mio sfondo con una bella macchina di Distress Oxide Candied Apple diluito con acqua, ho lasciato asciugare ed ho aggiunto delle gocce d'oro.


I stamped a bunch of poppies onto a piece of white cardstock, I coloured with promarkers and fussy cut.

Ho timbrato un po' di papaveri su del cartoncino bianco, li ho colorati con i promarkers e li ho ritagliati.


To finish off the card, I die cut one of the sentiment of the Cool Cuts Tiny Sentiments die-set from gold cardstock and I glued the whole panel on a kraft cardbase.

Per finire la card, ho fustellato una delle scritte presenti nel set Cool Cuts Tiny Sentiments utilizzando del cartoncino dorato. Infine ho incollato il tutto su una base kraft.


The final result makes me very happy and I hope you join us by entering the challenge: you can win a 25€ gift card to shop on Create a Smile!

Il risultato mi piace moltissimo e spero che anche voi vi unirete alla sfida: potete vincere una gift card del valore di 25€ per fare shopping presso Create a Smile!
Share
Tweet
Pin
Share
No commenti

Hello guys! The new challenge on Create a Smile blog is focused on one of my favorite techniques: creating your own background. There are so many ways to customize a background for a card - such as stenciling, stamping, embossing, coloring, die cutting... and so on.

Ciao a tutti! La nuova sfida sul blog di Create a Smile è focalizzata su una delle mie tecniche preferite: creare sfondi personalizzati. Ci sono tantissimi modi per farlo, per esempio utilizzando stencil, timbrando ripetutamente, embossando, colorando, fustellando... e così via.


Today I'm sharing a card in which I stamped my background using geometric images from Clear Going Graphic stampset and a specific color palette that I saw in a beautiful store. In fact, the first thing I did was choosing the inks for the card: mint, yellow and grey. I used 3 different triangles to built my background and create a sort of pattern. 

Oggi vi mostro una card in cui ho timbrato il mio sfondo utilizzando immagini geometriche dal set Clear Going Graphic e una color palette specifica che ho visto accostata in un bellissimo negozio di home decor. Infatti, la prima cosa che ho fatto è stata scegliere i tamponi per la card: menta, giallo e grigio. Ho utilizzato 3 diversi triangoli per costruire il mio sfondo e creare una sorta di pattern.


Then I stamped the hyppo from Clear Served Up! stampset with Memento Tuxedo black ink and coloured it with promarkers. 

Poi ho timbrato l'ippopotamo dal set Clear Served Up! con dell'inchiostro Memento nero e l'ho colorato con i promarkers. 


Then I fussy cut it and the sentiment, that I previously stamped on a piece of grey cardstock that I cut in few strips. Finally I glued everything down, adding a piece of vellum between the background and the other elements to make them pop even more. 
You have 2 weeks for joining us here and trying to win a 25€ gift certificate to the shop!


Quindi ho ritagliato sia l'animaletto che il sentiment, preventivamente timbrato su del cartoncino grigio che ho ritagliato in più strisce. Ho incollato il tutto sulla base, aggiungendo del vellum tra lo sfondo e gli altri elementi della card così da farli risaltare ancora di più.
Avete 2 settimane per unirvi a noi, partecipare alla sfida che trovate qui e provare a vincere un buono da 25€ per lo shop!
Share
Tweet
Pin
Share
No commenti

Hi my friends! It's already time for a new challenge on Create a Smile Stamps blog and it's all about my favorite season: fall! I love everything of this season, especially the colors of the landscapes!

Ciao amici! E' già tempo di una nuova sfida sul blog di Create a Smile Stamps e si tratta di giocare con la mia stagione preferita: l'autunno! Adoro ogni cosa di questo periodo dell'anno, specialmente i colori che tingono i paesaggi.


While I was looking through my stash for a "fall" stampset, I saw these beautiful trees from the "Clear Scene Builders" stampset and I decided to play with them and create my own color palette. I stamped a bunch of them with Memento Tuxedo Black ink and I colored them with Promarker pens in warm colors.

Mentre stavo cercando tra i miei timbri qualcosa di "autunnale", ho visto questo bellissimi alberelli dal set "Clear Scene Builders" e ho deciso di utilizzarli, colorandoli con una palette di colori ad hoc. Ho timbrato un po' di alberi con dell'inchiostro Memento nero e li ho colorati con i colori caldi dell'autunno grazie ai Promarkers.


Then I fussy cut, I glued them onto a piece of kraft cardstock and I stamped the sentiment using the letters from the "Clear Crystal Letters Upper" stampset in brown. Get inspired on Create a Smile Stamps blog and join us for the next two weeks: you can win a 25€ gift certificate for the shop!

Li ho poi ritagliati, incollati su del cartoncino kraft e qui ho timbrato anche la scritta che ho composto utilizzando le lettere del set "Clear Crystal Letters Upper" in marrone. Lasciatevi ispirare sul blog di Create a Smile Stamps e unitevi a noi per le prossime 2 settimane: potete vincere un buono da 25€ da utilizzare nello shop!


Share
Tweet
Pin
Share
No commenti

Hello my friends! My favorite season has just begun and I feel full of inspiration. As my Prismacolor pencils are keeping on calling me, I decided to color these crocus and made a little squared card just to say "hello!" for the current Create a Smile blog challenge:

Ciao amici! La mia stagione preferita è appena cominciata e mi sento ricca di ispirazione. Visto che le mie matite Prismacolor continuano a chiamarmi, ho deciso di colorare questi crochi e creare una piccola card quadrata solo per dire "ciao!", adattissima all'attuale sfida sul blog di Create a Smile:


First I stamped the three crocus images and a couple of leaves from the "Clear Crokisses" stampset on a piece of kraft paper with Versafine black ink. I took note of the prismacolor I used, so that you can try the same one to achieve a similar result: I used PC938, PC956, PC1009, PC1026, PC118 and PC917 for the crocus, while PC989, PC1005 and PC1091 for the grass. I stamped them with the MISTI tool in order to stamp them again to strengthen the edges after the coloring process.

Prima di tutto ho timbrato le tre immagini di crochi e un paio di fili d'erba dal set "Clear Crokisses" su della carta kraft con dell'inchiostro Versafine nero. Ho preso nota delle matite che ho utilizzato, così che chiunque possa utilizzare le stesse per ottenere un risultato simile: ho usato PC938, PC956, PC1009, PC1026, PC118 and PC917 per i crochi, PC989, PC1005 e PC1091 per l'erba. Ho timbrato il tutto con il MISTI così da poterci ri-timbrare sopra una volta colorati.


Then I fussy cut them and die cut a circle out of a piece of vellum. I choose the "hello" die from the Cool Cuts Tiny Sentiments set and I die cut a piece of gold cardstock, that I glued on a strip of black paper. Get inspired on Create a Smile blog and join us: you can win a 25€ gift certificate for the shop!

In seguito ho ritagliato tutto e fustellato un cerchio da del vellum. Ho scelto la fustella "hello" dal set Cool Cuts Tiny Sentiments set, che ho utilizzato su del cartoncino oro che ho a sua volta incollato su dela cartoncino nero. Lasciatevi ispirare sul blog di Create a Smile e unisciti a noi: puoi vincere un coupon da 25€ per lo shop!
Share
Tweet
Pin
Share
No commenti

Hi there! While I was on vacation I really missed my prismacolor pencils. Since I haven't used them for a while, I decided to put the box on my desk and try out some new color combinations. The final result was a little fairy, that I imagine working through the night: the perfect character for a little shaped card for the new Create a Smile challenge!


Ciao a tutti! Mentre quest'estate ero in vacanza, mi sono mancate tantissimo le matite prismacolor. Visto che, per di più, erano rimaste chiuse nella scatola per tanto tempo, ho deciso di metterle sulla scrivania e provare qualche combinazione di colore diversa dal solito. Il risultato finale è stata questa piccola fatina, che ho immaginato lavorare per tutta la notte: il personaggio perfetto per una piccola shaped card per la nuova sfida di Create a Smile!


For the background I blended some Distress Inks (in particular Salty Ocean, Faded Jeans, Chipped Sapphire and Black Soot) on a piece of watercolor paper that I previously die cut with an oval cool die by Create a Smile stamps. This is the base of my shaped card, that I can open and close by adhering another panel behind this one.

Per lo sfondo ho utilizzato un po' di Distress Inks (in particolare Salty Ocean, Faded Jeans, Chipped Sapphire e Black Soot) su della carta acquerellabile che ho precedentemente fustellato con uno dei cool dies ovali di Create a Smile stamps. Questa sarà la base della mia shaped card, che posso aprire e chiudere grazie ad un altro pannello identico incollato dietro a quello frontale.


To finish my background I heat embossed the sentiment in white and I used some embossing paste on the Wave of Stars stencil. Finally I glued the fairy that I coloured using these pencils: for the hair PC903, PC906 and PC1086, for the skin PC1059, PC1061 and PC1063, for the wings PC949. You have 2 weeks to join us here and be eligibile to win a 25€ gift certificate to the shop!

Per finire lo sfondo ho embossato una scritta in bianco e ho utilizzato dell'embossing paste sullo stencil Wave of Stars. Infine ho incollato la fatina che avevo precedentemente colorato utilizzando le matite: per i capelli PC903, PC906 e PC1086, per la pelle PC1059, PC1061 e PC1063, per le ali PC949. Avete 2 settimane per unirvi a noi qui e rischiare di vincere un coupon di 25€ per lo shop!
Share
Tweet
Pin
Share
No commenti

Hi there! "For kids" is the new theme on Create a Smile blog challenge: since August is ending, I thought of this cute gang of koalas to create my latest summer card.

Ciao a tutti! "Per bimbi" è il tema della nuova sfida sul blog di Create a Smile: visto che agosto sta finendo, ho pensato di creare la mia ultima card estiva con questa simpaticissima gang di koala.


So I stamped three of them from "All Hands on Deck" stampset - plus the pirate flag and a bunch of coins - with Memento Tuxedo Black ink and coloured with promarkers. Then I fussy cut and arranged them onto a piece of patterned paper that matches perfectly. 

Ho timbrato tre di loro dal set "All Hands on Deck" - più la bandiera dei pirati e un gruzzoletto di monetine - con dell'inchiostro Memento nero e li ho colorati con i promarkers. Poi li ho ritagliati e li ho posizionati su della carta pattern che si sposa alla perfezione.


At this point I only needed to cut two strips of white cardstock and I glued them down at the top and at the bottom of the card base with some foam adhesive.

A questo punto ho solo dovuto tagliare due strisce di cartoncino bianco e le ho incollate ai lati della base con del nastro adesivo spessorato.


Then I stamped the sentiment and... arrr, that's it! Join us and enter the challenge here, you can win a 25€ gift certificate!

Poi ho timbrato la scritta e... arrr, questo è tutto! Unitevi a noi, potete vincere un buono da 25€ per lo shop!
Share
Tweet
Pin
Share
No commenti


Hi everyone! Are you struggling with masculine cards? The new challenge on Create a Smile blog could be really helpful... and inspired you to create something different. The theme is "masculine" card and we have lots of projects made with love here:

Ciao a tutti! Siete sempre in pena per i biglietti al maschile? La nuova sfida di Create a Smile potrebbe esservi d'aiuto...e ispirarvi a creare qualcosa di diverso. Il tema è "card al maschile" e noi del team abbiamo moltissimi progetti realizzati con amore qui:


It seems like I have a thing for stamped background: I saw Yana Smakula some time ago and I'm keeping on playing with them because they are so relaxing! Since it's summer and ships are masculine-related, I thought to use the Message in a bottle stampset to create a card with simple design, perfect for any occasion.

Sembra che io non riesca a staccarmi dagli sfondi timbrati: ho visto quelli di Yana Smakula e continuo a crearne... li trovo davvero rilassanti! Visto che è estate e che le navi sono soggetti abbastanza mascolini, ho pensato di utilizzare il set Message in a bottle per creare una card con un design semplice, perfetta per ogni occasione.


As you can see, I stamped the ships all over my base and colored them one by one using alcohol markers. Then I die cut an oval with the Cool Cuts Stacked Pierced Ovals from vellum, I added an embossed sentiment and two papers.

Come potete vedere, ho timbrato le navi fino a riempire lo sfondo e le ho poi colorate una per una con i promarkers. Poi ho fustellato un ovale con la fustella Staked Pierced Ovals da del vellum, ho aggiunto un augurio embossato e due fogli arrotolati.


It looks like opening a message with something important in it! Keep in mind: you can join us here and try to win a 25€ gift certificate to the online store! More info here

L'effetto è quello dell'apertura di un messaggio che riporta qualcosa di davvero importante! E ricordate: potete unirvi a noi e provare a vincere un coupon di 25€ per lo shop! Più info qui
Share
Tweet
Pin
Share
No commenti

Hello there! Happy mail for me: I'm honored to guest design for Create a Smile this month, in particular for the challenge on their Facebook group! Thank you so much for this fantastic opportunity! The theme for this month is "interactive card", so I made this "Pop up Slider card" with this cute bear mail.

Ciao a tutti! Oggi ho una bella novità: sono onorata di essere stata scelta come Guest Designer per Create a Smile e per la loro sfida mensile sul gruppo Facebook! Grazie mille per questa bellissima opportunità! Il tema è quello delle card interattive, per cui ho creato questa "Pop up Slider card" con questo carinissimo orsetto postino.

This is the closed card:

Così è come si presenta chiusa:


And this is how it turns out:

Mentre diventa così una volta aperta:


Interactive cards are always a surprise for the recipient: they could be time consuming to make, but I really love the final effect!

Le card interattive sono sempre una sorpresa per chi le riceve: spesso richiedono molto tempo, ma adoro il risultato finale!
Share
Tweet
Pin
Share
No commenti
Older Posts

About me

About me
I'm Giada, an italian cardmaker. I love clean and simple cards...and coloring critters! Thank for being here!

Follow Me

  • Facebook
  • Instagram
  • Youtube

Contact me

Nome

Email *

Messaggio *

Blog Archive

  • ▼  2023 (3)
    • ▼  nov 2023 (1)
      • Winter Friends
    • ►  giu 2023 (1)
    • ►  feb 2023 (1)
  • ►  2022 (14)
    • ►  ott 2022 (1)
    • ►  ago 2022 (1)
    • ►  lug 2022 (2)
    • ►  giu 2022 (1)
    • ►  mag 2022 (1)
    • ►  apr 2022 (1)
    • ►  mar 2022 (3)
    • ►  feb 2022 (1)
    • ►  gen 2022 (3)
  • ►  2021 (27)
    • ►  dic 2021 (1)
    • ►  nov 2021 (1)
    • ►  ott 2021 (2)
    • ►  set 2021 (2)
    • ►  ago 2021 (3)
    • ►  lug 2021 (2)
    • ►  giu 2021 (1)
    • ►  mag 2021 (2)
    • ►  apr 2021 (2)
    • ►  mar 2021 (2)
    • ►  feb 2021 (5)
    • ►  gen 2021 (4)
  • ►  2020 (72)
    • ►  dic 2020 (2)
    • ►  nov 2020 (2)
    • ►  ott 2020 (4)
    • ►  set 2020 (8)
    • ►  ago 2020 (4)
    • ►  lug 2020 (7)
    • ►  giu 2020 (8)
    • ►  mag 2020 (5)
    • ►  apr 2020 (12)
    • ►  mar 2020 (7)
    • ►  feb 2020 (7)
    • ►  gen 2020 (6)
  • ►  2019 (68)
    • ►  dic 2019 (6)
    • ►  nov 2019 (8)
    • ►  ott 2019 (9)
    • ►  set 2019 (9)
    • ►  ago 2019 (8)
    • ►  lug 2019 (8)
    • ►  giu 2019 (3)
    • ►  mag 2019 (4)
    • ►  apr 2019 (2)
    • ►  mar 2019 (3)
    • ►  feb 2019 (4)
    • ►  gen 2019 (4)
  • ►  2018 (59)
    • ►  dic 2018 (2)
    • ►  nov 2018 (7)
    • ►  ott 2018 (7)
    • ►  set 2018 (7)
    • ►  ago 2018 (7)
    • ►  lug 2018 (6)
    • ►  giu 2018 (4)
    • ►  mag 2018 (4)
    • ►  apr 2018 (4)
    • ►  mar 2018 (4)
    • ►  feb 2018 (3)
    • ►  gen 2018 (4)
  • ►  2017 (45)
    • ►  nov 2017 (6)
    • ►  ott 2017 (3)
    • ►  set 2017 (5)
    • ►  ago 2017 (3)
    • ►  lug 2017 (3)
    • ►  giu 2017 (3)
    • ►  mag 2017 (3)
    • ►  apr 2017 (5)
    • ►  mar 2017 (3)
    • ►  feb 2017 (6)
    • ►  gen 2017 (5)
  • ►  2016 (32)
    • ►  dic 2016 (1)
    • ►  nov 2016 (6)
    • ►  ott 2016 (3)
    • ►  set 2016 (3)
    • ►  ago 2016 (3)
    • ►  lug 2016 (4)
    • ►  giu 2016 (4)
    • ►  mag 2016 (2)
    • ►  apr 2016 (1)
    • ►  mar 2016 (2)
    • ►  feb 2016 (2)
    • ►  gen 2016 (1)
  • ►  2015 (21)
    • ►  dic 2015 (1)
    • ►  nov 2015 (2)
    • ►  set 2015 (1)
    • ►  ago 2015 (2)
    • ►  lug 2015 (1)
    • ►  mag 2015 (1)
    • ►  apr 2015 (2)
    • ►  mar 2015 (4)
    • ►  feb 2015 (4)
    • ►  gen 2015 (3)
  • ►  2014 (31)
    • ►  dic 2014 (2)
    • ►  nov 2014 (2)
    • ►  ott 2014 (2)
    • ►  set 2014 (4)
    • ►  ago 2014 (1)
    • ►  lug 2014 (3)
    • ►  giu 2014 (3)
    • ►  mag 2014 (3)
    • ►  apr 2014 (2)
    • ►  mar 2014 (3)
    • ►  feb 2014 (3)
    • ►  gen 2014 (3)
  • ►  2013 (33)
    • ►  dic 2013 (4)
    • ►  nov 2013 (5)
    • ►  ott 2013 (4)
    • ►  set 2013 (3)
    • ►  ago 2013 (4)
    • ►  lug 2013 (5)
    • ►  giu 2013 (8)

Search

Labels

  • crackerbox & suzy stamps
  • craftin desert divas
  • create a smile stamps
  • lawnfawn
  • mft stamps
  • rinea foiled paper
  • so suzy stamps
  • someoddgirl
  • whimsy stamps
  • wplus9

Created with by BeautyTemplates