Copyright giadaelesuenuvole.blogspot.it. Powered by Blogger.

giadalesuenuvole

Pagine

  • Chi sono
  • Privacy Policy


Hello there! I'm back here to share a winter slimline card made for Impronte d'Autore. I wanted to create a card with multiple windows and a unique scene full of snow, trees and critters. 

Ciao a tutti! E' passato un po' di tempo dall'ultima volta ed oggi sono qui per condividere una card slimline invernale realizzata per Impronte d'Autore. Stavolta ho voluto realizzare una card con più finestre e un'unica scena, ricca di neve, alberi e animaletti.

First of all I die cut a piece of cardstock by ModaScrap (Pastel Sky) with the Slimline Frames die and covered it with white dots made with a gel pen.

Prima di tutto ho fustellato del cartoncino ModaScrap (Pastel Sky) con la fustella Slimline Frames e ho poi coperto l'intero pannello di puntini bianchi "effetto neve" con una penna gel.

Then I took another piece of cardstock by ModaScrap (Pastel Frost) and built a scene with a snowy hill (cut with Bordo Alberi Slimline die) and a couple of trees made with Abeti die and vellum or grey cardstocks. I added some white dots and pearls here and there and put everything together with regular and foam adhesives.

In seguito ho preso dell'altro cartoncino ModaScrap (Pastel Frost) e ho costruito la mia scena con una collina innevata (ritagliata con la fustella Bordo Alberi Slimline) e un paio di alberi ottenuti con la fustella Abeti e cartoncini vellum o grigi. Ho aggiunto altri puntini bianchi e qualche mezza perla qua e là, fissando tutto insieme con biadesivo normale e spessorato.

Finally I stamped a bunch of critters from the Baby Polar Friends stampset with Memento Rich Cocoa ink, colored them with Illustrator markers and cut with the coordinated dies. I added some white snowflakes on the front and more pearls and glued everything on a cardbase. I hope you liked it!

Infine ho timbrato una manciata di animaletti dal set Baby Polar Friends con dell'inchiostro Memento Rich Cocoa, colorati con i pennarelli Illustrator e ritagliati con le fustelle abbinate. Ho aggiunto qualche fiocco di neve bianco sul pannello frontale, qualche ulteriore perlina e ho incollato il tutto sulla base. Spero che vi piaccia!
Share
Tweet
Pin
Share
No commenti


Hello everyone! I love creating and customizing little gift boxes, so in today's project I decided to use the beautiful stamp "Soffio?" by Impronte d'Autore to decorate a little Prism Gift Box. I create the structure with brown cardstock and decorated it with bronze and rose pieces of cardstocks, which I picked from the Impronte mixed pack.

Ciao a tutti! Adoro realizzare e personalizzare piccole scatoline regalo, per cui per il progetto di oggi ho deciso di utilizzare il bellissimo timbro "Soffio?" di Impronte d'Autore per realizzare una piccola scatolina regalo a prisma. Ho realizzato la struttura con del cartoncino marrone e l'ho decorata con dei cartoncini bronzo e rosa, che ho selezionato dal pacco convenienza cartoncini misti.


Then I stamped the cutest mice ever with Memento Tuxedo black ink and colored them with Illustrator markers. I die cut the image with the coordinated die and glued it on the top of the box with foam adhesive.

Poi ho timbrato i più bei topini al mondo con dell'inchiostro nero Memento Tuxedo e li ho colorati con i pennarelli Illustrator. Ho fustellato l'immagine con la fustella coordinata e l'ho incollata con del biadesivo gommato.


Finally I closed the box with a bit of rose twine. It's a very little box, but super-cute too!

Infine ho chiuso la scatolina fissandolo con del twine rosa. Si tratta di una scatolina piccina piccina, ma anche super carina!

Share
Tweet
Pin
Share
No commenti


Hi there! When I want to clear my mind and keep it focused on something, I usually color or watercolor an image. For watercoloring a stamp I love to use Distress inks, even if it's time consuming for me, and today I picked a couple of fairies by Impronte d'Autore and chose a monochromatic look.

Ciao a tutti! Quando voglio sgombrare la mente e mantenerla focalizzata su qualcosa adoro colorare e acquerellare un'immagine. Per acquerellare un timbro, processo per me molto lungo in termini di tempo, adoro utilizzare i Distress Inks - sono gli unici che mi mettono a mio agio - ed oggi ho scelto un paio di fatine di Impronte d'Autore, scegliendo un look monocromatico.

I stamped two fairies from the Tinker Bell stampset with Vintage Photo Distress ink on a piece of watercolor paper. Next I watercolored them using Vintage Photo, Tea Dye and Tattered Rose Distress Inks. I added a touch of shimmer magic with Gansai Tambi White Gold watercolor on the wings and the headband.

Ho timbrato due fatine del set Tinker Bell con il Distress ink Vintage Photo su della carta acquerellabile. Poi le ho acquerellate utilizzando i Distress ink Vintage Photo, Tea Dye e Tattered Rose. Ho aggiunto un pizzico di magia utilizzando dell'acquerello White Gold Gansai Tambi su ali e cerchietto.

Finally I added few stars here and there with Tattered Rose Distress Oxide and a sentiment at the bottom of the panel, both included in the Tinker Bell set. Then I framed the watercolor piece on a chocolate cardstock and that's all.

Infine ho aggiunto qualche stellina qua e là con del Distress Oxide Tattered Rose, insieme a una scritta nella parte bassa del pannello, entrambi inclusi nel set Tinker Bell. Poi ho montato il tutto su dei cartoncini marroni di base.

When I'm in mood for watercoloring I like to color more then one image, so I stamped another fairy and colored it with the same ink pads I used for the first one. 

Quando mi sento in vena di acquerellare mi piace colorare più di un'immagine, per cui ho timbrato un'altra fatina e l'ho colorata con gli stessi inchiostri che ho utilizzato per la prima.

Since I love Fantasy books, I decided to create a page corner bookmark with the Segnalibro die, using brown and cream colors.

Visto che adoro la letteratura fantasy, ho deciso di realizzare un segnalibro angolare con la fustella Segnalibro, utilizzando colori marroni e crema. 
Share
Tweet
Pin
Share
No commenti


Hello... it's never too early to get ready for Christmas, right? Well, it's so hot outside that I'm dreaming of Christmas time! I decided to create a slimline card with dies by Impronte d'Autore and a beautiful digital stamp by Whimsy Stamps.

Ciao... non è mai troppo presto per cominciare a pensare al Natale, vero? Beh, fuori da così caldo che pensare all'autunno ed al Natale è quasi automatico per me! Ho pensato di realizzare una card slimline con fustelle di Impronte d'Autore e un bellissimo timbro digitale di Whimsy Stamps.


First of all I die cut the base from kraft cardstock and the border from white cardstock, as well as the sentiment and some pines with a bit of snow on top. I added some snow on kraft using a white gel pen.

Prima di tutto ho scelto di utilizzare un cartoncino kraft come base, poi ho fustellato il bordo bianco, insieme alla scritta e agli abeti con la punta innevata. Ho aggiunto anche della neve su kraft grazie ad una penna gel bianca.


Then I printed the Cinnamon and Reindeer digital stamp on white cardstock and colored it with Illustrator markers, looking for colors that matched with the card. I fussy cut and added some details with a gold gel pen. Finally I placed everything on the card base and glued each element with regular and foam adhesives. I just can't wait for Christmas!

Poi ho stampato il timbro Cinnamon and Reindeer su del cartoncino bianco e l'ho colorato con i pennarelli Illustrator, cercando i colori che più i sposavano con gli altri elementi presenti sulla card. Ho ritagliato l'immagine e ho aggiunto alcuni dettagli con la penna gel oro. Infine ho posizionato il tutto sulla base ed ho incollato ogni elemento utilizzando anche il nastro gommato. Non vedo l'ora che arrivi il Natale!

Share
Tweet
Pin
Share
No commenti


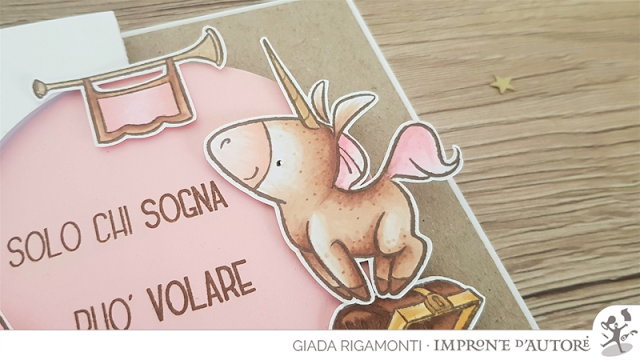
Hello everyone! It's been a rough week, but it's finally over... so let's the relax begins! I created a sweet card with one of my favorite color combinations: white, kraft, rose colors and a bit of gold. In particular this is a swing card, since I loved the one I made for a Holy Communion few weeks ago. I used the one of the Cerchi Big dies for the interactive mechanism, which gives a twist to the whole project.

Ciao a tutti! E' stata una settimana tosta, ma finalmente è finita... e quindi diamo il via al weekend e al relax! Ho creato una dolce card con una delle mie combinazioni preferite: bianco, kraft e rosa, con un pizzico di oro. In particolare si tratta di una swing card, visto che mi sono divertita molto a realizzare questa per la Prima Comunione qualche settimana fa. Anche in questo caso mi sono fatta aiutare dalle fustelle Cerchi Big, che hanno dato una marcia in più all'intero progetto.

I decided to combine Dante e Bo stampset with a sentiment from Neverland stampset. I stamped a bunch of images with Memento Cocoa ink and colored them with Illustrator markers and a bit of gold for details.

Ho deciso di mettere insieme il set di timbri Dante e Bo con l'augurio dal set Neverland. Ho timbrato un po' di immagini con dell'inchiostro Memento Cocoa e le ho colorate con i pennarelli Illustrator ed una penna oro per i dettagli.

I chose the unicorn, the banner, the treasure and the castle and I used the same color scheme I chose for the cardstocks.

Ho optato per l'unicorno, lo stendardo, il tesoro ed il castello ed ho utilizzato gli stessi colori che ho scelto per i cartoncini.

I glued everything on the front with foam adhesive, except for the treasure which is on the inside in order to help the card to stay close. 

Ho incollato il tutto sul fronte della card con del nastro gommato, ad eccezione del tesoro che ho fissato all'interno, così da aiutare la card a rimanere chiusa.

I put a kraft cardstock inside and a rose circle on the front of the structure. On the circle I stamped the sentiment with Memento Cocoa ink. 

Ho posizionato un cartoncino kraft all'interno e un cerchio rosa sul fronte della struttura. Sul cerchio ho timbrato la scritta sempre con dell'inchiostro Memento Cocoa.

I love how everything turned out, I think it's a perfect card for people who have the head in the clouds ora little girls that just like unicorns!

Adoro il risultato finale, penso che sia un biglietto perfetto per coloro che hanno la testa tra le nuvole o per piccole donne che amano gli unicorni!
Share
Tweet
Pin
Share
No commenti


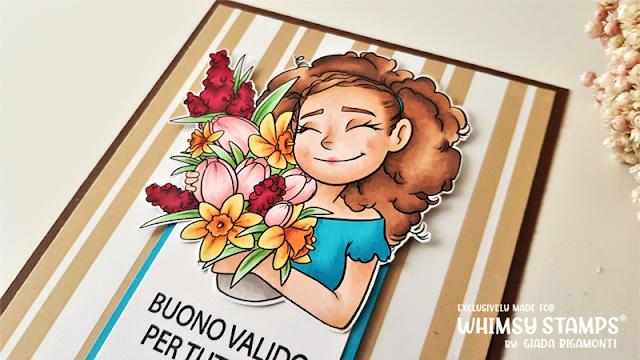
Hello everyone! Today I want to share a Spring card with a beautiful digi stamp available at Whimsy Stamps shop. It's a simple one, very quick to make since the stamp I'm using is so gorgeous and detailed! I printed Bouquet Piper stamp on white cardstock, colored it with Illustrator markers and fussy cut.

Ciao a tutti! Oggi voglio condividere una card primaverile realizzata con il bellissimo digi disponibile su Whimsy Stamps. Si tratta di un biglietto molto semplice e veloce da realizzare, visto che il timbro che sto utilizzando è splendido e dettagliato! Ho stampato il timbro Bouquet Piper su del cartoncino bianco, colorato con i pennarelli Illustrator e ritagliato.


I stamped a sentiment on a strip of white cardstock and framed it with another one, that I colored with the same marker I used for Piper's shirt. Finally I put everything on a digi patterned paper and chose a brown cardstock for my cardbase.

Ho timbrato la scritta su del cartoncino bianco e l'ho incorniciato con un altro, che ho colorato con lo stesso pennarello che ho utilizzato per la maglietta di Piper. Infine ho fissato il tutto su una carta digitale e ho optato per un cartoncino marrone come base.

Share
Tweet
Pin
Share
No commenti


Hello everyone! Today I'm back with an easel circle card, showcasing the new dies by Impronte d'Autore. I find the latest release so unique, because I love both stamps and dies included! In particular for creating this card I used a bunch of circles from the Cerchi Big die set and the Compleanno Big die too.

Ciao a tutti! Oggi voglio mostrarvi una card easel circolare, con cui vi presento le nuovissime fustelle di Impronte d'Autore. Trovo che l'ultima release sia davvero pazzesca, tanto che adoro sia i timbri che le fustelle! In particolare per realizzare questa card ho utilizzato un po' di fustelle circolare del set Cerchi Big e la scritta Compleanno Big.

Since today is the first day of spring I wanted to say goodbye to winter, so I chose cold colors and the Baby Polar Friends stamps - their size matches the sentiment perfectly. I stamped a lot of critters with Memento Tuxedo Black ink, colored them with Illustrator markers and die cut with coordinated dies.

Visto che oggi è il primo giorno di primavera ho voluto salutare l'inverno, per cui ho scelto una palette di colori freddi ed i timbri del set Baby Polar Friends - la loro dimensione si sposa perfettamente con la scritta di auguri. Ho timbrato moltissimi animaletti con l'inchiostro Memento Tuxedo nero, li ho colorati con i pennarelli Illustrator e li ho fustellati con le fustelle abbinate.

I decided to complete the front panel with the heart-shaped balloon included in the Sweet Bee stampset. Then I die cut the sentiment die three time from different cardstock and glued it together a little bit shifted, in order to add a shadow effect and make the sentiment pop. I picked 3 different circle dies and glued them together too, creating my front panel. Then I die cut another big circle and scored it on top in order to crete a circle card. 

Ho deciso di completare il pannello frontale con il palloncino a forma di cuore incluso nel set Sweet Bee. Poi ho fustellato la scritta tre volte con cartoncini di colore diverso e li ho incollati insieme senza farli aderire perfettamente, così da aggiungere l'effetto ombra e far risaltare la scritta. Ho preso 3 diversi cerchi grandi e li ho incollati insieme per realizzare un pannello frontale. In seguito ho fustellato un altro cerchio grande e l'ho piegato in alto, così da realizzare una card circolare.

Finally I die cut another circle and added it to create the easel mechanism: the card can stand vertically, thanks to a little fox at the bottom of the card.

Infine ho fustellato un altro cerchio e l'ho aggiunto in basso per completare il meccanismo della easel card: in questo modo il biglietto rimane in piedi, grazie alla piccola volpina che la tiene ferma nella parte bassa della card.

I love this card and its vibes... Goodbye Winter, see you next year!

Adoro questa card e questo mood... Addio inverno, ci rivediamo l'anno prossimo!
Share
Tweet
Pin
Share
No commenti

Hello stampers, today is the day: the new release by Impronte d'Autore is now live! This is one of my favorite ever because it's full of playful critters! I decided to stamp, color and put part of them (all that I can, but the Party Time set is very big) on a side step card.

Ciao a tutti! Oggi è il gran giorno: la nuova release di Impronte d'Autore è ora online! Questa è una delle mie preferite di sempre perché ricca di animaletti festosi! Ho deciso di timbrare, colorare e posizionare parte di loro (il set Party Time è davvero grandino e non ci stavano tutti!) su una side step card.

So I colored all of them with the Illustrator markers and used coordinated dies to cut them. I created the cardbase, adding Cracked Pistachio Distress Ink for the sky and Vintage Photo on the hills - which I die cut using the die from the Bordo Alberi Slimline set.

Quindi li ho colorati tutti con i pennarelli Illustrator e ho utilizzato le fustelle coordinate per ritagliarli. Ho creato la base della card, aggiungendo del Distress Ink Cracked Pistachio per il cielo e del Vintage Photo sulle colline - ottenute utilizzando la fustella del set Bordo Alberi Slimline.

Finally I placed the critters here and there, some in the foreground and other in the background. I added a couple of sentiments and some birthday candles. This card is one of my favorite ever, it's so full of joy!

Infine ho scelto dove posizionare e incollare i vari animaletti, alcuni in primo piano e altri in secondo piano. Ho incollato un paio di auguri e qualche candelina qua e là. Questa card è una delle mie preferite di sempre, è così piena di gioia!

Share
Tweet
Pin
Share
No commenti


Hello my friends! Today I'm showing you a card with my very first CCDesign digi stamp, Cinnamon and Bunnies, available at Whimsy Stamps. Easter is near and this image really inspired me! I printed it on white cardstock, colored it with alcohol markers and then added some details with Prismacolor pencils.

Ciao amici! Oggi vorrei mostrarvi una card realizzata con il mio primissimo timbro digitale Cinnamon and Bunnies di CCDesigns, disponibile sul sito di Whimsy Stamps. Pasqua si sta avvicinando e questa immagine mi ha davvero ispirato! L'ho timbrata su del cartoncino bianco, colorata con i pennarelli ad alcol ed ho poi aggiunto qualche dettaglio con le matite colorate Prismacolor.


I finally traced a line for the ground and stamped a sentiment at the bottom of the panel. Next I framed it with a strip of red cardstock and glued everything on a blue panel. This is just so sweet!

Ho tracciato una linea per il terreno e ho timbrato una scritta nella parte bassa del pannello frontale. L'ho mattato con del cartoncino rosso e ho incollato il tutto su un pannello azzurro. La trovo davvero dolce come card!
Share
Tweet
Pin
Share
2 commenti


"A hug is like a boomerang – you get it back right away" (B. Keane). 
I love hugs, even if I am to wait for them... until we'll be covid-free. And so I love the new stampset Hugs by Impronte d'Autore, full of critters and holfi hugging each other. The dragon and the unicorn, called Dante and Bo, are my favorite, in fact I created this card for my Valentine.

"Un abbraccio è come un boomerang: torna subito indietro” (B. Keane).
Adoro gli abbracci, anche se in questo periodo mi sono trattenuta, in attesa che la situazione pandemica finisca. Per cui non potevo non innamorarmi del nuovo set Hugs di Impronte d'Autore, ricco di animaletti ed holfi che si abbracciano a vicenda. Il drago con l'unicorno, Dante e Bo, sono i miei preferiti... infatti ho scelto loro come protagonisti della card di San Valentino.

I stamped the image with Antique Linen Distress Ink for the no-line coloring technique, then I watercolored it with a bunch of Distress Inks. I mainly used Seedless Preserves and Picked Raspberry for the dragon, with a little bit of Vintage Photo too. For the unicorn I chose Antique Linen, Picked Raspberry and Tattered Rose.

Ho timbrato l'immagine con il Distress Ink Antique Linen così da poter colorare con la tecnica no-line, poi l'ho acquerellata con un po' di Distress Inks. Ho usato principalmente Seedless Preserves e Picked Raspberry per il drago, con un pizzico di Vintage Photo. Per l'unicorno ho scelto Antique Linen, Picked Raspberry e Tattered Rose.

Finally I picked one of the beautiful sentiments included in the set and heat embossed it under the image, using Versamark Ink and gold embossing powder. Next I framed the panel with purple cardstock and glued everything on a kraft cardbase.

Infine ho preso uno dei bellissimi sentiment inclusi nel set e l'ho embossato a caldo al di sotto dell'immagine, utilizzando l'inchiostro Versamark e la polvere da embossing oro. Per finire ho mattato il pannello con del cartoncino viola e ho incollato il tutto su una base kraft.

Share
Tweet
Pin
Share
No commenti


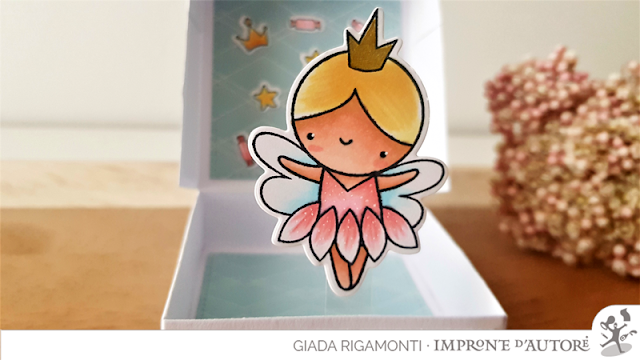
Hello there! Today I'm back with a project made in collaboration with Impronte d'Autore. When I was little, the Tooth Fairy gave me some money or a message. To be honest, I can't remember! Since Christmas is over, I wanted to keep a bit of magic and put it in a box that reveals the Tooth Fairy... I think it's a great idea for kids.

Ciao a tutti! Oggi sono tornata con un progetto che ho realizzato in collaborazione con Impronte d'Autore. Quando ero piccola, la Fatina dei Denti mi regalava qualche soldino, oppure mi lasciava un messaggio...onestamente non lo ricordo con esattezza! Visto che Natale è ormai lontano, ho voluto portare con me un po' di magia e inserirla in una scatolina, che una volta aperta si rivela essere la dimora della Fata dei Denti. Un'idea molto carina, soprattutto per i bambini!

First of all, I created a little box with the Box Pizza die: I used a white cardstock for the structure and a patterned paper from the ModaScrap "Enjoy the Jorney" paper pack for all the decorative parts (outside and inside). I die cut some rose letters with the Alfabeto die in order to compose "Tooth Fairy" in italian. Then I stamped the fairy and some stars, crowns and sweets from the Schiaccianoci stampset and die cut with the coordinating dies. I colored everything with Illustrator markers.

Prima di tutto ho realizzato una piccola scatolina con la fustella Box Pizza: ho utilizzato del cartoncino bianco per la struttura e una carta decorativa dal pack ModaScrap "Enjoy the Journey" per tutti gli elementi decorativi (esterni ed interni). Ho fustellato alcune lettere rosa con la fustella Alfabeto così da comporre le parole desiderate. In seguito ho scelto il set di timbri Schiaccianoci, ho timbrato la fatina, un po' di stelline, corone e caramelle e poi le ho fustellate. Ho colorato il tutto con i pennarelli Illustrator. 


For making the fairy more fascinating, I added some white dots on her dress and a bit of gold on the crown. I glued the image on top of a strip of acetate, so that she will pop up every time the box opens.

Per far sì che la fatina fosse più elegante, ho aggiunto qualche puntino bianco sul suo vestito e un po' d'oro sulla corona. Ho incollato l'immagine su una striscia di acetato, così che possa saltar fuori ogni volta che la scatolina viene aperta.

At the end I decided to add some extra details on the inside too by adhering some little images. I think that this is a very unique project, very easy to reproduce!

Alla fine ho deciso di aggiungere qualche ulteriore dettaglio all'interno della scatola, incollando qualche piccola immagine in più. Penso che si tratti proprio di un progetto originale e molto semplice da ricreare!
Share
Tweet
Pin
Share
No commenti


Hello everyone and happy New Year! I hope to update my blog more often this year, for a start let's see a super-sweet card I made for Whimsy Stamps. I chose the digi stamp Hare Bear Friends with a bear and a bunny, printed on regular paper, colored with alcohol markers and fussy cut. I wanted to create a sort of friendship card: friends can be different and love each other still. Then I picked a bunch of pastel colors as kraft, rose and white.

Ciao a tutti e buon anno! Spero di essere più costante sul blog ed aggiornarlo più spesso quest'anno, intanto inauguro il 2022 con una card molto dolce che ho realizzato per Whimsy Stamps. Ho scelto il timbro digitale Hare Bear Friends, che comprende un orso e un coniglio. L'ho stampato su del cartoncino bianco, colorato con i pennarelli ad alcool e ritagliato. L'idea di base era di creare una sorta per gli amici, che possono essere diversi tra loro ma continuano a volersi bene a vicenda. Poi ho selezionato un po' di colori pastello, come il kraft, il rosa e il bianco.


I die cut a white panel with a circle die, then I used a folder with polka dots to emboss it. I put a digital paper from the Holiday Cheer Papers set set behind the panel, die cut a rose grass border from the Build a Fairy Garden die set and glued a sentiment too. A very easy card, but it makes me smile!

Ho fustellato del cartoncino bianco con una fustella a cerchio, poi ho utilizzato un folder con i polka dots e l'ho embossato. Ho posizionato una carta digitale scelta dal set Holiday Cheer Papers dietro al pannello, ho fustellato un bordo erboso con del cartoncino rosa e ho incollato un augurio. Si tratta di una card molto semplice, ma mi fa sorridere!
Share
Tweet
Pin
Share
1 commenti
 

Hello there! I made tons of Holiday cards this year, but it seems like I didn't finish yet. Thanks to Impronte d'Autore, I have new Christmas stamps and dies I can work with... and today I used the sweetest and cutest snowman I've ever seen to create a winter card. I stamped the Snowman with Memento Tuxedo black ink, die cut with the coordinating die and colored with Illustrator markers. 

Ciao a tutti! Ho realizzato tantissime card natalizie quest'anno, ma sembra proprio che non abbia ancora finito. Grazie a Impronte d'Autore, mi sono procurata un sacco di timbri e fustelle natalizie con cui lavorare... ed oggi ho utilizzato il pupazzo di neve più dolce e più carino che abbia mai visto per realizzare una card invernale. Ho timbrato il Pupazzo di neve con dell'inchiostro Memento Tuxedo nero, l'ho ritagliato con le fustelle abbinate e l'ho colorato con i pennarelli Illustrator.


Then I picked a piece of watercolor paper and I blended it with Tumbled Glass, Broken China and Faded Jeans Distress Oxides. I let it dry and sprinkled some waterdrops here and there. Then I die cut some tree trunks and a couple of hills from the Alberi and Bordo Alberi Slimline dies. I blended some Broken China at the bottom of the hills too. Finally I put everything together with foam tape and regular adhesive, adding a embossed sentiment on top of the scene.

In seguito ho preso un foglio acquerellabile e l'ho sfumato con i Distress Oxide Tumbled Glass, Broken China e Faded Jeans. Ho aspettato che asciugasse e ci ho spruzzato sopra qualche goccia d'acqua. Poi ho fustellato dei fusti d'albero e un paio di colline, grazie alle fustelle Alberi e Bordo Alberi Slimline. Ho sfumato del Broken China anche nella bordo inferiore delle colline. Infine ho messo insieme il tutto, utilizzando sia del nastro gommato sia del biadesivo standard, aggiungendo una scritta embossata su cartoncino rosso.
Share
Tweet
Pin
Share
No commenti

Hello my friends! I'm creating as a busy bee for Christmas and today I wanted to share a couple of cards in a box that I made for Impronte d'Autore. I used their dies to create the structure of the box: these are a must-have in my opinion, since they made my life easier and the process faster!

Ciao amici! Sto creando come una matta per Natale e oggi vi voglio mostrare un paio di card in a box che ho realizzato per Impronte d'Autore. Ho utilizzato le loro fustelle per realizzare la struttura della scatolina: si tratta di un must-have secondo me, perché rendono questa operazione molto più veloce! 

In fact the dies cut the box itself, which is composed by two parts that should be adhered together, and the strips, which can be added in the middle to create two (or more) layers. Plus, in the set there are also other rectangular dies to be used for the decoration of the box.

Infatti le fustelle tagliano la scatolina, che è composta da due parti che devono essere incollate tra loro, e le due strisce che possono essere aggiunte al centro della card per realizzare due (o più) livelli. In più, in questo set ci sono anche altre fustelle rettangolari che permettono di decorare la scatolina.

First I die cut the structure out of white cardstock, while I chose a couple of patterned papers from the set Winterland by Mintay for the decorative parts - which is the perfect set to create a winter scene.

Prima di tutto ho fustellato la struttura da del cartoncino bianco, mentre ho scelto un paio di carte decorative dal set Winterland di Mintay, perfette per mettere insieme una scena invernale.

Then I die cut all the other things I needed to complete the scene: some white hills with the Bordo Alberi Slimline dies and some trees with the Alberi dies from kraft cardstock.

Poi ho fustellato tutto ciò che mi serviva per completare la scenetta: qualche collina bianca con le fustelle Bordo Alberi Slimline e qualche albero con le fustelle Alberi da del cartoncino kraft.

Finally I needed to fill the scene with critters: I chose the penguin and the bear from the Baby Polar Friends set and the Santa from the Babbo Esultante set: I stamped them with Memento Tuxedo Black Ink, colored with Illustrator markers and die cut. I adhered everything trying to create a dynamic scene on two layers and heat embossed the sentiment Buon Natale on a strip of white cardstock. As usual, this card in a box can be folded and put in a standard envelope. 

Infine avevo bisogno di riempire la scenetta con dei personaggi: ho scelto il pinguino e l'orsetto dal set Baby Polar Friends e il Babbo Natale dal set Babbo Esultante: li ho timbrati con dell'inchiostro nero Memento Tuxedo, colorati con i pennarelli Illustrator e fustellati. Ho incollato il tutto in modo da creare una scena dinamica su più livelli e ho embossato l'augurio Buon Natale su una striscia di cartoncino bianco. Come per tutte le card in a box, questa può essere piegata e inserita in una busta standard.

I coudn't resist, so I created another card in a box with the unique Christmas Elves of the Fairy Forest stampset, which are called "Holfi". I stamped three of them with Memento Ink, die cut and colored with Illustrator markers. Then I put the structure together, using green cardstock and papers from the Christmas Italian Style pack by Moda Scrap.

Non ho potuto resistere, per cui ho realizzato una seconda card in a box con gli originalissimi elfi natalizi del set Fairy Forest, che sono chiamati "Holfi". Ho timbrato tre di loro con dell'inchiostro Memento nero, fustellati e colorati con i pennarelli Illustrator. Poi ho messo insieme la struttura, utilizzando del cartoncino verde e le carte patterned dal set Christmas Italian Style di Moda Scrap.

As the first version, I added some white hills and put the elves on the two layers. 

Come per la prima versione, ho aggiunto delle colline bianche e ho incollato gli elfi su due livelli.

Finally I added the die cut sentiment, which is part of the starter kit of the Cutty Machine. I really love the Santa's version of the card, but the elves have a super cute faces too!

Infine ho aggiunto un sentiment fustellato, che fa parte dello start kit della macchinetta Cutty. Adoro la versione con Babbo Natale, ma è innegabile che gli elfi abbiano una simpatica faccina!
Share
Tweet
Pin
Share
No commenti
Older Posts

About me

About me
I'm Giada, an italian cardmaker. I love clean and simple cards...and coloring critters! Thank for being here!

Follow Me

  • Facebook
  • Instagram
  • Youtube

Contact me

Nome

Email *

Messaggio *

Blog Archive

  • ▼  2023 (3)
    • ▼  nov 2023 (1)
      • Winter Friends
    • ►  giu 2023 (1)
    • ►  feb 2023 (1)
  • ►  2022 (14)
    • ►  ott 2022 (1)
    • ►  ago 2022 (1)
    • ►  lug 2022 (2)
    • ►  giu 2022 (1)
    • ►  mag 2022 (1)
    • ►  apr 2022 (1)
    • ►  mar 2022 (3)
    • ►  feb 2022 (1)
    • ►  gen 2022 (3)
  • ►  2021 (27)
    • ►  dic 2021 (1)
    • ►  nov 2021 (1)
    • ►  ott 2021 (2)
    • ►  set 2021 (2)
    • ►  ago 2021 (3)
    • ►  lug 2021 (2)
    • ►  giu 2021 (1)
    • ►  mag 2021 (2)
    • ►  apr 2021 (2)
    • ►  mar 2021 (2)
    • ►  feb 2021 (5)
    • ►  gen 2021 (4)
  • ►  2020 (72)
    • ►  dic 2020 (2)
    • ►  nov 2020 (2)
    • ►  ott 2020 (4)
    • ►  set 2020 (8)
    • ►  ago 2020 (4)
    • ►  lug 2020 (7)
    • ►  giu 2020 (8)
    • ►  mag 2020 (5)
    • ►  apr 2020 (12)
    • ►  mar 2020 (7)
    • ►  feb 2020 (7)
    • ►  gen 2020 (6)
  • ►  2019 (68)
    • ►  dic 2019 (6)
    • ►  nov 2019 (8)
    • ►  ott 2019 (9)
    • ►  set 2019 (9)
    • ►  ago 2019 (8)
    • ►  lug 2019 (8)
    • ►  giu 2019 (3)
    • ►  mag 2019 (4)
    • ►  apr 2019 (2)
    • ►  mar 2019 (3)
    • ►  feb 2019 (4)
    • ►  gen 2019 (4)
  • ►  2018 (59)
    • ►  dic 2018 (2)
    • ►  nov 2018 (7)
    • ►  ott 2018 (7)
    • ►  set 2018 (7)
    • ►  ago 2018 (7)
    • ►  lug 2018 (6)
    • ►  giu 2018 (4)
    • ►  mag 2018 (4)
    • ►  apr 2018 (4)
    • ►  mar 2018 (4)
    • ►  feb 2018 (3)
    • ►  gen 2018 (4)
  • ►  2017 (45)
    • ►  nov 2017 (6)
    • ►  ott 2017 (3)
    • ►  set 2017 (5)
    • ►  ago 2017 (3)
    • ►  lug 2017 (3)
    • ►  giu 2017 (3)
    • ►  mag 2017 (3)
    • ►  apr 2017 (5)
    • ►  mar 2017 (3)
    • ►  feb 2017 (6)
    • ►  gen 2017 (5)
  • ►  2016 (32)
    • ►  dic 2016 (1)
    • ►  nov 2016 (6)
    • ►  ott 2016 (3)
    • ►  set 2016 (3)
    • ►  ago 2016 (3)
    • ►  lug 2016 (4)
    • ►  giu 2016 (4)
    • ►  mag 2016 (2)
    • ►  apr 2016 (1)
    • ►  mar 2016 (2)
    • ►  feb 2016 (2)
    • ►  gen 2016 (1)
  • ►  2015 (21)
    • ►  dic 2015 (1)
    • ►  nov 2015 (2)
    • ►  set 2015 (1)
    • ►  ago 2015 (2)
    • ►  lug 2015 (1)
    • ►  mag 2015 (1)
    • ►  apr 2015 (2)
    • ►  mar 2015 (4)
    • ►  feb 2015 (4)
    • ►  gen 2015 (3)
  • ►  2014 (31)
    • ►  dic 2014 (2)
    • ►  nov 2014 (2)
    • ►  ott 2014 (2)
    • ►  set 2014 (4)
    • ►  ago 2014 (1)
    • ►  lug 2014 (3)
    • ►  giu 2014 (3)
    • ►  mag 2014 (3)
    • ►  apr 2014 (2)
    • ►  mar 2014 (3)
    • ►  feb 2014 (3)
    • ►  gen 2014 (3)
  • ►  2013 (33)
    • ►  dic 2013 (4)
    • ►  nov 2013 (5)
    • ►  ott 2013 (4)
    • ►  set 2013 (3)
    • ►  ago 2013 (4)
    • ►  lug 2013 (5)
    • ►  giu 2013 (8)

Search

Labels

  • crackerbox & suzy stamps
  • craftin desert divas
  • create a smile stamps
  • lawnfawn
  • mft stamps
  • rinea foiled paper
  • so suzy stamps
  • someoddgirl
  • whimsy stamps
  • wplus9

Created with by BeautyTemplates