Copyright giadaelesuenuvole.blogspot.it. Powered by Blogger.

giadalesuenuvole

Pagine

  • Chi sono
  • Privacy Policy

Hello my friends! Today I'm back with a birthday card for Crackerbox & Suzy Stamps. The layout is very versatile: it can be used for anniversary, congratulation or thank you cards too, depending on the sentiment you choose. Plus, this card has no coloring at all since is full of stamping and heat embossing.

Ciao amici! Oggi sono tornata con una card di compleanno per Crackerbox & Suzy Stamps. Il design della card è molto versatile: può essere utilizzato per card di anniversario, di congratulazioni o anche solo per ringraziare qualcuno, in base all'augurio che si intende utilizzare. In più, questa card non prevede alcuna colorazione, visto che si basa su stamping e heat embossing.


First of all, I stamped the Solid Branch multiple times on the edges of a lilac cardstock. I used a similar color of ink to achieve a tone-on-tone look.

Prima di tutto ho timbrato il Solid Branch più volte, sui bordi di un cartoncino lillà. Ho utilizzato un tampone dal colore simile per ottenere un effetto tono-su-tono. 


Then I stamped it again with other inks of the same color family.

Poi l'ho nuovamente timbrato con altri tamponi della stessa famiglia cromatica.


I decided to add a bit of interest by stamping these Solid Butterflies with Versamark Ink on vellum. Next I covered everything with gold embossing powder, heat embossed and fussy cut.

Ho deciso di aggiungere un po' di interesse timbrando il Solid Butterflies con dell'inchiostro Versamark su del vellum. In seguito ho coperto il tutto con della polvere dorata, ho embossato con l'heat gun e ritagliato.


Finally I took a strip of white cardstock and I stamped the Celebrate sentiment on top.

Infine ho preso una striscia di cartoncino bianco e ho timbrato la scritta Celebrate.


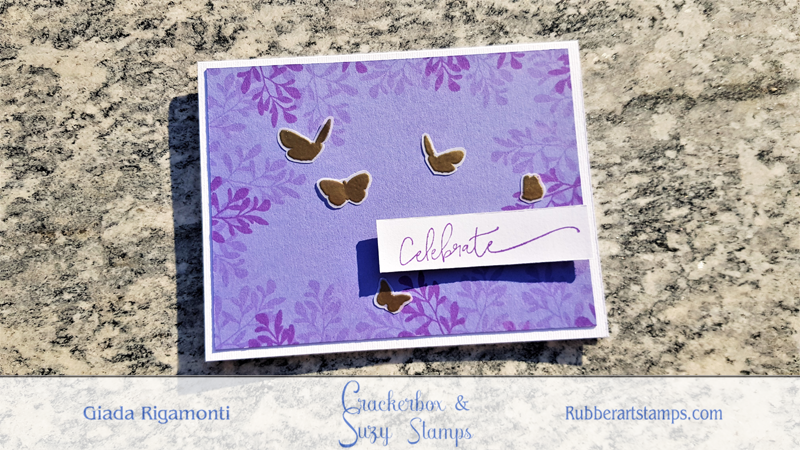
I placed the lilac panel on a white cardbase, adhered all the butterflies and glued the sentiment with foam tape. I love the clean but elegant look of the result!

Ho posizionato il pannello lillà su un cartoncino bianco di base, ho incollato le farfalle e fissato la scritta con del nastro adesivo. Adoro il risultato pulito ma elegante!


Supplies used:

Solid Branch
Butterflies Solid Lg.
Celebrate
Share
Tweet
Pin
Share
No commenti


Hello everyone! I'm keeping on being obsessed by flowers, so today I want to show you my latest card for Crackerbox & Suzy Stamps using the Morning Glory - set of 5 stamps. I love them because I can build a cluster of flowers and leaves as my focal point on the card.

Ciao a tutti! Continuo ad essere ossessionata dai fiori e a smarmellarli su ogni card che mi capiti a tiro! La card di oggi, realizzata per Crackerbox & Suzy Stamps, vede come protagonista il set composto da 5 timbri "Morning Glory". Adoro questo set perché mi permette di costruire un bel gruppo di fiori e foglie, perfetto per riempire una card.


First of all, I stamped all the pieces of the set on a piece of kraft cardstock, colored everything with prismacolor pencils and fussy cut. I like to place my stamps on a MISTI tool so I can stamp them again and again, in order to achieve a dark outline after the coloring process.

Prima di tutto ho timbrato tutti i pezzi di cui è composto il set su del cartoncino kraft, ho colorato tutto con le matite prismacolor e ho ritagliato. Mi piace posizionare i timbri nel mio MISTI, così posso timbrarli di nuovo una volta che li ho colorati per far risaltare nuovamente i contorni dell'immagine.


Then I took another piece of kraft cardstock and an embossed white panel. I heat embossed the sentiment with gold embossing powder on white cardstock and fussy cut it too.

Poi ho preso dell'altro cartoncino kraft e una base bianca precedentemente embossata. Ho embossato a caldo l'augurio, utilizzando della polvere da embossing oro su del cartoncino bianco. Ho ritagliato anche questo, seguendo i contorni.


At this point I arranged the flowers on the kraft piece and fixed all the images with regular and foam adhesive. I glued the sentiment under the cluster of flowers and the entire panel on a white cardbase.

A questo punto ho sistemato i fiori sul cartoncino kraft, fissando tutte le singole immagini con del biadesivo sia normale che gommato. Ho incollato l'augurio sotto il gruppo floreale e l'interno pannello sopra la base bianca.


A quick reminder: the February sale (20% off) by Crackerbox & Suzy Stamps is all about Easter, Friendship and St.Patrick's Day stamps!

Vi ricordo che le categorie interessate dallo sconto di febbraio di Crackerbox & Suzy Stamps (scontate del 20%) sono Pasqua, amicizia e il giorno di San Patrizio!


Supplies used:

Morning Glory - set of 5

Happy Birthday open

Share
Tweet
Pin
Share
No commenti

Hello romantic people! Well, today I'm sharing the card I made for my boyfriend in order to celebrate Valentine's Day. Unfortunately we're currently living apart from each other, but I'm going to give him this card quite soon. I chose this adorable couple of donuts with hearts in their hands, available on Some Odd Girl shop.

Buongiorno a tutti i romantici! Già, oggi vi mostro la card che ho realizzato per il mio ragazzo, così da poter festeggiare San Valentino. Sfortunatamente al momento viviamo lontani, ma sto per consegnargliela a mano tra una settimana. Ho scelto questa adorabile coppia di ciambelle con il cuore tra le mani, disponibile sullo shop di Some Odd Girl.


I colored them with alcohol markers on white cardstock and fussy cut.

Li ho colorati con i pennarelli ad alcohol su del cartoncino bianco e li ho ritagliati.


I combined these two donuts with two patterned papers: a pink one and a brown one with a woodgrain effect. I adhered the donuts with foam tape in order to give them some dimension and I put everything on a white cardbase.

Ho deciso di abbinare a queste ciambelle due carte patterned: una rosa e una marrone con effetto legno. Ho incollato le ciambelle con del nastro gommato così da dar loro maggior rilievo rispetto allo sfondo e ho fissato il tutto su una base bianca.


I mean, I couldn't resist their sweet faces!

Cioè, si può resistere a due facce dolciose come queste?!
Share
Tweet
Pin
Share
No commenti

Hello my friends! Today I'm back with flowers... I'm a bit obsessed, I know! This year winter seems like a long and sunny spring, flowers are already blooming and I feel quite inspired by them. Today I made clean and simple card, with a big flower by Some Odd Girl and a scripty sentiment.

Ciao amici! Oggi ritorno con un altro fiori...ne sono un po' ossessionata, lo riconosco! Quest'anno l'inverno sembra aver lasciato spazio a una lunga e soleggiata primavera, i fiori stanno già sbocciando ed io mi sento ispirata dalla loro bellezza. Oggi ho realizzato una card davvero semplice e veloce, con un fiore di dimensioni particolarmente importanti - disegnato da Some Odd Girl - e un augurio dallo stile calligrafico.


This image is full of details and petals, so I decided to magnify and print it. I colored the flower with alcohol makers, adding more shadows and depth with prismacolor pencils too.

Quest'immagine è ricca di dettagli e petali, per cui ho deciso di ingrandirla molto e stamparla. Ho colorato il fiore con i pennarelli ad alcohol, aggiungendo dei tocchi di matite prismacolor per aggiungere ombre e profondità.


I fussy cut the big flower and fixed it at the bottom of a lilac panel with foam adhesive. I stamped the sentiment on top, outlining it with a white gel pen. I put everything on a white cardbase and that's all!

Ho ritagliato il fiorellone e l'ho incollato su un cartoncino lillà, nella parte inferiore, con del nastro  gommato. Ho timbrato l'augurio al di sopra, contornandolo con una penna gel bianca. Ho fissato il tutto su una base bianca e...voilà!
Share
Tweet
Pin
Share
2 commenti


Hello stampers! Today I want to share with you this sort of summer card, inspired by the seagull stamp by Crackerbox & Suzy Stamps. Since it is flying, I wanted to create something related to fly and dreamers.

Ciao amici! Oggi voglio mostrarvi questa card dal sentore un po' estivo, ma in realtà ispirata dal timbro seagull di Crackerbox & Suzy Stamps. Visto che il gabbiano sta volando, ho voluto creare qualcosa relativo al volo e ai sognatori.


First of all I stamped three seagulls on white cardstock, colored them with light grey and orange shades of alcohol markers, then fussy cut.

Prima di tutto ho timbrato 3 gabbiani su del cartoncino bianco, li ho colorati con del con i pennarelli ad alcohol arancione e grigio chiaro, poi li ho ritagliati.


At this point I took a piece of grey cardstock, stamped the sentiment on it and die cut a circle in the center. I chose a piece of light blue cardstock and blended some Broken China Distress Oxide on top of a wave stencil.

A questo punto ho preso del cartincino grigio, ho timbrato l'augurio e ho fustellato un cerchio al centro. Ho scelto  del cartoncino azzurro e ho sfumato su uno stencil del Distress Oxide Broken China, così da fingere l'effetto dell'oceano.


I added a piece of cloudy sky made with stencil and Tumbled Glass Distress Oxide too. Finally I put everything together, making sure to place a couple of seagull in the foreground.

Ho aggiunto del cielo nuvoloso realizzato sempre con uno stencil e il Distress Oxide Tumbled Glass. Ho messo insieme il tutto, assicurandomi di posizionare un paio di gabbiani in secondo piano.


I glued everything on a dark grey cardbase and I traced some dash lines on the light grey cardstock. 

Ho incollato il tutto su del cartoncino grigio scuro e ho disegnato delle linee tratteggiate sul cartoncino grigio chiaro.

Supplies used:

Seagull

Share
Tweet
Pin
Share
1 commenti

Hello there! It's time for the Some Odd Girl new release, which is full of moth girls. Today I chose my favorite one, which is Blue Moth: it seems like a japanese girl who is going to school. As usual, I love the colors of the reference image, so I decided to print and color her.

Ciao a tutti! E' tempo di una nuova release di Some Odd Girl, che è piena di ragazze-falena. Oggi ho scelto la mia preferita, che è Blue Moth: mi piace perché sembra proprio una ragazza giapponese che sta andando a scuola. Come sempre, mi sono divertita a seguire i colori dell'immagine presente sul sito, per cui ho deciso di stamparla e colorarla.


I used teal shades for her hair, dress and shoes and finished with beige and light blue colors. Then I fussy cut.

Ho utilizzato sfumature blu per i capelli, il vestito e le scarpe, poi ho finito con il beige e l'azzurro chiaro. Poi ho ritagliato la figura.


I picked a piece of patterned paper with grey designs and put it on the front panel. Next I decided to add a white tag at the center of the card, in order to create a focus.

Ho scelto della carta decorativa con dei design grigi e l'ho posizionata sul pannello frontale. In seguito ho deciso di aggiungere una tag bianca al centro della card, così da poter creare un focus.


Finally I stamped a sentiment that says "Follow your dreams" at the bottom of the moth. 

Infine ho timbrato il sentiment e l'ho posizionato tra le gambe della falena.
Share
Tweet
Pin
Share
No commenti

Hello there!As you may know, flowers are my favorite subject for cards. For today's one I used the Big Rose by Crackerbox & Suzy Stamps, which is full of little details, and a patterned paper. Quick, simple and easy!

Ciao a tutti! Come già avrete capito, i soggetti floreali sono i miei preferiti per le card. Per quella di oggi ho utilizzato la Big Rose di Crackerbox & Suzy Stamps, che è ricca di piccoli dettagli, e carta decorativa. Veloce, semplice e facile da realizzare!


First of all I stamped it on white cardstock with Memento Tuxedo Black ink, colored with alcohol markers and fussy cut. I added some dots all around the shadows of the petals in order to give some dimension to the flower.

Prima di tutto l'ho timbrato su del cartoncino bianco con dell'inchiostro Memento nero, colorato con pennarelli ad alcohol e ritagliato. Ho aggiunto qualche puntino tutto intorno alle zone d'ombra dei petali, con l'obiettivo di dare maggior tridimensionalità al fiore.


Then I chose a patterned paper, picked a piece of white cardstock cut in a diagonal way. I stamped the sentiment, that says "best wishes" in italian.

In seguito ho scelto una carta decorativa, ho preso del cartoncino bianco e l'ho tagliato in senso diagonale, timbrandoci sopra l'augurio.


To finish the card, I took a strip of black cardstock and I placed it under the white cardstock. I glued everything on a cardbase and I adhered the big flower with foam tape.

Per concludere il tutto, ho preso del cartoncino nero e l'ho piazzato proprio sotto quello bianco. Ho incollato il tutto su una baso e ho fissato il fiore con del nastro gommato.


Supplies used:

Rose Lg. Open

Share
Tweet
Pin
Share
No commenti
Newer Posts
Older Posts

About me

About me
I'm Giada, an italian cardmaker. I love clean and simple cards...and coloring critters! Thank for being here!

Follow Me

  • Facebook
  • Instagram
  • Youtube

Contact me

Nome

Email *

Messaggio *

Blog Archive

  • ▼  2023 (3)
    • ▼  nov 2023 (1)
      • Winter Friends
    • ►  giu 2023 (1)
    • ►  feb 2023 (1)
  • ►  2022 (14)
    • ►  ott 2022 (1)
    • ►  ago 2022 (1)
    • ►  lug 2022 (2)
    • ►  giu 2022 (1)
    • ►  mag 2022 (1)
    • ►  apr 2022 (1)
    • ►  mar 2022 (3)
    • ►  feb 2022 (1)
    • ►  gen 2022 (3)
  • ►  2021 (27)
    • ►  dic 2021 (1)
    • ►  nov 2021 (1)
    • ►  ott 2021 (2)
    • ►  set 2021 (2)
    • ►  ago 2021 (3)
    • ►  lug 2021 (2)
    • ►  giu 2021 (1)
    • ►  mag 2021 (2)
    • ►  apr 2021 (2)
    • ►  mar 2021 (2)
    • ►  feb 2021 (5)
    • ►  gen 2021 (4)
  • ►  2020 (72)
    • ►  dic 2020 (2)
    • ►  nov 2020 (2)
    • ►  ott 2020 (4)
    • ►  set 2020 (8)
    • ►  ago 2020 (4)
    • ►  lug 2020 (7)
    • ►  giu 2020 (8)
    • ►  mag 2020 (5)
    • ►  apr 2020 (12)
    • ►  mar 2020 (7)
    • ►  feb 2020 (7)
    • ►  gen 2020 (6)
  • ►  2019 (68)
    • ►  dic 2019 (6)
    • ►  nov 2019 (8)
    • ►  ott 2019 (9)
    • ►  set 2019 (9)
    • ►  ago 2019 (8)
    • ►  lug 2019 (8)
    • ►  giu 2019 (3)
    • ►  mag 2019 (4)
    • ►  apr 2019 (2)
    • ►  mar 2019 (3)
    • ►  feb 2019 (4)
    • ►  gen 2019 (4)
  • ►  2018 (59)
    • ►  dic 2018 (2)
    • ►  nov 2018 (7)
    • ►  ott 2018 (7)
    • ►  set 2018 (7)
    • ►  ago 2018 (7)
    • ►  lug 2018 (6)
    • ►  giu 2018 (4)
    • ►  mag 2018 (4)
    • ►  apr 2018 (4)
    • ►  mar 2018 (4)
    • ►  feb 2018 (3)
    • ►  gen 2018 (4)
  • ►  2017 (45)
    • ►  nov 2017 (6)
    • ►  ott 2017 (3)
    • ►  set 2017 (5)
    • ►  ago 2017 (3)
    • ►  lug 2017 (3)
    • ►  giu 2017 (3)
    • ►  mag 2017 (3)
    • ►  apr 2017 (5)
    • ►  mar 2017 (3)
    • ►  feb 2017 (6)
    • ►  gen 2017 (5)
  • ►  2016 (32)
    • ►  dic 2016 (1)
    • ►  nov 2016 (6)
    • ►  ott 2016 (3)
    • ►  set 2016 (3)
    • ►  ago 2016 (3)
    • ►  lug 2016 (4)
    • ►  giu 2016 (4)
    • ►  mag 2016 (2)
    • ►  apr 2016 (1)
    • ►  mar 2016 (2)
    • ►  feb 2016 (2)
    • ►  gen 2016 (1)
  • ►  2015 (21)
    • ►  dic 2015 (1)
    • ►  nov 2015 (2)
    • ►  set 2015 (1)
    • ►  ago 2015 (2)
    • ►  lug 2015 (1)
    • ►  mag 2015 (1)
    • ►  apr 2015 (2)
    • ►  mar 2015 (4)
    • ►  feb 2015 (4)
    • ►  gen 2015 (3)
  • ►  2014 (31)
    • ►  dic 2014 (2)
    • ►  nov 2014 (2)
    • ►  ott 2014 (2)
    • ►  set 2014 (4)
    • ►  ago 2014 (1)
    • ►  lug 2014 (3)
    • ►  giu 2014 (3)
    • ►  mag 2014 (3)
    • ►  apr 2014 (2)
    • ►  mar 2014 (3)
    • ►  feb 2014 (3)
    • ►  gen 2014 (3)
  • ►  2013 (33)
    • ►  dic 2013 (4)
    • ►  nov 2013 (5)
    • ►  ott 2013 (4)
    • ►  set 2013 (3)
    • ►  ago 2013 (4)
    • ►  lug 2013 (5)
    • ►  giu 2013 (8)

Search

Labels

  • crackerbox & suzy stamps
  • craftin desert divas
  • create a smile stamps
  • lawnfawn
  • mft stamps
  • rinea foiled paper
  • so suzy stamps
  • someoddgirl
  • whimsy stamps
  • wplus9

Created with by BeautyTemplates