Copyright giadaelesuenuvole.blogspot.it. Powered by Blogger.

giadalesuenuvole

Pagine

  • Chi sono
  • Privacy Policy


Hi there! When I want to clear my mind and keep it focused on something, I usually color or watercolor an image. For watercoloring a stamp I love to use Distress inks, even if it's time consuming for me, and today I picked a couple of fairies by Impronte d'Autore and chose a monochromatic look.

Ciao a tutti! Quando voglio sgombrare la mente e mantenerla focalizzata su qualcosa adoro colorare e acquerellare un'immagine. Per acquerellare un timbro, processo per me molto lungo in termini di tempo, adoro utilizzare i Distress Inks - sono gli unici che mi mettono a mio agio - ed oggi ho scelto un paio di fatine di Impronte d'Autore, scegliendo un look monocromatico.

I stamped two fairies from the Tinker Bell stampset with Vintage Photo Distress ink on a piece of watercolor paper. Next I watercolored them using Vintage Photo, Tea Dye and Tattered Rose Distress Inks. I added a touch of shimmer magic with Gansai Tambi White Gold watercolor on the wings and the headband.

Ho timbrato due fatine del set Tinker Bell con il Distress ink Vintage Photo su della carta acquerellabile. Poi le ho acquerellate utilizzando i Distress ink Vintage Photo, Tea Dye e Tattered Rose. Ho aggiunto un pizzico di magia utilizzando dell'acquerello White Gold Gansai Tambi su ali e cerchietto.

Finally I added few stars here and there with Tattered Rose Distress Oxide and a sentiment at the bottom of the panel, both included in the Tinker Bell set. Then I framed the watercolor piece on a chocolate cardstock and that's all.

Infine ho aggiunto qualche stellina qua e là con del Distress Oxide Tattered Rose, insieme a una scritta nella parte bassa del pannello, entrambi inclusi nel set Tinker Bell. Poi ho montato il tutto su dei cartoncini marroni di base.

When I'm in mood for watercoloring I like to color more then one image, so I stamped another fairy and colored it with the same ink pads I used for the first one. 

Quando mi sento in vena di acquerellare mi piace colorare più di un'immagine, per cui ho timbrato un'altra fatina e l'ho colorata con gli stessi inchiostri che ho utilizzato per la prima.

Since I love Fantasy books, I decided to create a page corner bookmark with the Segnalibro die, using brown and cream colors.

Visto che adoro la letteratura fantasy, ho deciso di realizzare un segnalibro angolare con la fustella Segnalibro, utilizzando colori marroni e crema. 
Share
Tweet
Pin
Share
No commenti


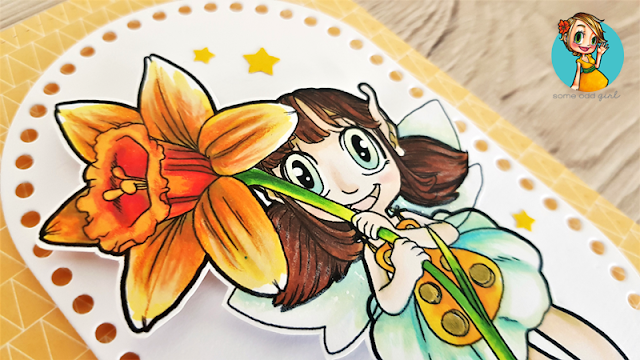
Hello my friends! Fairies, critters and flowers are my favorite subjects, especially for coloring. This Daffodil Fairy is part of the new Digi Release by Some Odd Girl for Whimsy Stamps and I needed to print and color it - the details on the daffodil are amazing. This time I decided to combine alcohol markers with prismacolor pencils to reinforce highlights and shadows.

Ciao a tutti! Fate, animaletti e fiori sono i miei soggetti preferiti, specialmente quando parliamo di colorazione. Questa Daffodil Fairy fa parte della nuova Digi Release di Some Odd Girl per Whimsy Stamps e ho sentito il bisogno di stamparla e colorarla (manco a dirlo, i dettagli del narciso sono stupendi). Questa volta ho deciso di combinare pennarelli ad alcol e matite prismacolor per far risaltare punti luce e ombre.


First of all I printed the image on a regular cardstock, colored it and fussy cut. As I used lots of orange, I picked a patterned paper of the same color for the front panel. Then I die cut an oval shape from white cardstock and glued the fairy on top with some foam tape. Finally I added a sentiment by heat embossing it on a strip of brown cardstock and a bunch of yellow stars too.

Prima di tutto ho stampato l'immagine su del cartoncino bianco, l'ho colorata e ritagliata. Visto che ho utilizzato molto arancione, ho scelto una carta decorativa dello stesso colore del pannello frontale. Poi ho fustellato un ovale da del cartoncino bianco e ho incollato la fatina con del nastro gommato. Infine ho aggiunto la scritta, embossandola su una striscia di cartoncino marrone, e un po' di stelline gialle.
Share
Tweet
Pin
Share
No commenti

Hi there! While I was on vacation I really missed my prismacolor pencils. Since I haven't used them for a while, I decided to put the box on my desk and try out some new color combinations. The final result was a little fairy, that I imagine working through the night: the perfect character for a little shaped card for the new Create a Smile challenge!


Ciao a tutti! Mentre quest'estate ero in vacanza, mi sono mancate tantissimo le matite prismacolor. Visto che, per di più, erano rimaste chiuse nella scatola per tanto tempo, ho deciso di metterle sulla scrivania e provare qualche combinazione di colore diversa dal solito. Il risultato finale è stata questa piccola fatina, che ho immaginato lavorare per tutta la notte: il personaggio perfetto per una piccola shaped card per la nuova sfida di Create a Smile!


For the background I blended some Distress Inks (in particular Salty Ocean, Faded Jeans, Chipped Sapphire and Black Soot) on a piece of watercolor paper that I previously die cut with an oval cool die by Create a Smile stamps. This is the base of my shaped card, that I can open and close by adhering another panel behind this one.

Per lo sfondo ho utilizzato un po' di Distress Inks (in particolare Salty Ocean, Faded Jeans, Chipped Sapphire e Black Soot) su della carta acquerellabile che ho precedentemente fustellato con uno dei cool dies ovali di Create a Smile stamps. Questa sarà la base della mia shaped card, che posso aprire e chiudere grazie ad un altro pannello identico incollato dietro a quello frontale.


To finish my background I heat embossed the sentiment in white and I used some embossing paste on the Wave of Stars stencil. Finally I glued the fairy that I coloured using these pencils: for the hair PC903, PC906 and PC1086, for the skin PC1059, PC1061 and PC1063, for the wings PC949. You have 2 weeks to join us here and be eligibile to win a 25€ gift certificate to the shop!

Per finire lo sfondo ho embossato una scritta in bianco e ho utilizzato dell'embossing paste sullo stencil Wave of Stars. Infine ho incollato la fatina che avevo precedentemente colorato utilizzando le matite: per i capelli PC903, PC906 e PC1086, per la pelle PC1059, PC1061 e PC1063, per le ali PC949. Avete 2 settimane per unirvi a noi qui e rischiare di vincere un coupon di 25€ per lo shop!
Share
Tweet
Pin
Share
No commenti

Hello my friends! Today I'm sharing with you a one-layer card using Distress blending, stenciling and stamping. In fact there are a couple of brand new fairies from the So Suzy Stamps latest release and I just can't hold on any longer: I want to use them!

Ciao amici! Oggi voglio condividere con voi una one-layer card che sfrutta Distress blending, stencil e timbrate. Infatti nell'ultima release di So Suzy Stamps ci sono un paio di nuovissime fatine...e non potevo più resistere, dovevo usarle!


First I used an old stencil and I blended three Oxides: Wilted Violet (at the edges), Worn Lipstick and Fossilized Amber (in the center). Then I removed the stencil and I picked up some colors thank to water droplets. Then I set it aside to dry.

Prima di tutto ho utilizzato un vecchio stencil e ho sfumato 3 Oxides: Wilted Violet (sui bordi), Worn Lipstick e Fossilized Amber (al centro). Poi ho rimosso lo stencil e ho picchiettato un po' d'acqua così da riattivare gli inchiostri e tirar via un po' di colore. Ho poi lasciato asciugare.


At this point I took my MISTI and I stamped the fairy and the sentiment - it's gorgeous, right? - with Versafine Black Ink. Thanks to the stamping tool, I stamped everything 3 times to achieve a bold impression.

A questo punto ho preso il mio MISTI e ho timbrato la fatina e la scritta - bellissima, non è vero? - con del Versafine nero. Grazie allo stamping tool, ho potuto timbrare ogni cosa 3 volte, ottenendo così una timbrata piena e perfetta.


Finally I fixed everything onto a standard size cardbase and I added some clear sequins with a bit of glossy accents. Quick and easy, what else?

Infine ho incollato il tutto alla base e ho aggiunto alcuni sequins trasparenti, fissati con un poco di glossy accents. Veloce e semplice da fare... cosa volere di più?


Supplies used:

Dreamers

Swinging Fairy

Share
Tweet
Pin
Share
2 commenti

They are new, but almost everyone knows what Distress Oxides are. 
As usual I needed time to decide to buy them - and which colors as well. Finally I chose two pads from So Suzy Stamps shop: Broken China (the first Distress Ink I purchased years ago) and Walnut Stain (never had as Distress Ink). This is my first attempt with Oxides and the theme for my card is, obviously, "magic".

Sono nuovi, ma quasi tutti sanno già cosa sono i Distress Oxides.
Come sempre mi ci è voluto tempo per decidere di comprarli - e, oltretutto, su che colori concentrarmi. Alla fine ne ho scelti due dallo shop di So Suzy Stamps: Broken China (il primo Distress Ink che ho acquistato in assoluto anni fa) e Walnut Stain (mai utilizzato come Distress Ink). Questo è il mio primissimo tentativo con gli Oxide ed il tema per la card è, ovviamente, "magia".


I started by blending Broken China and Walnut Stain Distress Oxides: I put a lot of pigment onto a piece of watercolor paper, beginning from the center to the border. When I was satisfied, I sprinkled some waterdrops onto the paper, let them react with the inks and set aside to dry.

Ho cominciato applicando i due Oxides Broken China e Walnut Stain, lasciando sul foglio di carta acquarellabile un bel po' di pigmento, partendo dal centro e proseguendo sui bordi. Quando sono rimasta soddisfatta del risultato, ho spruzzato un po' d'acqua sul foglio, ho lasciato che reagisse con gli inchiostri e ho lasciato asciugare.


Then I picked some new stuff you can find on So Suzy Stamps Shop: the Sugar Glitter Paste and the "Oh my Stars" stickable stencil from BoBunny. I set the stencil on the top left corner of the paper and I added glitter paste on some of the stars, as the fairy was sending them from the right corner of the card. Next I cleaned up the stencil and I let the paste dry.

In seguito ho utilizzato un po' di nuove cosine che si possono trovare nel negozio di So Suzy Stamps: la pasta glitterata "sugar" e lo stencil "Oh my Stars" entrambi di BoBunny. Ho posizionato lo stencil nell'angolo in alto e ho aggiunto la pasta glitterata su alcune stelle, come se la fata le stesse inviando dall'angolo opposto della card. Ho ripulito lo stencil e ho lasciato asciugare.


Finally I stamped the Dancing Fairy from So Suzy Stamps multiple times with Versafine Black Ink. As final touches, I added some dots all around the stars with white gel pen. This is the final result: so clean but so cool, right? And yes, I love how Oxides look!

Infine ho stampato la Fata Danzante di So Suzy Stamps diverse volte con del Versafine nero. Come tocco finale, ho aggiunto dei puntini tutt'intorno alle stelle con una penna bianca. Questo è il risultato finale: così pulito ma così bello, vero? Eh sì, adoro come gli Oxides rimangono impressi su carta!


And what about the shimmer of the glitter paste? It seems that this fairy is surrounded by shooting stars!

E cosa dire della brillantezza della pasta glitterata? Sembra proprio che questa fatina sia circondata da stelle cadenti!


Supplies used:

Dancing Fairy

Sugar Glitter Paste
Broken China Distress Oxide

Stencil "Oh My Stars"

Walnut Stain Distress Oxide


Share
Tweet
Pin
Share
No commenti

Hi ladies! When I saw this fairy from So Suzy Stamps I thought it would be perfect in the moonlight. Since the technique of the month is "masking", I decided to create a nocturnal landscape with a big moon and some Distress blending!

Ciao a tutti! Quando ho visto questa fatina di So Suzy Stamps ho pensato che potesse essere perfetta al chiaro di luna. Visto che la tecnica del mese è "masking", ho deciso di creare un paesaggio notturno con una grande luna e un po' di Distress blending!


First of all, I picked a piece of watercolour paper and I use the circle of the Jo's Bubbles stencil in order to mask off the moon. Then I blended a bunch of Distress Inks, such as: Salty Ocean, Seedless Preserves, Chipped Sapphire and a bit of Mustard Seed all around the circle.

Prima di tutto, ho preso della carta acquarellabile ed ho usato il cerchio presente nella confezione dello stencil Jo's Bubbles per mascherare la luna. Poi ho sfumato con un po' di Distress Inks: Salty Ocean, Seedless Preserves, Chipped Sapphire e un poco di Mustard Seed tutto intorno al cerchio. 


I removed the circle mask and I blended some Mustard Seed inside the moon. Then I cut out the paper to have a A2 size panel.

Ho rimosso la maschera e ho applicato del Mustard Seed dentro il cerchio lunare. Poi ho tagliato il foglio per ottenere un pannello di dimensione A2.


At this point, I grabbed the Fairy, the sentiment and the Blowing Tree from So Suzy Stamps, trying to figure out the scene. Then I stamped all my images with Stazon Jet Black Ink, using the tree as a branch for the fairy.

A questo punto ho preso la fatina, l'augurio e l'albero autunnale di So Suzy Stamps, provando a costruire la scena. Poi ho timbrato tutte le immagini con dello Stazon, ruotando l'albero come se fosse un ramo per la fatina.


At the end I used a bit of Wink of Stella Clear Glitter Pen on the fairy and I added some dots with white gel pen. The card is pretty much finished: I only took a black card base and I glued the panel down.

Infine ho aggiunto del Wink of Stella trasparente sulla fatina e qualche puntino di penna gel bianca tutto intorno al cerchio lunare. La card è praticamente finita: ho scelto del cartoncino nero e ho incollato il pannello alla base.

Did you see that we're hosting the Mirror Image Event, together with The Ton and My Sweet Petunia? Hurry up and check out all the stunning creations using the MISTI tool and the Mirror Image Stamp!

Avete visto il Mirror Image Event, a cui noi di So Suzy Stamps partecipiamo insieme a The Ton e My Sweet Petunia? Se non lo avete ancora fatto, andate a vedere tutte le bellissime creazioni (realizzate con MISTI e Mirror Image Stamp) che per tutto febbraio vi accompagneranno...senza contare i fantastici premi!


Supplies used:

Dancing Fairy

You're Amazing


Jo's Bubbles


Blowing Tree


Share
Tweet
Pin
Share
6 commenti
Older Posts

About me

About me
I'm Giada, an italian cardmaker. I love clean and simple cards...and coloring critters! Thank for being here!

Follow Me

  • Facebook
  • Instagram
  • Youtube

Contact me

Nome

Email *

Messaggio *

Blog Archive

  • ▼  2023 (3)
    • ▼  nov 2023 (1)
      • Winter Friends
    • ►  giu 2023 (1)
    • ►  feb 2023 (1)
  • ►  2022 (14)
    • ►  ott 2022 (1)
    • ►  ago 2022 (1)
    • ►  lug 2022 (2)
    • ►  giu 2022 (1)
    • ►  mag 2022 (1)
    • ►  apr 2022 (1)
    • ►  mar 2022 (3)
    • ►  feb 2022 (1)
    • ►  gen 2022 (3)
  • ►  2021 (27)
    • ►  dic 2021 (1)
    • ►  nov 2021 (1)
    • ►  ott 2021 (2)
    • ►  set 2021 (2)
    • ►  ago 2021 (3)
    • ►  lug 2021 (2)
    • ►  giu 2021 (1)
    • ►  mag 2021 (2)
    • ►  apr 2021 (2)
    • ►  mar 2021 (2)
    • ►  feb 2021 (5)
    • ►  gen 2021 (4)
  • ►  2020 (72)
    • ►  dic 2020 (2)
    • ►  nov 2020 (2)
    • ►  ott 2020 (4)
    • ►  set 2020 (8)
    • ►  ago 2020 (4)
    • ►  lug 2020 (7)
    • ►  giu 2020 (8)
    • ►  mag 2020 (5)
    • ►  apr 2020 (12)
    • ►  mar 2020 (7)
    • ►  feb 2020 (7)
    • ►  gen 2020 (6)
  • ►  2019 (68)
    • ►  dic 2019 (6)
    • ►  nov 2019 (8)
    • ►  ott 2019 (9)
    • ►  set 2019 (9)
    • ►  ago 2019 (8)
    • ►  lug 2019 (8)
    • ►  giu 2019 (3)
    • ►  mag 2019 (4)
    • ►  apr 2019 (2)
    • ►  mar 2019 (3)
    • ►  feb 2019 (4)
    • ►  gen 2019 (4)
  • ►  2018 (59)
    • ►  dic 2018 (2)
    • ►  nov 2018 (7)
    • ►  ott 2018 (7)
    • ►  set 2018 (7)
    • ►  ago 2018 (7)
    • ►  lug 2018 (6)
    • ►  giu 2018 (4)
    • ►  mag 2018 (4)
    • ►  apr 2018 (4)
    • ►  mar 2018 (4)
    • ►  feb 2018 (3)
    • ►  gen 2018 (4)
  • ►  2017 (45)
    • ►  nov 2017 (6)
    • ►  ott 2017 (3)
    • ►  set 2017 (5)
    • ►  ago 2017 (3)
    • ►  lug 2017 (3)
    • ►  giu 2017 (3)
    • ►  mag 2017 (3)
    • ►  apr 2017 (5)
    • ►  mar 2017 (3)
    • ►  feb 2017 (6)
    • ►  gen 2017 (5)
  • ►  2016 (32)
    • ►  dic 2016 (1)
    • ►  nov 2016 (6)
    • ►  ott 2016 (3)
    • ►  set 2016 (3)
    • ►  ago 2016 (3)
    • ►  lug 2016 (4)
    • ►  giu 2016 (4)
    • ►  mag 2016 (2)
    • ►  apr 2016 (1)
    • ►  mar 2016 (2)
    • ►  feb 2016 (2)
    • ►  gen 2016 (1)
  • ►  2015 (21)
    • ►  dic 2015 (1)
    • ►  nov 2015 (2)
    • ►  set 2015 (1)
    • ►  ago 2015 (2)
    • ►  lug 2015 (1)
    • ►  mag 2015 (1)
    • ►  apr 2015 (2)
    • ►  mar 2015 (4)
    • ►  feb 2015 (4)
    • ►  gen 2015 (3)
  • ►  2014 (31)
    • ►  dic 2014 (2)
    • ►  nov 2014 (2)
    • ►  ott 2014 (2)
    • ►  set 2014 (4)
    • ►  ago 2014 (1)
    • ►  lug 2014 (3)
    • ►  giu 2014 (3)
    • ►  mag 2014 (3)
    • ►  apr 2014 (2)
    • ►  mar 2014 (3)
    • ►  feb 2014 (3)
    • ►  gen 2014 (3)
  • ►  2013 (33)
    • ►  dic 2013 (4)
    • ►  nov 2013 (5)
    • ►  ott 2013 (4)
    • ►  set 2013 (3)
    • ►  ago 2013 (4)
    • ►  lug 2013 (5)
    • ►  giu 2013 (8)

Search

Labels

  • crackerbox & suzy stamps
  • craftin desert divas
  • create a smile stamps
  • lawnfawn
  • mft stamps
  • rinea foiled paper
  • so suzy stamps
  • someoddgirl
  • whimsy stamps
  • wplus9

Created with by BeautyTemplates