Copyright giadaelesuenuvole.blogspot.it. Powered by Blogger.

giadalesuenuvole

Pagine

  • Chi sono
  • Privacy Policy


Hello crafty friends! Dragons are fascinating creatures, aren't they? The ones by Whimsy Stamps are cute too! Today I'm showing you a romantic card with Dudley and Dahlia: she's swinging on a swing and he is pushing her.

Ciao amici creativi! I draghi sono creature affascinanti, vero? Quelli di Whimsy Stamps sono anche tenerissimi! Oggi vi mostro una card romantica, realizzata con la coppia Dudley e Dahlia: lei è seduta sull'altalena e lui la sta spingendo.


I printed them on white cardstock and colored with alcohol markers, one with with roses and one with blues. Then I fussy cut the full scene leaving a white border all around.

Li ho stampati su del cartoncino bianco e li ho colorati con i pennarelli ad alcol, una con i toni del rosa e l'altro dell'azzurro. Poi ho ritagliato l'intera scena molto minuziosamente, lasciando un bordo bianco tutto intorno.


Next I ink blended the background in order to create a cloudy sky and added an handmade hill for the ground. Finally I glued the dragons at the center of the panel with a bunch of foam tape!

In seguito ho realizzato uno sfondo con dell'inchiostro azzurro per ricreare un cielo nuvoloso, ho aggiunto una collina ed infine ho incollato i dragone al centro della scena, con un bel po' di nastro gommato. 
Share
Tweet
Pin
Share
No commenti


Hello my friends, today I'm back after some busy and stressing weeks without any creative inspiration. Coloring is so relaxing and therapeutic! The image I chose to color is one from the latest release by Whimsy Stamps, in particular the Antartic Mermaid by Some Odd Girl. She has such a classy look and her little friends are so cute!

Ciao amici, eccomi di ritorno dopo alcune settimane frenetiche e stressanti, con pochissimo estro creativo. Colorare però è sempre così rilassante e terapeutico! L'immagine che ho scelto di colorare fa parte dell'ultima release di Whimsy Stamps, in particolare l'Antartic Mermaid di Some Odd Girl. Ha un aspetto molto elegante e i suoi amichetti sono così teneri!


I printed the image on white cardstock and colored it with alcohol markers, adding white and silver dots here and there to make her dress and tail even more elegant. Then I fussy cut her, cutting off all the sea waves, since I wanted to put her on a blended background. 

Ho stampato l'immagine su del cartoncino bianco e l'ho colorata con i pennarelli ad alcol, aggiungendo puntini bianchi e argento per rendere il suo vestito e la sua coda ancora più eleganti. Poi l'ho ritagliata, eliminando le onde in basso perché avevo intenzione di posizionarla su uno sfondo sfumato con gli inchiostri.


For the background I used 3 Distress Oxides: Evergreen Bough, Cracked Pistachio and Antique Linen. Once they dried, I added some water splashes and some silver splashes too. Finally I put everything on a white cardbase, fixing the mermaid on top of a vellum circle and gluing a little sentiment on the left of the mermaid. 

Per lo sfondo ho utilizzato 3 diversi Distress Oxides: Evergreen Bough, Cracked Pistachio e Antique Linen. Una volta asciutti, ho aggiunto gocce d'acqua e d'argento. Infine ho posizionato il tutto su una base banca, incollando la sirenetta su un cerchio in vellum e incollando l'augurio a sinistra della sirenetta.
Share
Tweet
Pin
Share
1 commenti


Hi there! I'm back with another card made for Whimsy Stamps. This time I chose Farmer Tobie, a new digi by Some Odd Girl, and I tried to create a soft sky and a realistic grass... I love the final result! First of all I printed it on a piece of white cardstock and colored with alcohol markers, adding some details with prismacolor pencils. In particular both the markers and the pencils worked great for the grass, since I used different shades of them to build the ground.

Ciao a tutti! Sono di nuovo qui con una card realizzata per Whimsy Stamps. Questa volta ho scelto Farmer Tobie, un nuovo digi di Some Odd Girl, e ho provato a ricreare l'effetto del cielo e quello di un prato realistico... e adoro i risultato finale! Prima di tutto ho stampato l'immagine su del cartoncino bianco e l'ho colorata con i pennarelli ad alcohol, aggiungendo dettagli con le matite prismacolor. In particolare sia i pennarelli che le matite hanno avuto un ruolo cruciale per l'erba, avendo utilizzato diverse sfumature di entrambi per costruire il suolo.


It took my a while but the grass has a great depth effect at the end! Then I cut the scene and I decided to blend some Tumbled Glass Distress Oxide at the edges for the sky, avoiding to touch the image. Finally I placed it on top of the Cocoa Stripe digital paper from the Sweetness Digital Pack and I added a sentiment with a strip of kraft cardstock.

Mi ci è voluto un po' per finire il prato, ma alla fine sono riuscita a dargli un bell'effetto di profondità! Poi ho tagliato la scena e ho deciso di sfumare del Distress Oxide Tubled Glass ai bordi, per realizzare il cielo. Infine ho posto il pannello su una base realizzata con la carta digitale Cocoa Stripe del pack Sweetness e ho aggiunto l'augurio con una striscia di cartoncino kraft.
Share
Tweet
Pin
Share
No commenti


Hello my friends, today I have exciting news! I was asked to enter the Digital Team of Whimsy Stamps and I said "yes"! So I'll keep on creating with Some Odd Girl digis and using more images designed by different designers. Today I'm sharing my very first card for which I chose Rainy Day Dudley, the super-cute dragon. I decided to print Dudley on top of kraft cardstock, in order to color it with Prismacolor pencils.

Ciao amici, oggi ho un annuncio importante! Dopo la collaborazione con Whimsy Stamps mi è stato chiesto di entrare a far parte del Team Digital... ed ho risposto "sì"! In questo modo potrò continuare a creare con i digi di Some Odd Girl e utilizzare più immagini, realizzate da diversi designer. Oggi vi mostro la mia primissima card, per la quale ho scelto di utilizzare Rainy Day Dudley, il draghetto super-carino. Ho deciso di stamparlo su del cartoncino kraft, così da poterlo colorare con le matite Prismacolor.

Since I really wanted to make it pop against the background, I used blue and orange colors, with a touch of white for the highlights. For the rain I combined dash lines made with a white gel pen as well as a white pencil. Finally I built the ground with green pencils and added a sentiment with strips of paper.

Visto che volevo far risaltare il draghetto rispetto allo sfondo, ho utilizzato matite blu ed arancioni, con un tocco di bianco per enfatizzare i punti luce. Per la pioggia ho utilizzato un tratteggio, realizzato con penna gel bianca e matita bianca. Infine ho costruito il prato con le matite verdi e ho aggiunto l'augurio, suddiviso su più strisce di carta.
Share
Tweet
Pin
Share
No commenti


Hello stampers! Are you looking for some Easter inspiration? Here I am with a couple of cards made with Lawn Fawn Chirpy Chirp stampset, one of my favorite ever. Well, it's been ages since I used Lawn Fawn supplies and I really miss their cute critters!

Ciao a tutti! Cercate un po' di ispirazione per Pasqua? Ecco un paio di card realizzate con i pulcini del set Chirpy Chirp di Lawn Fawn, uno dei miei preferiti di sempre. Beh, sono passati mesi (se non anni!) da quando ho creato con gli animaletti di Lawn Fawn... quanto mi sono mancati!


For my first card I stamped the critters with soft brown ink (something new for me!), as I was inspired by Mona Toth videos. Then I took a three shades of yellow and orange markers, colored the chicks and fussy cut. I did the same with the eggshells. Next I chose a couple of patterned papers, created a tag and glued everything on a white cardbase, building a nice scene and adding an embossed sentiment.

Per realizzare la prima card di oggi ho timbrato gli animaletti con dell'inchiostro marrone (una novità per me!), poiché sono rimasta incantata dai video e dalla colorazione di Mona Toth. Poi ho scelto tre sfumature di gialli e arancioni, ho colorato i pulcini e li ho ritagliati. Ho fatto lo stessi con i gusci d'uovo. In seguito ho individuato un paio di carte decorative, ho creato una tag e ho incollato il tutto su una base bianca, mettendo insieme una scenetta e aggiungendo la scritta d'auguri.


For my second card I stamped other chicks and eggshells with soft brown ink, colored with alcohol markers and fussy cut. Since I had a bunch of them, I decided to create a crowded scene with a pastel color palette. 

Per la seconda card di oggi ho timbrato altri pulcini e gusci d'uovo con dell'inchiostro marrone, li ho colorati con i pennarelli ad alcohol e li ho ritagliati. Visto che ne avevo un bel po', ho deciso di creare una scenetta affollata con una palette di colori pastello.


I chose a patterned paper with flowers for the front panel, I die cut an oval shape from woodgrain paper and built a chicky scene. In order to fix everything I used both regular and foam tape. I really love how these cards turned out!

Come pannello frontale ho scelto una carta decorativa, ho fustellato un ovale da una carta effetto legno e ho costruito una scena piena di pulcini. Per incollare il tutto ho utilizzato sia nastro normale che gommato. Adoro il risultato finale!
Share
Tweet
Pin
Share
No commenti


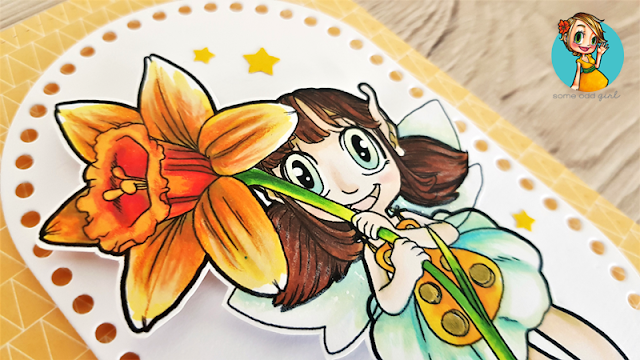
Hello my friends! Fairies, critters and flowers are my favorite subjects, especially for coloring. This Daffodil Fairy is part of the new Digi Release by Some Odd Girl for Whimsy Stamps and I needed to print and color it - the details on the daffodil are amazing. This time I decided to combine alcohol markers with prismacolor pencils to reinforce highlights and shadows.

Ciao a tutti! Fate, animaletti e fiori sono i miei soggetti preferiti, specialmente quando parliamo di colorazione. Questa Daffodil Fairy fa parte della nuova Digi Release di Some Odd Girl per Whimsy Stamps e ho sentito il bisogno di stamparla e colorarla (manco a dirlo, i dettagli del narciso sono stupendi). Questa volta ho deciso di combinare pennarelli ad alcol e matite prismacolor per far risaltare punti luce e ombre.


First of all I printed the image on a regular cardstock, colored it and fussy cut. As I used lots of orange, I picked a patterned paper of the same color for the front panel. Then I die cut an oval shape from white cardstock and glued the fairy on top with some foam tape. Finally I added a sentiment by heat embossing it on a strip of brown cardstock and a bunch of yellow stars too.

Prima di tutto ho stampato l'immagine su del cartoncino bianco, l'ho colorata e ritagliata. Visto che ho utilizzato molto arancione, ho scelto una carta decorativa dello stesso colore del pannello frontale. Poi ho fustellato un ovale da del cartoncino bianco e ho incollato la fatina con del nastro gommato. Infine ho aggiunto la scritta, embossandola su una striscia di cartoncino marrone, e un po' di stelline gialle.
Share
Tweet
Pin
Share
No commenti


Hello stampers! Here I am with my latest card as Guest Designer for Whimsy Stamps. Today I'm sharing a clean and simple card with this super-cute bunny from the Cute from Any Angle digi set (front and back images are included).

Ciao a tutti! Oggi sono qui per mostrarvi la mia ultima card come Guest Designer per Whimsy Stamps. Quella di oggi è una card semplice e veloce, realizzata con il tenerissimo coniglietto del set digitale Cute from Any Angle (include sia il fronte che il retro dell'immagine).


I printed the bunny on regular cardstock, colored it with a layer of alcohol markers and added more and more details with prismacolor pencils. Then I die cut the image with a circle die and combined it with a strip of light blue patterned paper. Finally I put everything on a grey panel, that I embossed with a polka dots embossing folder.

Ho stampato il coniglietto su del cartoncino bianco, l'ho colorato con i pennarelli ad alcohol per quanto riguarda un primo strato omogeneo, aggiungendo poi tutti i dettagli con le matite prismacolor. In seguito ho fustellato l'immagine con una fustella a cerchio e l'ho abbinata a della carta decorativa. Infine ho fissato il tutto su un pannello grigio, che ho embossato con un folder puntinato.
Share
Tweet
Pin
Share
1 commenti
Newer Posts
Older Posts

About me

About me
I'm Giada, an italian cardmaker. I love clean and simple cards...and coloring critters! Thank for being here!

Follow Me

  • Facebook
  • Instagram
  • Youtube

Contact me

Nome

Email *

Messaggio *

Blog Archive

  • ▼  2023 (3)
    • ▼  nov 2023 (1)
      • Winter Friends
    • ►  giu 2023 (1)
    • ►  feb 2023 (1)
  • ►  2022 (14)
    • ►  ott 2022 (1)
    • ►  ago 2022 (1)
    • ►  lug 2022 (2)
    • ►  giu 2022 (1)
    • ►  mag 2022 (1)
    • ►  apr 2022 (1)
    • ►  mar 2022 (3)
    • ►  feb 2022 (1)
    • ►  gen 2022 (3)
  • ►  2021 (27)
    • ►  dic 2021 (1)
    • ►  nov 2021 (1)
    • ►  ott 2021 (2)
    • ►  set 2021 (2)
    • ►  ago 2021 (3)
    • ►  lug 2021 (2)
    • ►  giu 2021 (1)
    • ►  mag 2021 (2)
    • ►  apr 2021 (2)
    • ►  mar 2021 (2)
    • ►  feb 2021 (5)
    • ►  gen 2021 (4)
  • ►  2020 (72)
    • ►  dic 2020 (2)
    • ►  nov 2020 (2)
    • ►  ott 2020 (4)
    • ►  set 2020 (8)
    • ►  ago 2020 (4)
    • ►  lug 2020 (7)
    • ►  giu 2020 (8)
    • ►  mag 2020 (5)
    • ►  apr 2020 (12)
    • ►  mar 2020 (7)
    • ►  feb 2020 (7)
    • ►  gen 2020 (6)
  • ►  2019 (68)
    • ►  dic 2019 (6)
    • ►  nov 2019 (8)
    • ►  ott 2019 (9)
    • ►  set 2019 (9)
    • ►  ago 2019 (8)
    • ►  lug 2019 (8)
    • ►  giu 2019 (3)
    • ►  mag 2019 (4)
    • ►  apr 2019 (2)
    • ►  mar 2019 (3)
    • ►  feb 2019 (4)
    • ►  gen 2019 (4)
  • ►  2018 (59)
    • ►  dic 2018 (2)
    • ►  nov 2018 (7)
    • ►  ott 2018 (7)
    • ►  set 2018 (7)
    • ►  ago 2018 (7)
    • ►  lug 2018 (6)
    • ►  giu 2018 (4)
    • ►  mag 2018 (4)
    • ►  apr 2018 (4)
    • ►  mar 2018 (4)
    • ►  feb 2018 (3)
    • ►  gen 2018 (4)
  • ►  2017 (45)
    • ►  nov 2017 (6)
    • ►  ott 2017 (3)
    • ►  set 2017 (5)
    • ►  ago 2017 (3)
    • ►  lug 2017 (3)
    • ►  giu 2017 (3)
    • ►  mag 2017 (3)
    • ►  apr 2017 (5)
    • ►  mar 2017 (3)
    • ►  feb 2017 (6)
    • ►  gen 2017 (5)
  • ►  2016 (32)
    • ►  dic 2016 (1)
    • ►  nov 2016 (6)
    • ►  ott 2016 (3)
    • ►  set 2016 (3)
    • ►  ago 2016 (3)
    • ►  lug 2016 (4)
    • ►  giu 2016 (4)
    • ►  mag 2016 (2)
    • ►  apr 2016 (1)
    • ►  mar 2016 (2)
    • ►  feb 2016 (2)
    • ►  gen 2016 (1)
  • ►  2015 (21)
    • ►  dic 2015 (1)
    • ►  nov 2015 (2)
    • ►  set 2015 (1)
    • ►  ago 2015 (2)
    • ►  lug 2015 (1)
    • ►  mag 2015 (1)
    • ►  apr 2015 (2)
    • ►  mar 2015 (4)
    • ►  feb 2015 (4)
    • ►  gen 2015 (3)
  • ►  2014 (31)
    • ►  dic 2014 (2)
    • ►  nov 2014 (2)
    • ►  ott 2014 (2)
    • ►  set 2014 (4)
    • ►  ago 2014 (1)
    • ►  lug 2014 (3)
    • ►  giu 2014 (3)
    • ►  mag 2014 (3)
    • ►  apr 2014 (2)
    • ►  mar 2014 (3)
    • ►  feb 2014 (3)
    • ►  gen 2014 (3)
  • ►  2013 (33)
    • ►  dic 2013 (4)
    • ►  nov 2013 (5)
    • ►  ott 2013 (4)
    • ►  set 2013 (3)
    • ►  ago 2013 (4)
    • ►  lug 2013 (5)
    • ►  giu 2013 (8)

Search

Labels

  • crackerbox & suzy stamps
  • craftin desert divas
  • create a smile stamps
  • lawnfawn
  • mft stamps
  • rinea foiled paper
  • so suzy stamps
  • someoddgirl
  • whimsy stamps
  • wplus9

Created with by BeautyTemplates