Copyright giadaelesuenuvole.blogspot.it. Powered by Blogger.

giadalesuenuvole

Pagine

  • Chi sono
  • Privacy Policy

Hello stampers! The card I'm sharing today is made by using the Cancer digital stamp by Some Odd Girl: as I saw this image, I thought of a japanese warrior with scissors. This digi is free during the month of July, check it out here.

Ciao a tutti! Questa card l'ho realizzata con il timbro digitale "Cancro" della serie zodiacale di Some Odd Girl: non appena l'ho visto ho pensato ad una guerriera giapponese con in mano due paia di forbici. Questo timbro è scaricabile gratuitamente durante il mese di luglio, scoprilo qui.


First of all, I printed the Cancer image on a piece of white cardstock, then I colored it with promaker pens and fussy cut. I loved coloring this image, using unconventional shades and adding some details on the eyes and the hair.

Prima di tutto ho stampato l'immagine su del cartoncino bianco, l'ho colorata con i promarkers e ritagliata. Mi sono divertita molto a darle vita con i colori, utilizzando sfumature non convenzionali e aggiungendo dettagli a occhi e capelli.


Then I looked through my stash and I saw the perfect sentiment by Crackerbox & Suzy Stamps, that I stamped on a grey hill.

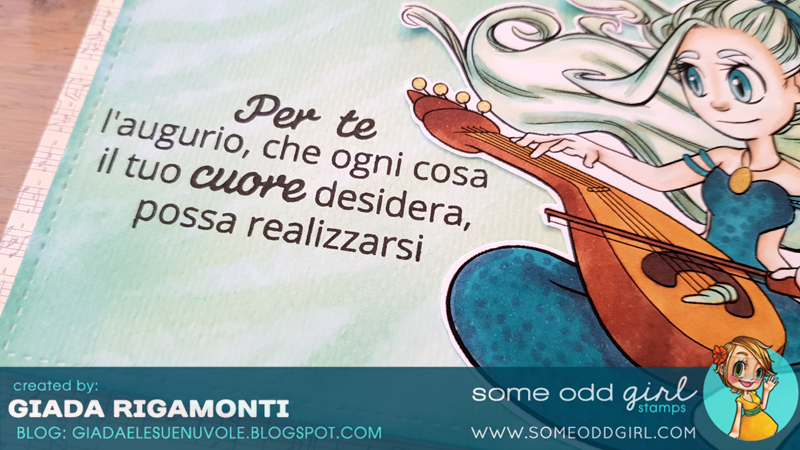
Poi ho dato un'occhiata ai miei timbri e ho trovato l'augurio perfetto di Crackerbox & Suzy Stamps, che ho timbrato su una collina grigia.


For the background I chose an old set by Sizzix and Hero Arts: I stamped the bamboo image and then I embossed it with the matching embossing folder.

Per lo sfondo ho scelto un vecchio set di Sizzix e Hero Arts: ho timbrato prima il bamboo e poi l'ho embossato a freddo con il folder corrispondente.
Share
Tweet
Pin
Share
1 commenti

Hello my friends! I'm so happy because I'm enjoying "The Daily Marker 30 Day" coloring challenge and I didn't miss a day! One of the subject I shared is this Musician Mermaid, a digital stamp by Some Odd Girl. The only thing left to do was creating a card: in this case I decided to emphasize the water element, as well as the musician side of the mermaid.

Ciao a tutti! Sono felice e soddisfatta di aver partecipato alla sfida di colorazione "The Daily Marker 30 Day" senza perdere nemmeno un giorno! Uno dei soggetti che ho condiviso è questa affascinantissima Musician Mermaid, una delle sirene in formato digitale di Some Odd Girl. L'unica cosa che mancava da fare era realizzare una card: in questo caso ho deciso di enfatizzare l'elemento acquatico, così come il lato musicale della sirenetta.


Even if the mermaid is very happy, I wanted to give her a sort of "melancholic feeling" by using blue and aqua shades of markers. Then I fussy cut.

Anche se la sirena sembra felice e a suo agio con lo strumento, ho voluto regalarle una vena malinconica utilizzando sfumature di azzurro e blu. Poi ho ritagliato la figura.


I created a pool using a wave stencil and Peacock Feathers and Cracked Pistachio Distress Inks, while for my cardbase I chose a paper with pentagrams.

Ho realizzato uno specchio d'acqua con uno stencil ad onda e i Distress Ink Peacock Feathers e Cracked Pistachio, mentre ho optato per una carta decorativa con pentagrammi come base.


The sentiment is in italian, made by La Coppia Creativa, and the meaning is "you deserve whatever your heart is set on". A beautiful one, perfect for a mermaid with lots of dreams!

La scritta è de La Coppia Creativa ed è davvero azzeccata per una sirena con un sacco di sogni!
Share
Tweet
Pin
Share
No commenti

Hello! Today I have a dirty-fingers project to show: I finally made my first rainbow background by blending a bunch of Distress Inks. The only stamp I used for this card is the Herb 1, that I stamped with black ink all over the rainbow.

Ciao a tutti! Il progetto che vi racconto oggi è uno di quelli che ti porta ad avere dita sporche (e cuore felice): una card con sfondo arcobaleno realizzato con i Distress Inks. L'unico timbro che ho utilizzato qui è Herb 1, che ho timbrato con l'inchiostro nero sopra l'arcobaleno.


To begin with, I picked a piece of regular cardstock and I blended some Distress Inks: Picked Raspberry, Spiced Marmalade, Mustard Seed, Twisted Citron, Mermaid Lagoon, Seedless Preserves. I masked the top and the bottom of the cardstock with tons of post-it.

Per cominciare ho preso del cartoncino bianco ed ho iniziato ad applicare qualche Distress Inks, in ordine: Picked Raspberry, Spiced Marmalade, Mustard Seed, Twisted Citron, Mermaid Lagoon, Seedless Preserves. Ho coperto la parte alta e bassa del cartoncino con un sacco di post-it.


Then I sprinkled some water and white ink onto the rainbow, so that Distress Inks could react.

Poi ho spruzzato dell'acqua e dell'inchiostro bianco sull'arcobaleno, così da far reagire i Distress.


When everything dried, I stamped the Herb 1 image all around the rainbow - as I did before, I used some post-it to mask the white spaces.

Quanto il tutto è asciugato, ho timbrato l'immagine Herb 1 tutto intorno all'arcobaleno - e come ho fatto prima, ho utilizzato qualche post-it per proteggere le parti bianche.


At this point I needed a sentiment, but at the same time I didn't want to cover part of the background. I decided to try the "inlay die cutting technique": I die cut some letters in order to write the word "best wishes" in italian both from foam and the background.

A questo punto avevo bisogno di un augurio, ma allo stesso tempo non volevo coprire parte dello sfondo. Ho deciso di tentare con la tecnica "inlay die cutting": ho fustellato delle lettere direttamente sullo sfondo e su della gomma adesiva.


I put everything in place, using the foam to make the letters pop.

Ho messo ogni pezzo al proprio posto, utilizzando la gomma adesiva per far risaltare le lettere.


The sentiment is at the center of the card, but at the same time the main focus is the background - which was not hidden at all! I hope you like this card, in any case we have a promotion for you: Friendship, Ladies and Love category stamps are 20% off during the month of July!


La scritta è al centro della card, ma allo stesso tempo il protagonista indiscusso è lo sfondo - che non è per nulla nascosto! Spero che questa card vi sia piaciuta, in ogni caso abbiamo una promozione per voi: i timbri riguardanti amicizia, donne e amore sono scontati del 20% durante il mese di luglio!

Supplies used:

Herb 1

Share
Tweet
Pin
Share
No commenti

Good morning everyone! Today I'm sharing my very first post as Some Odd Girl DT member. I'm so excited for this new adventure, since I love their products and unique designs! Here I used the Gemini digital stamp to create a simple friendship card - the one on the right is supposed to be me.

Ciao a tutti! Oggi ho una gran bella notizia: sono entrata nel DT di Some Odd Girl! Sono molto contenta di cominciare questa nuova avventura, visto che adoro i loro prodotti e lo stile unico! Qui ho utilizzato il timbro digitale "Gemini" per realizzare una card per un'amica - infatti quella sulla destra dovrei essere io.


Well, this card is a sort of Comedy of Errors: first of all, I printed the digi in the wrong way. In order to fix the grainy outline, I colored the girls with prismacolor pencils and went over the outline with black pencil.

Bene, mi tocca premettere che questa card è una sorta di Commedia degli Errori: prima di tutto, ho sbagliato a stampare il timbro. Per cercare di nascondere il contorno sgranato, ho colorato le ragazze con le matite prismacolor e ho ripassato il bordo con la matita nera.


Coloring is very relaxing for me, in fact I needed an hour to finish! Then I only trimmed everything down (and the legs too, because I didn't like the grass I created), I choose a sentiment and I glued the panel onto a brown cardbase.

Colorare è davvero rilassante per me, tanto che ci ho messo un'oretta per completare il tutto! Poi ho solo tagliato il tutto (e pure le gambe, visto che il prato che ho provato a disegnare non mi piaceva per nulla), ho scelto una scritta e ho incollato il tutto su un pannello marrone.
Share
Tweet
Pin
Share
No commenti

Hello everyone! When I'm looking for something to color and put together without any scene or complex layout, I always think of making a tag with a couple of images. For this one I chose the hat and the broom by Crackerbox & Suzy Stamps (you can find the same subjects here) and a kraft cardstock, that is my favorite for coloring with prismacolor pencils.

Ciao a tutti! Quando mi viene voglia di colorare qualcosa e di mettere insieme un progetto semplice e pulito, senza scenette o layout complessi, finisco sempre per realizzare una tag con un paio di immagini. Per quella che vi mostro oggi ho scelto il cappello e la scopa di Crackerbox & Suzy Stamps (potete trovare gli stessi soggetti qui) e del cartoncino kraft, che è il mio preferito quando si tratta di colorare con matite prismacolor.


As I already wrote, I stamped the two images on some kraft cardstock. I used my MISTI so that I could stamp everything again after the coloring process. I also die cut a tag and stamped a bunch of pointy stars with matching ink.

Come ho già scritto, ho timbrato le due immagini su del cartoncino kraft. Ho utilizzato il mio MISTI così da poter stampare nuovamente il tutto alla fine della colorazione. Ho anche fustellato una tag e ho timbrato un po' di stelline con un inchiostro delle stesse tonalità della base.


I colored the two images with Prismacolor pencils, choosing 3 shades for each color and the white for the highlights. Then I fussy cut, put everything in my MISTI and stamped again: in this way I could achieve a bold impression.

Ho colorato le due immagini con le matite Prismacolor, scegliendo 3 sfumature per ogni colore e la matita bianca per i punti luce. Poi le ho ritagliate, ho rimesso tutto nel MISTI e ho timbrato nuovamente: in questo modo ho riportato alla luce le linee della timbrata iniziale.


To finish the tag I added a sentiment and some golden accents with a gel pen and adhered the hat and the broom with some regular and foam tape.

Per finire la tag ho aggiunto una scritta e alcuni dettagli dorati con una penna gel, incollando il cappello e la scopa con biadesivo normale e gommato.


I think that this project could work for boys too, since lots of them love fantasy atmosphere and magical objects!

Penso che questo progettino possa adattarsi anche ad un uomo, visto che molti maschietti adorano le atmosfere fantasy e gli oggetti magici!


This kind of tags are a life-safer when you have to create something - but you are also out of time.

Questo tipo di tag sono una manna dal cielo quando devi creare qualcosa...ma hai pochissimo tempo!


Supplies used:


Witches Hat
Pointy Stars
Witch's Broom

Magical Birthday


Share
Tweet
Pin
Share
No commenti

Hello everybody! Today I was looking through my stash and saw this cute frog with a dreamy face from Crackerbox & Suzy Stamps. I thought to create a unique card, as if the frog was waiting for a girl to go out with.

Ciao a tutti! Oggi stavo dando un'occhiata ai miei timbri e ho visto questa rana con la faccia sognante di Crackerbox & Suzy Stamps. Ho pensato di realizzare una card originale, come se la rana stesse aspettando la ragazza con cui uscire.


First of all I stamped the sweet frog and the car onto a piece of white paper, colored with alcohol markers and fussy cut. I added a piece of vellum behind the windscreen of the car.

Prima di tutto ho timbrato la rana e la macchina su del cartoncino bianco, ho colorato con i pennarelli ad alcohol e ho ritagliato il tutto. Ho anche aggiunto del vellum dietro il parabrezza della macchina.


I grabbed a piece of watercolor paper and put a bit of watercolors splashes here and there. I matched it with a kraft cardstock as card base.

Ho preso del cartoncino acquerellabile e l'ho macchiato con dell'acquarello blu, lasciando qualche goccia qua e là. Ho poi abbinato il tutto al cartoncino color kraft.


Finally I stamped the perfect sentiment for the sweet frog and that's all: a romantic card with a bit of irony and without any hearts!

Infine ho timbrato un augurio che sta bene insieme alla ranocchia... e questo è tutto: una card romantica, con un pizzico di ironia e senza alcun cuoricino!


I added some extra touches with a white gel pen.

Ho aggiunto qualche dettaglio extra con una penna gel bianca.


This frog and all the animals by Crackerbox and Suzy Stamps are on sale until the end of the month:


Supplies used:

Frog Prince
Frog being sweet
Olesya's Car

Share
Tweet
Pin
Share
No commenti

Hello, my friends! Finally spring has sprung...well, it seems more like Summer because days are sunny and really hot! In any case, I'm in the mood for spring cards, with a touch of sweetness and soft colors. Today I'm playing with the butterfly stamp by Crackerbox & Suzy Stamps and Prismacolor pencils.

Ciao amici! Finalmente la primavera è sbocciata...anzi, sarebbe meglio dire l'estate, visto che le giornate sono diventate soleggiate, ma con temperature roventi! In ogni caso, questa atmosfera primaverile mi ha decisamente ispirata, per cui eccomi qui con un paio di card primaverili, con un tocco di dolcezza e di colori pastello. Oggi mi sono divertita a giocare con la farfalla di Crackerbox & Suzy Stamps, nonché con le matite Prismacolor.


I love how Prismacolor pencils work with kraft cardstock: the brightness of these pencils is perfect for this kind of image, it's like giving life to it!

Amo vedere come le matite Prismacolor funzionano con il cartoncino kraft: la luminosità di queste matite è perfetta per questo tipo di immagine, è come darle vita!


First of all, I stamped a couple of butterflies on two different types of kraft cardstock. I used my MISTI tool because I like to stamp the image again in order to have a solid line after the coloring process. At the same time, I cut 2 panels from kraft cardstocks and stamped some polka dots on it.

Prima di tutto, ho timbrato un paio di farfalle su due diversi tipi di cartoncino kraft. Ho utilizzato l'immancabile MISTI perché mi piace timbrare nuovamente l'immagine così da avere una linea di timbrata precisa anche dopo la colorazione. Allo stesso tempo, ho preso due basi di cartoncino kraft e ho timbrato uno sfondo a pois su entrambi.


Next the relaxing part begins: coloring the two butterflies, following the lines of the wings. I used 2 shades of pink and 3 shades of light blue, plus the white pencil. As I wrote, I put the images in my MISTI, stamped with Versamark Black ink again and fussy cut. I added some details around the wings with a white gel pen.

In seguito la parte più rilassante ha avuto inizio: colorare le due farfalle, seguendo le linee delle ali. Ho utilizzato 2 sfumature di rosa e 3 di azzurro, più la matita bianca. Come ho già scritto, ho nuovamente timbrato le immagini con il MISTI e le ho ritagliate. Ho aggiunto qualche dettaglio intorno alle ali con una penna bianca.


Finally I took a piece of vellum and I cut it in a banner shape and in a circle shape. I stamped the Beautiful and Miss you sentiments in black on two strips of white cardstock, then I glued everything together.

Infine ho preso del vellum e l'ho ritagliato a forma di banner e di cerchio. Ho timbrato le scritte Beautiful e Miss you con dell'inchiostro nero su cartoncino bianco, poi ho incollato tutto insieme.


I added foam tape on the back on my butterflies, placing some adhesive tape in the same spot in order to hide the glue under the vellum. If you love this butterflies as I do, you're going to do the happy dancing since Animal stamps are 20% off on Crackerbox & Suzy Stamps shop during the month of June!

Ho aggiunto del nastro gommato sul retro delle mie farfalle, posizionando il nastro adesivo nello stesso punto così da nascondere l'effetto dell'adesivo sotto il vellum. Se amate queste farfalle come le amo io, sarete contenti di sapere che i timbri a tema "animali" sono scontati del 20% sullo shop di Crackerbox & Suzy Stamps durante il mese di giugno!


Supplies used:


Monarch
Miss you
Beautiful

Share
Tweet
Pin
Share
No commenti
Newer Posts
Older Posts

About me

About me
I'm Giada, an italian cardmaker. I love clean and simple cards...and coloring critters! Thank for being here!

Follow Me

  • Facebook
  • Instagram
  • Youtube

Contact me

Nome

Email *

Messaggio *

Blog Archive

  • ▼  2023 (3)
    • ▼  nov 2023 (1)
      • Winter Friends
    • ►  giu 2023 (1)
    • ►  feb 2023 (1)
  • ►  2022 (14)
    • ►  ott 2022 (1)
    • ►  ago 2022 (1)
    • ►  lug 2022 (2)
    • ►  giu 2022 (1)
    • ►  mag 2022 (1)
    • ►  apr 2022 (1)
    • ►  mar 2022 (3)
    • ►  feb 2022 (1)
    • ►  gen 2022 (3)
  • ►  2021 (27)
    • ►  dic 2021 (1)
    • ►  nov 2021 (1)
    • ►  ott 2021 (2)
    • ►  set 2021 (2)
    • ►  ago 2021 (3)
    • ►  lug 2021 (2)
    • ►  giu 2021 (1)
    • ►  mag 2021 (2)
    • ►  apr 2021 (2)
    • ►  mar 2021 (2)
    • ►  feb 2021 (5)
    • ►  gen 2021 (4)
  • ►  2020 (72)
    • ►  dic 2020 (2)
    • ►  nov 2020 (2)
    • ►  ott 2020 (4)
    • ►  set 2020 (8)
    • ►  ago 2020 (4)
    • ►  lug 2020 (7)
    • ►  giu 2020 (8)
    • ►  mag 2020 (5)
    • ►  apr 2020 (12)
    • ►  mar 2020 (7)
    • ►  feb 2020 (7)
    • ►  gen 2020 (6)
  • ►  2019 (68)
    • ►  dic 2019 (6)
    • ►  nov 2019 (8)
    • ►  ott 2019 (9)
    • ►  set 2019 (9)
    • ►  ago 2019 (8)
    • ►  lug 2019 (8)
    • ►  giu 2019 (3)
    • ►  mag 2019 (4)
    • ►  apr 2019 (2)
    • ►  mar 2019 (3)
    • ►  feb 2019 (4)
    • ►  gen 2019 (4)
  • ►  2018 (59)
    • ►  dic 2018 (2)
    • ►  nov 2018 (7)
    • ►  ott 2018 (7)
    • ►  set 2018 (7)
    • ►  ago 2018 (7)
    • ►  lug 2018 (6)
    • ►  giu 2018 (4)
    • ►  mag 2018 (4)
    • ►  apr 2018 (4)
    • ►  mar 2018 (4)
    • ►  feb 2018 (3)
    • ►  gen 2018 (4)
  • ►  2017 (45)
    • ►  nov 2017 (6)
    • ►  ott 2017 (3)
    • ►  set 2017 (5)
    • ►  ago 2017 (3)
    • ►  lug 2017 (3)
    • ►  giu 2017 (3)
    • ►  mag 2017 (3)
    • ►  apr 2017 (5)
    • ►  mar 2017 (3)
    • ►  feb 2017 (6)
    • ►  gen 2017 (5)
  • ►  2016 (32)
    • ►  dic 2016 (1)
    • ►  nov 2016 (6)
    • ►  ott 2016 (3)
    • ►  set 2016 (3)
    • ►  ago 2016 (3)
    • ►  lug 2016 (4)
    • ►  giu 2016 (4)
    • ►  mag 2016 (2)
    • ►  apr 2016 (1)
    • ►  mar 2016 (2)
    • ►  feb 2016 (2)
    • ►  gen 2016 (1)
  • ►  2015 (21)
    • ►  dic 2015 (1)
    • ►  nov 2015 (2)
    • ►  set 2015 (1)
    • ►  ago 2015 (2)
    • ►  lug 2015 (1)
    • ►  mag 2015 (1)
    • ►  apr 2015 (2)
    • ►  mar 2015 (4)
    • ►  feb 2015 (4)
    • ►  gen 2015 (3)
  • ►  2014 (31)
    • ►  dic 2014 (2)
    • ►  nov 2014 (2)
    • ►  ott 2014 (2)
    • ►  set 2014 (4)
    • ►  ago 2014 (1)
    • ►  lug 2014 (3)
    • ►  giu 2014 (3)
    • ►  mag 2014 (3)
    • ►  apr 2014 (2)
    • ►  mar 2014 (3)
    • ►  feb 2014 (3)
    • ►  gen 2014 (3)
  • ►  2013 (33)
    • ►  dic 2013 (4)
    • ►  nov 2013 (5)
    • ►  ott 2013 (4)
    • ►  set 2013 (3)
    • ►  ago 2013 (4)
    • ►  lug 2013 (5)
    • ►  giu 2013 (8)

Search

Labels

  • crackerbox & suzy stamps
  • craftin desert divas
  • create a smile stamps
  • lawnfawn
  • mft stamps
  • rinea foiled paper
  • so suzy stamps
  • someoddgirl
  • whimsy stamps
  • wplus9

Created with by BeautyTemplates