Copyright giadaelesuenuvole.blogspot.it. Powered by Blogger.

giadalesuenuvole

Pagine

  • Chi sono
  • Privacy Policy

Hello my friends!
I had a little stop during the Holiday Season, due to a huge production for Christmas and a little trip for New Year's Eve. But here I am: welcome 2018, I'm ready for you!
Since it's quite cold and foggy here, I decided to create something different with So Suzy Stamps supplies: a couple of bookmarks for people who love sitting on the sofa, reading a book.
Let's focus on the first one!

Ciao a tutti!
Mi scuso per la latitanza, mi sono presa una piccola pausa dal blog per via della produzione intensa in vista del Natale, a cui è seguito un piccolo viaggetto che mi ha tenuto occupata fino al nuovo anno. Ma eccomi qui: benvenuto 2018, sono pronta!
Visto che in questi giorni fa piuttosto freddo e c'è molta nebbia, ho deciso di creare qualcosa di diverso con i prodotti di So Suzy Stamps: un paio di segnalibri per persone che amano passare l'inverno sul divano, in compagnia di un bel libro.
Cominciamo con il primo:


I cut a strip of white cardstock and sponged a bunch of Distress Inks (Salty Ocean, Chipped Sapphire and a bit of Black Soot) to create my own sky. I masked off the bottom in order to leave a white little hill. Then I moved the mask and blended a bit of Tumbled Glass for creating 2 hills.

Ho tagliato una striscia di cartoncino bianco e ho sfumato lo sfondo con una serie di Distress Inks (Salty Ocean, Chipped Sapphire e un po' di Black Soot). Ho mascherato la parte bassa del segnalibro per suggerire una collina innevata; ho spostato poi la stessa maschera e ho creato una seconda collina aggiungendo un pochino di Tumbled Glass.


Next I stamped the Street Light from So Suzy Stamps with some Versafine Ink - I used the MISTI to achieve the perfect impression. I let it dry and I added a bit of Fossilized Amber Distress Oxide with a fingertips sponge.

In seguito ho timbrato il lampione di So Suzy Stamps con del Versafine nero - ho utilizzato il MISTI così da ottenere una timbrata perfetta. Ho lasciato asciugare ed ho aggiunto un poco di Fossilized Amber Oxide con una piccola spugna per le dita.


As the Oxide covered the black ink, I put the cardstock again in my MISTI and I stamped the street light in the same position. At this point, I only had to cut the top angles, punch a hole and add some white dots as well as a baker's twine.

Visto che l'Oxide ha coperto parte dell'inchiostro nero, ho rimesso il cartoncino all'interno del MISTI e ho timbrato nuovamente il lampione, nella stessa posizione. A questo punto ho solo dovuto tagliare i due angoli in alto, fustellare un buco e aggiungere un twine (nonché dei puntini bianchi in mezzo al cielo).


The second bookmark is so quick and easy - and I made it because I had a strip of leftover cardstock. As I was working with kraft, I decided to stamp two Spruce Trees with Coffee Archival Ink, adding a white one in the center.

Il secondo segnalibro è davvero velocissimo da fare - e l'ho creato, peraltro, con del cartoncino avanzato da un precedente progetto. Lavorando su una base kraft, ho optato per timbrare un paio di Spruce Tree con l'Archival Coffee, aggiungendo un altro albero al centro, questa volta in bianco.


I made this one for my father and I think it's perfect for an useful and easy gift for a man!
I wish you a creative New Year... and we want to celebrate with you!

L'ho realizzato per mio padre e penso che sia un pensierino perfetto e utile per un uomo!
Vi auguro un anno creativo... e vogliamo festeggiare fin da subito con tutti voi!


We have a birthday girl this month: Terri! She designed this stamp and it's FREE if you order something on So Suzy Stamps shop during the month of January. Plus, "Get Well stamps" are on sale!

A gennaio abbiamo festeggiato il compleanno di Terri e lei ha disegnato questo timbro. Ecco, è gratis per tutti coloro che piazzeranno un ordine da So Suzy Stamps durante il mese di gennaio! In più, i timbri dedicati alla guarigione sono scontati:


Happy crafting and happy shopping!

Non mi resta che augurarvi buono scrap e buono shopping!


Supplies used:

Street light
Spruce Tree


Share
Tweet
Pin
Share
No commenti

Hello So Suzy fans! Today I'm focusing on a couple of stamps from the latest So Suzy Stamps release. Since I love coloring, I didn't have the opportunity to play with Terri's stamps... until now. And I have a big news for you: if you like some of these stamps - actually, the latest releases are just gorgeous! - So Suzy Stamps is having free shipping from today until November 28th and Christmas stamps on sale from 15-20% off:

Ciao a tutti! Il post di oggi, dedicato a So Suzy Stamps, mi vede concentrata su alcuni timbri dell'ultima release. Amo colorare, e proprio per questo non mi sono ancora data l'opportunità di giocare con i timbri disegnati da Terri... almeno fino ad ora. Ho anche una splendida notizia per voi: se vi piacciono questi timbri - ed obiettivamente, le ultime release sono davvero stupende! - So Suzy Stamps vi offre spese di spedizione gratis da oggi fino al 28 Novembre, nonché timbri natalizi scontati del 15-20%:


Let's start: today I'm sharing 2 circular cards that I made using only stamps designed by Terri - the wreath and the scripty sentiments.

Ora cominciamo: oggi ho realizzato due card circolari utilizzando solo timbri disegnati da Terri - la ghirlanda e gli auguri scritti a mano.


For the first one, I started by stamping the wreath on a piece of kraft cardstock, using Antique Linen Distress Ink.

Per la prima card, sono partita timbrando la ghirlanda su del cartoncino kraft, utilizzando del Distress Ink Antique Linen.


I didn't mind if the impression wasn't perfect, because I was going to cover it up with alcohol markers and coloured pencils.

Non mi è importato molto che la timbrata non fosse perfetta, perché sapevo che l'avrei completamente ricoperta con i promarker e le matite colorate.


Then I die cut the wreath and I did the same thing with the word "Joy": I stamped it with Antique Linen and traced the word again with a white gel pen. Finally I die cut a piece of white cardstock with a bigger circle as my card base, on which I glued a patterned paper.

Poi ho fustellato la ghirlanda e ho fatto la stessa cosa con la parola "Joy": l'ho timbrata con dell'Antique Linen, ricalcando la parola con una penna bianca. Infine ho nuovamente fustellato del cartoncino bianco con un cerchio più grande, su cui ho incollato della carta decorativa.


The idea of my second card is quite similar, but I worked on kraft cardstock with some Coffee Archival Ink and white Nuvo Drops. I also choose the other scripty sentiment by Terri, which is "Peace". This is a close-up of my first card:

L'idea della mia seconda card è abbastanza simile alla prima, ma ho lavorato su del cartoncino kraft con dell'inchiostro Archival Coffee e del Nuovo Drops bianco. Inoltre ho scelto l'altra parola disegnata da Terri, che è "Peace". Ecco un dettaglio della prima card:


And of my second card:

E della mia seconda card:


Supplies used:

Wreath
Joy
Peace

Share
Tweet
Pin
Share
No commenti

Good morning and angel kisses! These are my last two project for Craftin Desert Divas: I want to thank Tara for choosing me as Guest Designer and all the ladies that leave me beautiful comment on the social media.
I'm happy to say that I finally used all the different images from the Angel Kisses stampset:

Buongiorno e baci angelici per tutti! Questi sono i miei due ultimi progetti per Craftin Desert Divas: voglio proprio ringraziare Tara per questa opportunità e tutte le donne che hanno commentato sui social media con dolcezza ed entusiasmo.
Sono contenta di annunciare che sono riuscita a utilizzare tutte le immagini presenti nel set Angel Kisses:


It's just so cute and versatile, plus the images has a very neat impression on paper. First I made this sweet card, using the angel with the star in its hands:

Questo set è davvero carino e versatile, in più le immagine hanno proprio una stampata fine e nitida. Prima di tutto ho creato questa dolce card, usando l'angioletto con la stella in mano:


For the background, I blended a huge layer of Broken China Distress Oxide. 
My second project is something different: I made a couple of gift tags using two different angels from the stampset:

Per lo sfondo ho sfumato un bel po' di Distress Oxide Broken China.
Il mio secondo progetto è diverso: un paio di tag con protagonisti due diversi angioletti:


I stamped some of the little images of the stampset with Versamark Ink and Archival Coffee Ink, to have a tone-on-tone effect:

Ho timbrato alcune piccole immaginette del set con del Versamark e dell'Archival Coffee per avere un effetto tono-su-tono:


I hope that you can find some inspiration for you Holiday cards!

Spero che troverete ispirazione per le vostre card natalizie!

Share
Tweet
Pin
Share
No commenti

Hello stampers! Today I'm sharing with you a card with no coloring at all - only a bit of distress blending. I like coloring so much, but sometimes the stamped image is so beautiful and you don't need anything fancy. I decided to stamp the Wise Men from So Suzy Stamps on a sunset background, pairing with the Star of Bethlehem and a part of the Merry Christmas brush sentiment.

Ciao a tutti! Oggi voglio condividere con voi una card senza alcuna colorazione - solo un po' di distress blending. A me piace molto colorare, ma qualche volta ti trovi di fronte ad un timbro così bello e completo da non aver bisogno di aggiungere altro. Ho deciso di timbrare i Re Magi di So Suzy Stamps su un tramonto distressato, abbinandoli alla Stella di Betlemme e a una parte del timbro Merry Christmas Brush.


First I masked the upper part of a piece of watercolor paper with some post-it tape. I blended the bottom part with a lot of Black Soot Distress Ink in order to build up a hill.

Prima di tutto ho mascherato la parte superiore di un foglio acquerellabile con dei post-it. Ho sfumato la parte inferiore con un bello strato di Black Soot Distress Ink per creare una collina.


Next I covered the bottom part of the panel to color my background easily: I used, in order, Antique Linen, Picked Raspberry, Seedless Preserves, Chipped Sapphire and a little bit of Black Soot Distress Inks.

In seguito ho coperto la parte inferiore e ho iniziato a creare il mio sfondo: ho usato, sfumandoli nell'ordine, Antique Linen, Picked Raspberry, Seedless Preserves, Chipped Sapphire e un poco di Black Soot Distress Inks.


At this point I stamped the Wise Men and the Star of Bethlehem with Versafine Onyx Black, adding some details with white gel pen. Finally I heat embossed the sentiment in white, using versamark ink.

A questo punto ho stampato i Re Magi e la Stella di Betlemme con del Versafine nero, aggiungendo qualche dettaglio con la penna gel bianca. Infine ho embossato l'augurio sempre in bianco, con del Versamark Ink.


I really love the atmosphere of this card, that is perfect for mass producing - and the MISTI really makes a big difference, also for having a bold impression of the stamps!

Mi piace un sacco l'atmosfera di questa card, perfetta per la produzione massiva - e il MISTI fa davvero la differenza, anche per avere una stampata perfetta!

Supplies used:


Wise Men

Star of Bethlehem
Merry Christmas Brush
Share
Tweet
Pin
Share
No commenti

Hi guys! Here I am with my second card as Guest Designer for Craftin Desert Divas! As I already wrote here, I'm using the magical Angel Kisses stampset again and again: 

Ciao a tutti! Eccomi qui con la seconda card come Guest Designer per Crafin Desert Divas! Come ho già scritto qui, continuerò ad usare il magico set Angel Kisses:


In this case, I built a cluster of Angels all around a circle, singing and sending prayers. For making this card I used a lot of masking, so that it's almost a one-layer card. I choose the Angel that is singing aloud, I stamped it multiple times and then I coloured all the images in the same way.

Questa volta, ho messo insieme un bel gruppo di angioletti tutti intorno ad un cerchio centrale, mentre cantano e pregano. Per creare questa card ho utilizzato moltissimo la tecnica del masking, così da ottenere una quasi one-layer card. Ho scelto l'angioletto che sta cantando ad alta voce, l'ho stampato più volte e poi li ho colorati tutti nello stesso modo.


According to the soft color palette I used for the Angels, I decided to bring some color to the background by adding a bit of Cracked Pistachio Distress Ink. As final touches, I stamped some musical notes all around with the same ink for a tone-on-tone effect. 
See you in a couple of days for my last projects with CDD supplies!

Seguendo la palette di colori piuttosto leggera ed eterea che ho utilizzato per gli angioletti, ho deciso di aggiungere del colore allo sfondo sfumando con mano leggera del Cracked Pistachio Distress Ink. Come tocchi finali, ho timbrato qualche nota musicale tutto intorno, sempre con lo stesso inchiostro, per ottenere un effetto tono su tono.
Ci vediamo presto per i miei ultimi progetti targati CDD!

Share
Tweet
Pin
Share
No commenti


Hello stampers! November is going to be a month full of beauty and great news: after joining the So Suzy Stamps Snarky Christmas Blog Hop, I'm glad to annouce that I was chosen by Tara - Craftin Desert Divas as Guest Designer for the first week of November. And so this is the first project I'm going to share with you, featuring CDD supplies and focusing in particular on the Angel Kisses stampset:

Ciao a tutti! Credo proprio che novembre sarà un mese pieno di bellezza e di fantastiche novità: dopo aver partecipato alla Blog Hop Irriverente di So Suzy Stamps, sono lieta di annunciare che sono stata scelta da Tara di Craftin Desert Divas come Guest Designer per la prima settimana di Novembre. E questo è il primo progetto che sto condividendo con voi, utilizzando materiale CDD e concentrandomi in particolare sul set Angel Kisses:


These angels are perfect for Christmas cards: today I played with red, gold and white, which are very festive colors for me. I framed a piece of white embossed cardstock and a red strip of cardstock with golden paper, then I choose a matching patterned paper and I colored the two angels with a trumpet and a lyre with promarkers, using the same color combination.

Questi angioletti sono perfetti per le card natalizie: oggi mi sono divertita a giocare con rosso, oro e bianco, che sono colori molto festaioli per me. Ho incorniciato sia il cartoncino bianco embossato sia una striscia di cartoncino rosso con della carta dorata, poi ho scelto una carta pattern che legasse bene con il resto della card, ed ho colorato i due angeli con la tromba e la lira con i promarker, sempre rispettando la combinazione di colori usata.


I heat embossed one of the sentiments in white and I added the shining star on top.
As already written, stay tuned to find out all the projects I'll be sharing this week! An thank you Tara for this opportunity!

Ho embossato a caldo una delle scritte presenti nel set, aggiungendo la stellina scintillante.
Come già scritto, rimanete sintonizzati per scoprire tutti i progetti che condividerò questa settimana! E grazie, Tara, per questa opportunità!

Share
Tweet
Pin
Share
2 commenti

Are you ready for something different? Welcome to the So Suzy Stamps Snarky Blog Hop where funny and humorous Christmas cards take over! 
I am hopping along with Justine's 12 Days of Christmas Series. If you haven’t checked it out yet, click here: Justine has been busy creating a dozen Christmas Card video tutorials to inspire you this holiday, and best of all there are prizes to be won every day. 
Let's see what I create for this hop: I'm not a super-sarcastic person, but I love irony and make people smile. When I saw this funny hyena from "The Lion King" as well as this snarky sentiment, I knew they would be perfect together.


Siete pronti per qualcosa di diverso? Per cominciare questo mese di novità, vi do il benvenuto all'Irreverente Blog Hop di So Suzy Stamps, dove troverete un sacco di card natalizie ricche di humour e divertimento.
L'evento, a cui partecipo anch'io con questo post, è stato organizzato da Justine e fa parte del suo Justine's 12 Days of Christmas Series. Se non l'avete ancora visto, date un'occhiata qui: Justine sta continuando a creare dozzine di tutorial per card natalizie, così da darvi ispirazione... e ci sono anche premi giornalieri!
Vediamo cosa ho creato io per questa hop: non sono una persona particolarmente sarcastica, ma amo avere la battuta pronta e far sorridere le persone. Quando ho visto questa simpatica iena da "Il Re Leone" nonché questo ironico augurio, ho subito capito che avrebbero lavorato benissimo insieme.


First I stamped the hyena with Memento Black, fussy cut and coloured it with promakers. I also stamped a little Santa hat that I had in my stash and that fits perfectly. I picked a red tiny bell too.

Prima di tutto ho timbrato la iena con del Memento, ritagliandola e colorandola con i promarkers. Ho timbrato anche un piccolo cappellino di Natale che si adattava alla perfezione. Ho anche preso un piccolo sonaglino rosso.


Next I did my own background with the embossing resists technique: I stamped the medium and the large snowflakes from So Suzy Stamps with some Versamark ink, then I heat embossed in white. At this point I grabbed a bunch of Distress Inks (Peacock Feathers, Salty Ocean, Chipped Sapphire and Black Soot), I blended them out and I sprinkled some water drops on top.

Poi ho creato il mio sfondo con la tecnica dell'embossing resists: ho timbrato i fiocchi di neve (medium e large) di So Suzy Stamps con del Versamark, embossandoli in bianco. A questo punto ho scelto una serie di Distress Inks (Peacock Feathers, Salty Ocean, Chipped Sapphire and Black Soot) e li ho sfumati dal più chiaro al più scuro, spruzzando dell'acqua alla fine.


Finally I die cut an hill from white cardstock and I stamped the first part of the snarky sentiment. I glued down all the pieces and I added some twine all around the neck of the hyena.

Infine ho fustellato una collina da del cartoncino bianco, dove ho timbrato la prima parte della scritta. Ho incollato tutte le varie parti e ho aggiunto del twine intorno al collo della iena.


I popped up the funny animal with a bit of foam tape. The bell make it even more strange!
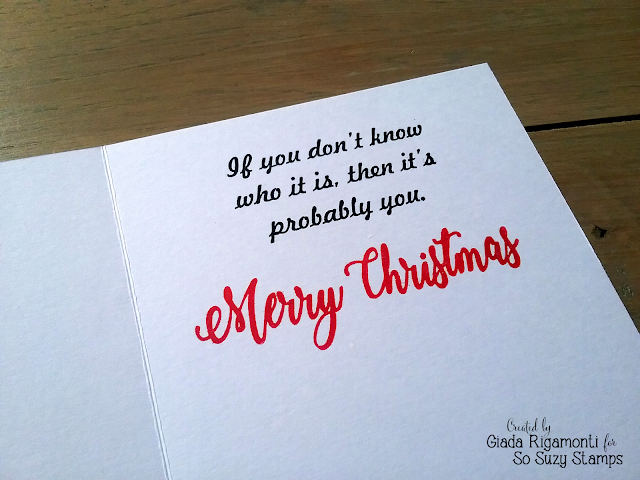
I stamped the second part of the sentiment inside, adding a part of the Merry Christmas brush sentiment:

Ho dato tridimensionalità al bizzarro animale con un poco di nastro gommato. Il sonaglino lo rende ancora più strano! Ho timbrato la seconda parte della scritta all'interno, aggiungendo un pezzo dell'augurio Merry Christmas brush:


One last important thing: all you have to do to be eligible to win a $25 gift certificate is comment on each of the blogs - so be sure to leave a comment here. We will pick two winners on November 9th. Good luck!

Blog hop participants:
Justine
Giada - you're here
Tracy
Teresa
Cornelia

Un'ultima cosa: tutto ciò che dovete fare per poter vincere un coupon di 25$ è commentare su ognuno dei blog partecipanti - per cui mi raccomando, lasciate un commento anche qui. Due fortunati verranno estratti il 9 Novembre. Buona fortuna! 


Supplies used:
Every family

Psycho Critter

Snowflakes by Olesya Medium
Merry Christmas Brush
Snowflakes by Olesya Large


Share
Tweet
Pin
Share
144 commenti
Newer Posts
Older Posts

About me

About me
I'm Giada, an italian cardmaker. I love clean and simple cards...and coloring critters! Thank for being here!

Follow Me

  • Facebook
  • Instagram
  • Youtube

Contact me

Nome

Email *

Messaggio *

Blog Archive

  • ▼  2023 (3)
    • ▼  nov 2023 (1)
      • Winter Friends
    • ►  giu 2023 (1)
    • ►  feb 2023 (1)
  • ►  2022 (14)
    • ►  ott 2022 (1)
    • ►  ago 2022 (1)
    • ►  lug 2022 (2)
    • ►  giu 2022 (1)
    • ►  mag 2022 (1)
    • ►  apr 2022 (1)
    • ►  mar 2022 (3)
    • ►  feb 2022 (1)
    • ►  gen 2022 (3)
  • ►  2021 (27)
    • ►  dic 2021 (1)
    • ►  nov 2021 (1)
    • ►  ott 2021 (2)
    • ►  set 2021 (2)
    • ►  ago 2021 (3)
    • ►  lug 2021 (2)
    • ►  giu 2021 (1)
    • ►  mag 2021 (2)
    • ►  apr 2021 (2)
    • ►  mar 2021 (2)
    • ►  feb 2021 (5)
    • ►  gen 2021 (4)
  • ►  2020 (72)
    • ►  dic 2020 (2)
    • ►  nov 2020 (2)
    • ►  ott 2020 (4)
    • ►  set 2020 (8)
    • ►  ago 2020 (4)
    • ►  lug 2020 (7)
    • ►  giu 2020 (8)
    • ►  mag 2020 (5)
    • ►  apr 2020 (12)
    • ►  mar 2020 (7)
    • ►  feb 2020 (7)
    • ►  gen 2020 (6)
  • ►  2019 (68)
    • ►  dic 2019 (6)
    • ►  nov 2019 (8)
    • ►  ott 2019 (9)
    • ►  set 2019 (9)
    • ►  ago 2019 (8)
    • ►  lug 2019 (8)
    • ►  giu 2019 (3)
    • ►  mag 2019 (4)
    • ►  apr 2019 (2)
    • ►  mar 2019 (3)
    • ►  feb 2019 (4)
    • ►  gen 2019 (4)
  • ►  2018 (59)
    • ►  dic 2018 (2)
    • ►  nov 2018 (7)
    • ►  ott 2018 (7)
    • ►  set 2018 (7)
    • ►  ago 2018 (7)
    • ►  lug 2018 (6)
    • ►  giu 2018 (4)
    • ►  mag 2018 (4)
    • ►  apr 2018 (4)
    • ►  mar 2018 (4)
    • ►  feb 2018 (3)
    • ►  gen 2018 (4)
  • ►  2017 (45)
    • ►  nov 2017 (6)
    • ►  ott 2017 (3)
    • ►  set 2017 (5)
    • ►  ago 2017 (3)
    • ►  lug 2017 (3)
    • ►  giu 2017 (3)
    • ►  mag 2017 (3)
    • ►  apr 2017 (5)
    • ►  mar 2017 (3)
    • ►  feb 2017 (6)
    • ►  gen 2017 (5)
  • ►  2016 (32)
    • ►  dic 2016 (1)
    • ►  nov 2016 (6)
    • ►  ott 2016 (3)
    • ►  set 2016 (3)
    • ►  ago 2016 (3)
    • ►  lug 2016 (4)
    • ►  giu 2016 (4)
    • ►  mag 2016 (2)
    • ►  apr 2016 (1)
    • ►  mar 2016 (2)
    • ►  feb 2016 (2)
    • ►  gen 2016 (1)
  • ►  2015 (21)
    • ►  dic 2015 (1)
    • ►  nov 2015 (2)
    • ►  set 2015 (1)
    • ►  ago 2015 (2)
    • ►  lug 2015 (1)
    • ►  mag 2015 (1)
    • ►  apr 2015 (2)
    • ►  mar 2015 (4)
    • ►  feb 2015 (4)
    • ►  gen 2015 (3)
  • ►  2014 (31)
    • ►  dic 2014 (2)
    • ►  nov 2014 (2)
    • ►  ott 2014 (2)
    • ►  set 2014 (4)
    • ►  ago 2014 (1)
    • ►  lug 2014 (3)
    • ►  giu 2014 (3)
    • ►  mag 2014 (3)
    • ►  apr 2014 (2)
    • ►  mar 2014 (3)
    • ►  feb 2014 (3)
    • ►  gen 2014 (3)
  • ►  2013 (33)
    • ►  dic 2013 (4)
    • ►  nov 2013 (5)
    • ►  ott 2013 (4)
    • ►  set 2013 (3)
    • ►  ago 2013 (4)
    • ►  lug 2013 (5)
    • ►  giu 2013 (8)

Search

Labels

  • crackerbox & suzy stamps
  • craftin desert divas
  • create a smile stamps
  • lawnfawn
  • mft stamps
  • rinea foiled paper
  • so suzy stamps
  • someoddgirl
  • whimsy stamps
  • wplus9

Created with by BeautyTemplates